10-Minute Twine-Wrapped Bottle Vases: The Bottom-Up Rule That Stops the Gaps
If your first twine-wrapped bottle came out striped, you are in good company. Not a pattern, just dark glass showing through in thin lines where the rows have drifted apart, all the way down the shoulder like a badly rolled bandage. A glue gun in one hand, a hundred feet of jute in the other, and the result still looks like it was done in the dark. That is usually the point the bottle goes to the back of a shelf and the whole idea gets dropped for a year.
Here is the one change that fixes it. Start at the bottom of the bottle instead of the top. Wrap upward and every new row lands on the finished row underneath it, so you can press it down and it stays pressed. Wrap downward, which is how nearly every tutorial shows it, and each new row hangs off the work with nothing beneath it. Press it toward its neighbor and you are pressing upward against gravity. Let go and it drops away again, and the space it leaves behind is the gap you are looking at.
Bottom-up works on olive oil bottles, squat kombucha bottles, and wine bottles by the dozen at craft night. The wrap comes out as one solid sleeve of jute with no glass showing at all. Hold a finished one against a window and no light comes through it.
What we are making
A bud vase built on a bottle that was headed for the recycling. The lower two thirds gets a tight band of natural jute, the glass above it stays bare, and the line where the twine stops sits right where the bottle starts to curve in. One dried stem goes in the top. That is it.
The bare glass is doing real work up there. A bottle wrapped from base to neck reads as a craft project. A bottle with a jute band and a clean stopping line reads as something from a shop, because the stopping line looks like a decision rather than the place the twine ran out. It is also faster, which is how this stays a ten-minute make.
Ten minutes is the wrapping. Getting the label off is a separate ten, mostly spent waiting for a sink of hot water to do the work while you go and find your scissors. Do a few bottles at once and the label soak stops mattering.
These hold a dried stem, a single silk stem, or a short cutting of eucalyptus. They will hold water and a fresh flower too, since the glass is untouched inside, but keep the water level well below the twine line and fill from a jug rather than the tap so you do not splash the jute. Wet jute smells like a wet dog and stays smelling like one.
Disclosure: Some of the supply links below are affiliate links. As an Amazon Associate, Crafting With Donna earns from qualifying purchases, at no extra cost to you.
What you’ll need
- Natural jute twine, 3mm, and more of it than you think. Thickness is the single biggest decision here, so it gets its own section below. Buy 3mm rather than the thin 1mm garden twine most of us already own. A 3mm band on a wine bottle eats about forty feet, and thin twine triples that. (3mm natural jute twine)
- A mini hot glue gun. Mini rather than full size, because you want small dots and a full-size gun puts out a bead the size of a pea. That bead becomes a ridge under the twine and a ridge is exactly what forces a gap. A low-temp gun is fine here and kinder to fingertips. (mini hot glue gun)
- Mini glue sticks to match. Buy the pack that fits your gun’s barrel, and buy more than one pack. Three glue points per bottle is not much, but a gun left on will drool through a stick faster than you expect. (mini glue sticks)
- Adhesive remover for the label glue. The paper peels off in hot water. The sticky grey film underneath does not, and hot glue will not hold on it. A citrus-based remover and a paper towel takes it off in about thirty seconds. Rubbing alcohol works on some brands and does nothing on others. (citrus adhesive remover)
- Self-adhesive felt pads for the base. A three-inch round pad stuck under the bottle covers the start of your wrap, stops the glue lump rocking the vase, and means the thing can sit on a wooden dresser without leaving a ring of scratches. This is a fifty-cent step that makes it look finished. (self-adhesive felt pads)
- Dried stems. Bunny tails, dried lavender, preserved eucalyptus, wheat. One or three stems, never two, and cut them so the stems stand about as tall again as the bottle. Fresh flowers work but the dried ones are why this reads as a finished object on a shelf rather than a vase waiting for something. (dried stem bundle)
- An empty bottle. Free. Wine bottles are the easiest because the barrel is straight for a good six inches. Olive oil bottles, sauce bottles, and tall beer bottles all work. Skip anything with raised lettering molded into the glass, because the twine climbs the letters and you get a bulge.
How much twine one bottle actually eats
This is the part nobody tells you, and it is why so many wrapped bottles are only half wrapped. The math is simple enough to do at the shelf in the shop.
A standard wine bottle is about three inches across, so one time around it is a little over nine inches of twine. The number of times you go around is the height of your band divided by the thickness of your twine. That is the whole calculation.
A six-inch band in 3mm jute is about fifty rows, which is roughly forty feet of twine. The same band in 2mm is about seventy-six rows and sixty feet. In the 1mm garden twine in your shed it is a hundred and fifty rows and well over a hundred feet, and you will be sitting there for an hour. Wrapping the whole bottle to the neck in 2mm runs to about eighty feet.
Two things follow from that. Thicker twine is around four times faster than the thin stuff for the same band, because you are laying a third of the rows and each one covers more ground. And a small hundred-foot spool is one bottle and a bit, not the six bottles you were planning. Buy the big spool.
Getting the bottle ready
Fill the sink with water as hot as your hands will stand, add a squirt of dish soap, and stand the bottles in it for ten minutes. Most labels then slide off in one piece. Any that shred, scrape with the back of a butter knife rather than a scourer, which scratches.
Then deal with the grey adhesive film. Dry the bottle, put remover on a paper towel, and rub in circles until the glass squeaks under your thumb. Squeaks is the test. If it drags at all there is still glue there.
Dry it completely, inside and out, and let it sit for a few minutes. Hot glue does not bond to a damp or greasy surface, and this is the real reason wrapped bottles sometimes end up as a jute tube you can twist around the glass like a sleeve. The wrapping was fine. Two dots of glue at the bottom let go of a bottle that had not finished drying.
The wrap, bottom-up
- Anchor at the base. Stand the bottle upright. Put one dot of glue on the glass a quarter inch up from the bottom, press the cut end of the twine into it, and hold for five seconds. Wrap the first row directly over that tail so it disappears.
- Wrap upward, tight, no glue. Turn the bottle with one hand and feed twine with the other, keeping steady tension and laying each row hard against the top edge of the row below. The bottle turning is doing the work; you are only guiding. There is no glue at all through this part.
- Pack every fifth row. Stop, run your thumbnail down the wrap, and push the stack of rows down toward the base. They will move a little and close up as they go. This is the beat that makes the difference between a good wrap and a perfect one, and it takes a second.
- One glue dot at the halfway mark. Around the middle of the band, lift the working strand, put a single small dot on the glass, and lay the twine back over it. That dot stops the finished lower half from ever sliding, and one is enough.
- Stop at the shoulder. Wrap up to the point where the bottle starts curving in toward the neck and stop on that line. Do not go past it. That line is what makes the whole thing look intentional.
- Finish the tail. Cut the twine at a long shallow angle so the end tapers instead of stopping square. Glue dot, press the tapered end down, and wrap the last row over the top of it. Tuck any stray fiber under the previous row with the tip of a bobby pin.
- Felt pad on the base. Peel and stick. Done.
Hold the finished bottle up to a window and look through the wrap. If you cannot see light between the rows, it is right.
Where it goes wrong
You wrapped downward. This is the big one and it is the one this whole piece is about. Wrapping from the neck toward the base means every new row hangs below the finished work with nothing supporting it, and there is no way to seat it except to press upward. It will not stay. Start at the base.
Your first row was not level. The first row is the template for every row above it, and a first row that runs even slightly uphill turns into a visible spiral by the twentieth row. Starting at the base helps here too, because the bottom of a bottle is straight and wide and a level start is easy. The neck is a curve, which is the hardest possible place to lay a level first row.
You ran a bead of glue instead of dots. Continuous glue does two bad things. It builds a ridge the twine has to climb, and every climb spreads the rows apart. It also soaks up into jute and dries in shiny dark patches you cannot sand off. Three dots per bottle, no more.
The bottle was damp. Covered above, and worth repeating, because the failure shows up an hour later when the glue lets go and the whole sleeve rotates.
You stopped in a random place. A band that ends partway up a straight barrel looks unfinished, and a band that ends exactly where the glass starts to curve looks designed, for the same twine and the same ten minutes. Find the curve with your fingertips before you start and you will know where you are heading.
Making a set of them
These are better in threes. Three bottles of different heights, all wrapped to their own shoulder line, grouped on a tray or a windowsill. The wrap is the thing they have in common, so the mismatched heights read as a collection rather than as three leftover bottles.
For craft night, put out a crate of prepped bottles with the labels already off, one glue gun per two people, and a spool of 3mm each. Most people get through two. The prep is the only part that does not scale, so do all the soaking the night before and it stops being a chore.
They make good gifts, and better hostess gifts, because a wrapped bottle with one dried stem in it is a present that does not ask the person to find a vase for it. Tie a second length of the same twine around the neck in a simple bow if you want it to look wrapped rather than given.
Get the free twine guide
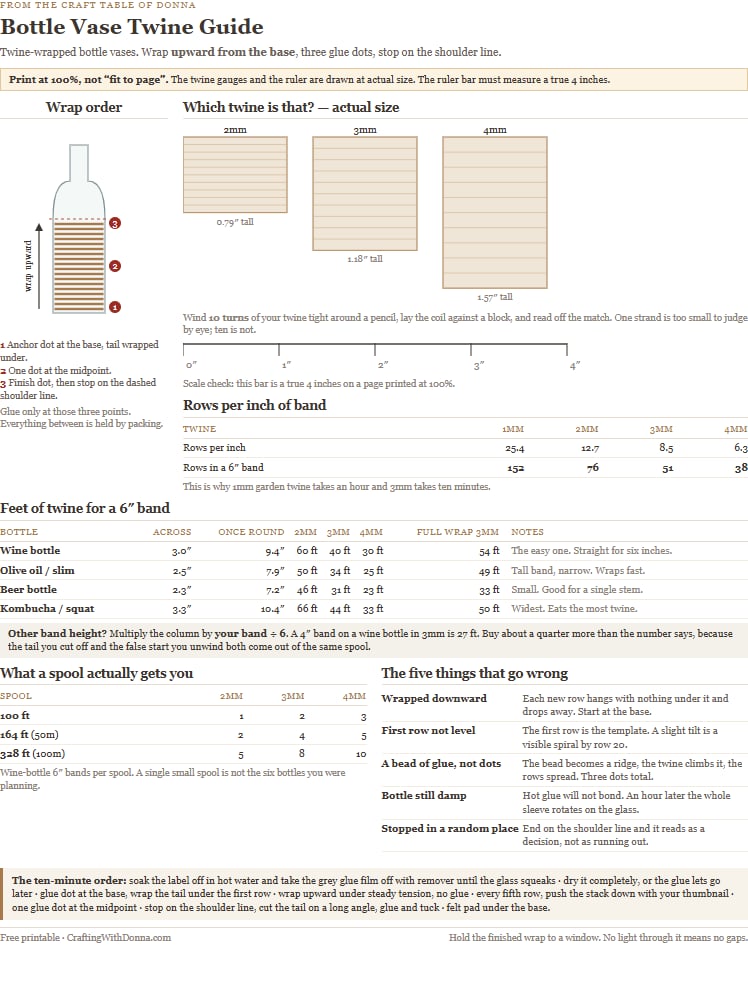
I put together a one-page printable to go with this one, because the twine thickness question is the whole game and you cannot answer it standing in a shop holding a spool.
It has a 1:1 thickness gauge you hold your twine against to tell 2mm from 3mm from 4mm, a yards-needed chart for the common bottle sizes and band heights, and the wrap-order diagram with the three glue points marked. Print it at 100% with no page scaling, because the gauge only works at actual size, and the page says so at the top so you do not forget.
Pop your email in the box below and it comes straight to your inbox. Then go and look in your recycling, because the odds are good there is a bottle in there that wants to be a vase.