10-Minute No-Sew Fabric Gift Bows: The Doubling Rule That Stops the Layers Disappearing
I want to tell you about the bow that taught me to double. It was a birthday present, the paper was lovely, and I thought a handmade fabric bow would finish it properly. So I cut three strips from a scrap of blue cotton, each one a bit shorter than the last, looped them, pinched them, stacked them and glued them down. What I got was a lump. Three layers went into it and one layer came out.
I assumed I had been careless, so I made another and stepped the strips down in smaller and smaller amounts. It came out worse. That is when I stopped blaming my scissors, laid one strip flat on the table with a ruler beside it, and found out that the strip and the bow are not the same number at all. They are out by a factor of two, every single time.
What we are making
A layered no-sew fabric bow to sit on top of a wrapped gift, where each of the three layers actually reads as its own layer instead of hiding inside the one beneath it. No sewing, no bow-maker board, no template. And once you have the rule you can make one to any finished width you like, on purpose, first go.
The clock on this one is honest: ten minutes and twenty seconds for a finished three-layer bow, and that is the whole thing, glue included. There is no curing day hiding at the end. The only thing that can slow you down is fabric that frays, and I deal with that properly further down rather than pretending it does not happen.
Why your layers disappeared
Here is the part nobody says out loud. You are holding a strip. The strip is the only length you control, so the strip is what you plan. You cut one at nine inches, one at eight and a half, one at eight, and you expect three bows that step down by half an inch each.
They step down by a quarter.
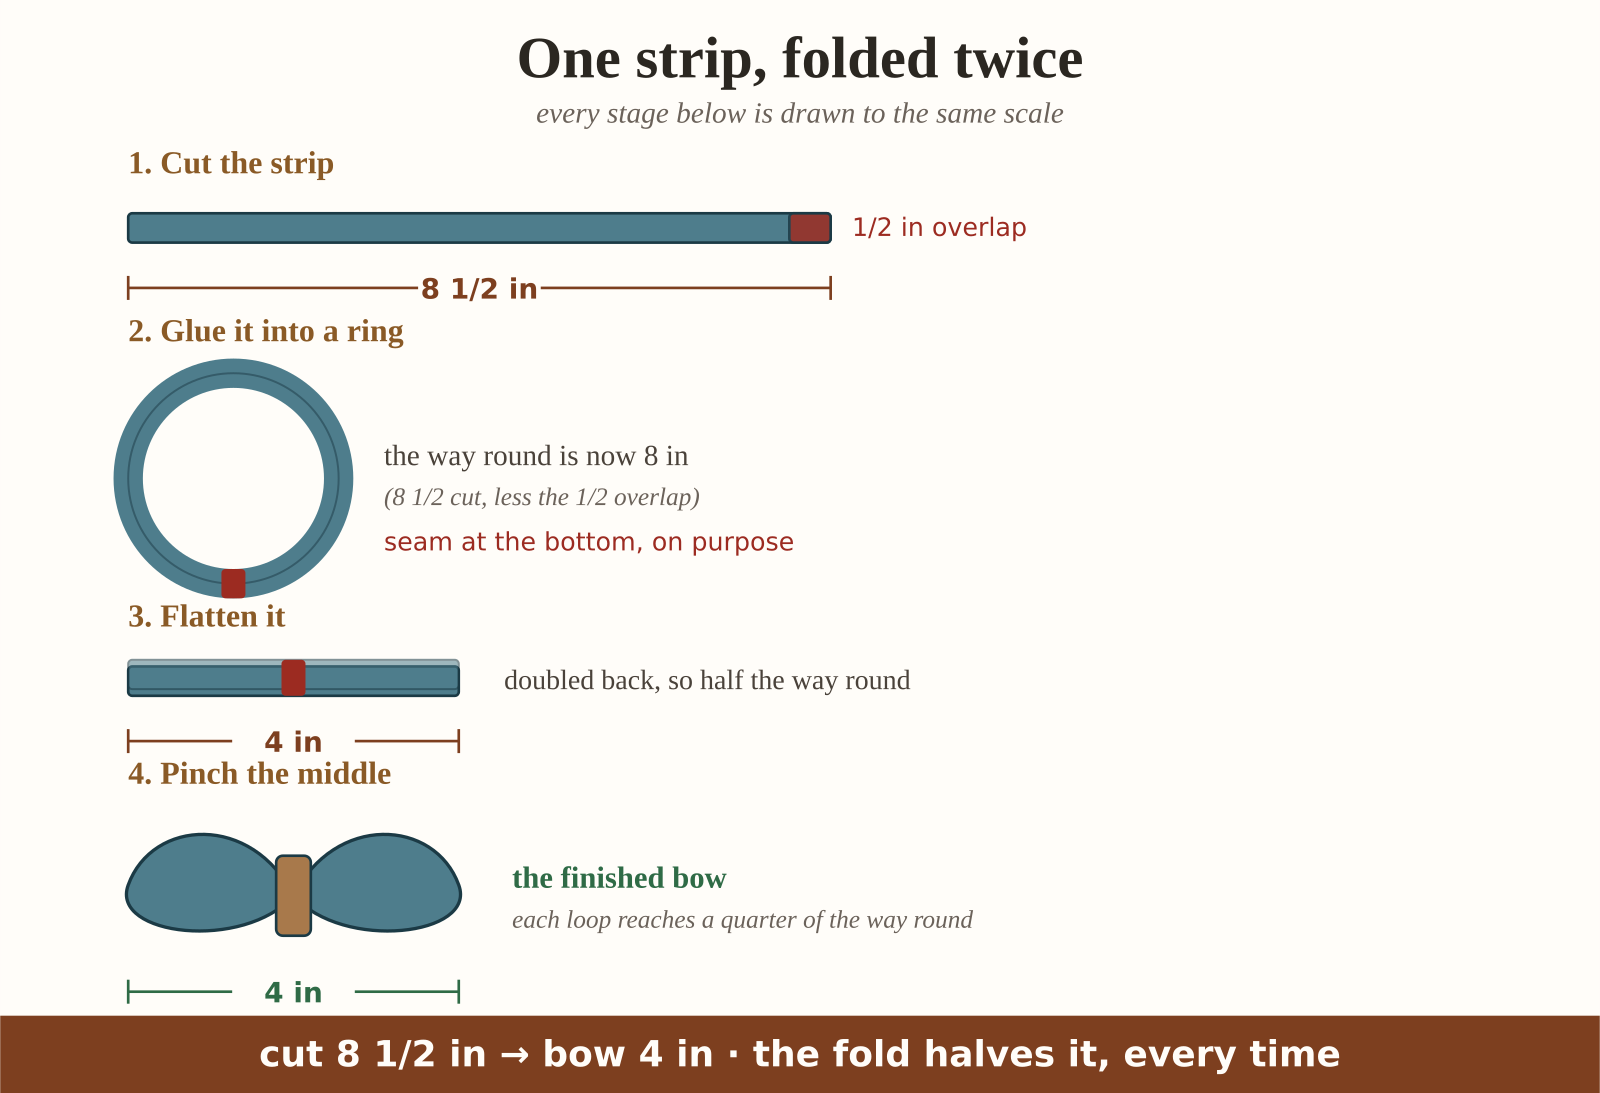
Follow the fabric. You glue the two ends of the strip together, so first you lose the overlap. Then you flatten that ring, and a ring flattens to half its way round, because the fabric is doubled back on itself. Then you pinch that flat band in the middle, which sends each loop out to only a quarter of the way round. Tip to tip, what you end up looking at is half the ring.
So the fold does the halving for you, whether you meant it or not. Step your strips down by half an inch and your bows step down by a quarter of an inch, which is a difference the eye will not read as layering. Three layers, a quarter inch apart, stacked and glued, is a lump. Mine were not badly made. They were badly numbered.
The doubling rule
It fits on one line.
Decide how wide you want the finished bow. Double it. Add half an inch for the glue join. Cut that.
Written the other way, so you can check a strip you have already cut: the bow you will get is the strip length, minus the half-inch overlap, divided by two.
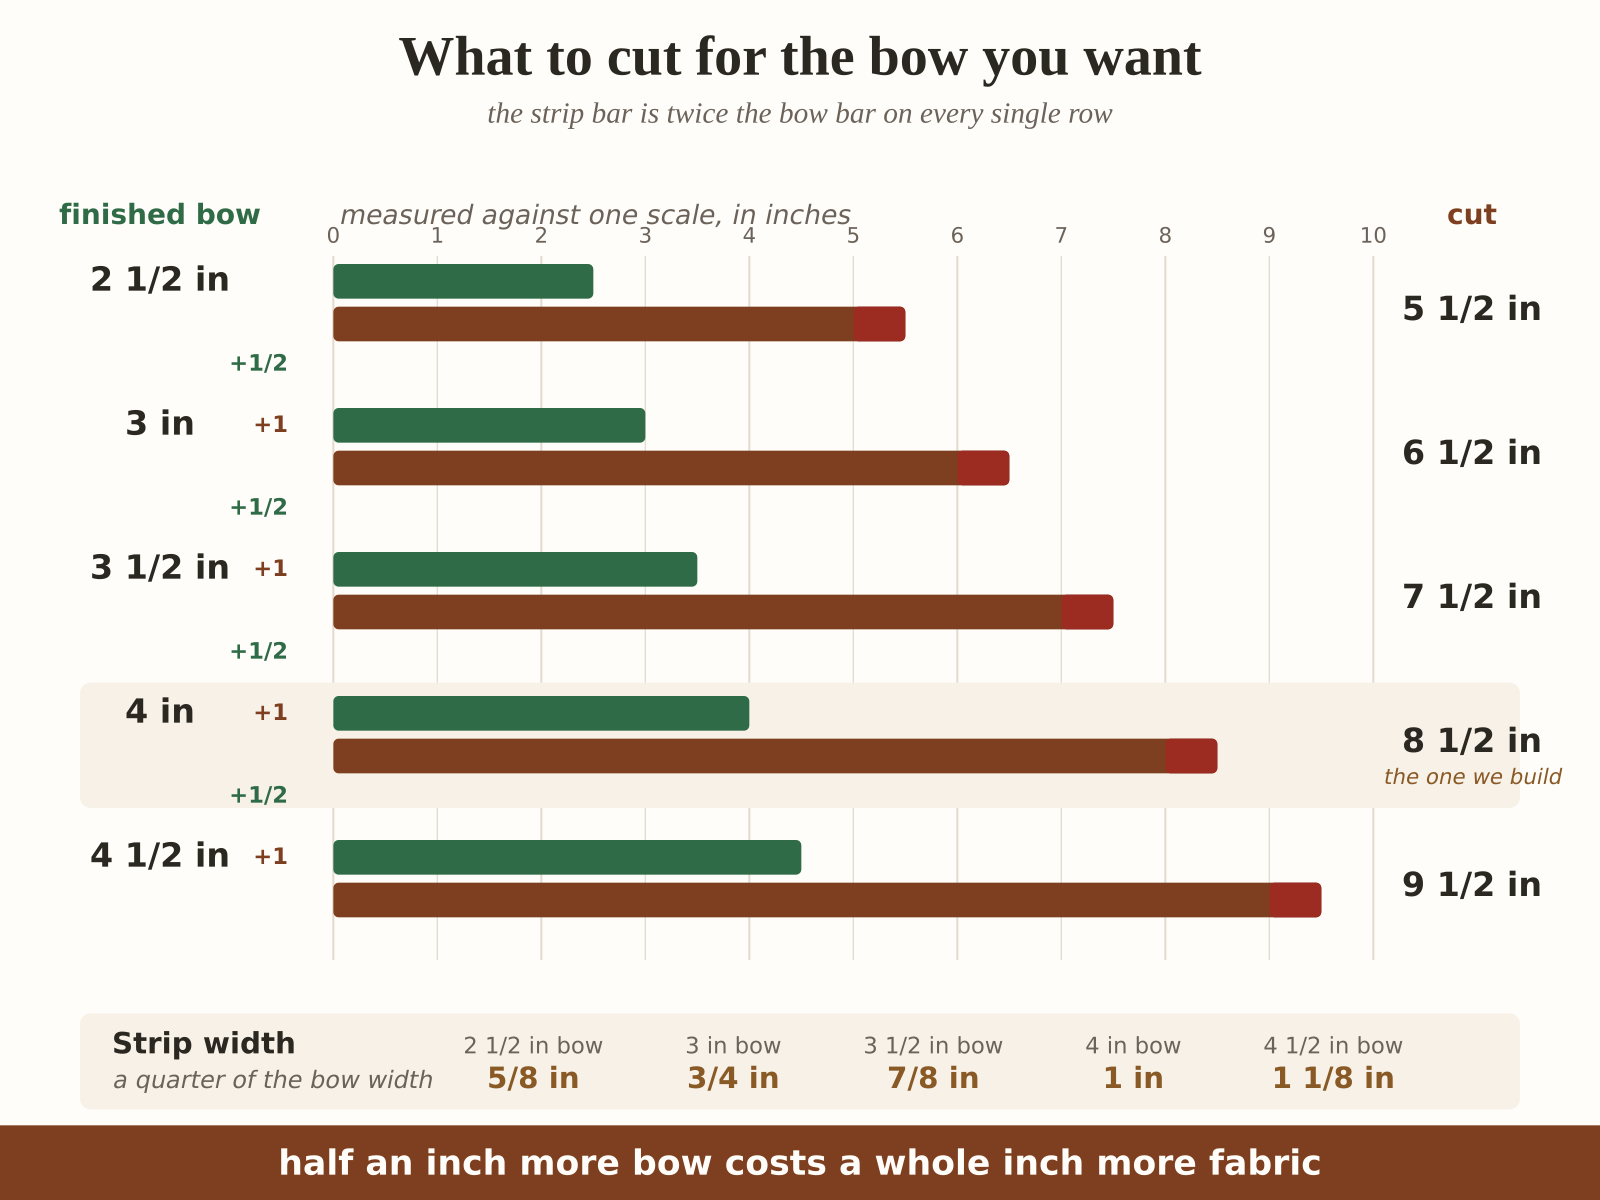
Take the bow I make most, a four-inch one for a shoebox-sized parcel. Four doubled is eight, plus half an inch of overlap, so I cut 8 1/2 inches. It finishes at four inches. Not about four. Four.
And now the consequence worth knowing, because it is the one that surprised me most. Going up half an inch in bow costs you a whole inch of fabric. Half an inch of bow is never half an inch of strip. That is why sizing bows by eye off a shrinking scrap goes wrong so fast. The fabric runs out twice as fast as your eye expects.
The cut chart
Every number here comes straight out of that one line, so you never have to do the arithmetic at the table.
- A 2 1/2 in bow → cut 5 1/2 in, strips 5/8 in wide
- A 3 in bow → cut 6 1/2 in, strips 3/4 in wide
- A 3 1/2 in bow → cut 7 1/2 in, strips 7/8 in wide
- A 4 in bow → cut 8 1/2 in, strips 1 in wide
- A 4 1/2 in bow → cut 9 1/2 in, strips 1 1/8 in wide
Look down the two columns and you can see the whole idea. The bows go up by half an inch a step. The strips go up by a full inch a step. That gap between the columns is the thing that was wrecking my bows.
The widths in that last column are the span divided by four. That ratio is not a rule of physics, it is just what stops a bow looking stringy at one extreme and blocky at the other, and it has held up for me across every size I have made. Use it as a starting point and go a touch wider if your fabric is very soft.
Building a three-layer bow that actually layers
For layers you can see, step the finished bows by half an inch, which, now you know the rule, means stepping the strips by a whole inch. For a four-inch bow that is:
- Outer layer, finishing at 4 in → cut 8 1/2 in
- Middle layer, finishing at 3 1/2 in → cut 7 1/2 in
- Inner layer, finishing at 3 in → cut 6 1/2 in
- Centre wrap, the little band that hides the pinch → cut 2 1/2 in
All four strips are cut 1 in wide, set by the outer layer. Twenty-five inches of strip in total, which is less than one fat quarter and well inside most ribbon offcuts.
One thing to get right: where the seam goes
When you glue a strip into a ring you make a seam, and that seam is the only ugly bit on the whole bow. You do not have to hide it afterwards if you put it in the right place to begin with.
Flatten the ring so the seam sits at the centre of the flat band, not out at either fold. Then when you pinch the middle, the pinch lands on the seam and swallows it, and the centre wrap goes over the top of both. Get that habit early and every bow you make from now on has an invisible join. I spent a long time gluing seams and then trying to turn them out of sight.
Making it, start to finish
Ten minutes and twenty seconds. I timed the parts rather than rounding the total down:
- Pick your finished width and read the four cut lengths off the chart: 20 seconds.
- Cut the three strips and the centre wrap: 150 seconds.
- Glue each strip into a ring, overlapping the ends by half an inch: 120 seconds.
- Flatten each ring with the seam at the centre, and pinch: 105 seconds.
- Stack the three pinched loops largest to smallest and glue the centres: 120 seconds.
- Wrap the little band round the middle and glue it at the back: 75 seconds.
- Fix the bow to the parcel: 30 seconds.
Work largest to smallest and set each layer down turned slightly off the one below, so the loops sit in the gaps rather than in line. A few degrees is plenty. It costs nothing and it is most of the difference between a handmade bow and a handmade-looking bow.
The fabric part, honestly
A cut edge of woven cotton will fray. It will not fall apart on the parcel, but it will fuzz along the loops within a few days, and if you are making these to keep or to sell you want to deal with it. There are three ways and they all work:
Cut with pinking shears. The zigzag cuts across the weave, so there is no long thread to pull. Fastest fix, costs you nothing extra at the table, and it suits a country-looking bow.
Use grosgrain ribbon instead of fabric. The edges are already finished, it holds a loop better than cotton does, and every number on this page still applies, because the doubling rule is about folding rather than about what you are folding. If you want the crispest possible bow, start here.
Back the fabric with lightweight fusible interfacing before you cut. This is the one for soft or thin cotton that will not hold a loop open at all. It stiffens the strip so the loops stand up, and it locks the weave so the edges stay put. It adds a couple of minutes with the iron, before the ten I promised, and I would only bother for a gift that matters.
What I would not do is run a bead of glue along the raw edges. It goes shiny, it goes stiff in the wrong places, and it shows.
If yours still is not right
The loops collapse instead of standing up. The fabric is too soft for the width. Either go wider, since the span-over-four is a floor rather than a ceiling, or back it with interfacing.
The bow is a lump again. Measure a finished layer tip to tip and compare it with the chart. If your layers are a quarter of an inch apart rather than half, you stepped the strips by half an inch instead of a whole one, which is the original mistake wearing a different hat.
It came out smaller than you wanted. Check your overlap. Overlapping by a full inch instead of half takes a quarter inch straight off the finished bow, because the overlap comes off the ring before the halving does.
What you need
Some of the links below are affiliate links. If you buy through one, Crafting With Donna may earn a small commission at no extra cost to you.
- Cotton fat quarter bundle, one fat quarter makes a lot of bows
- One-inch grosgrain ribbon, the no-fraying route
- Pinking shears, for edges that will not fray
- Mini hot glue gun and sticks
- No-sew fabric glue, if you would rather not use heat
- Small sewing clips, to hold each overlap while it grabs
- Lightweight fusible interfacing, for fabric that will not hold a loop
Get the free cutting guide
I made you the sheet I wanted on the evening of the lump. It carries a 1:1 strip ruler running down the side, so you can lay your fabric straight against the paper and cut every strip to length without going to find a tape measure. Next to it is the full chart: five bow sizes, the exact strip length for each, and the strip width to go with it. The three-layer recipe sits underneath, worked out, so you can copy it straight off the page.
Print it at 100% rather than “fit to page”, or the ruler down the side stops being a ruler. The sheet says so across the top, so you cannot forget the way I did.
Keep the ten-minute craft nights coming
If quick wins like this one are your speed, the printable Craft Night Kit Planner from the craft table lays out the supplies, timing, and shopping list for a whole month of ten-minute craft nights — print it once, plan four cozy nights. It’s $7 in the Crafting With Donna shop.