10-Minute Poured Paint Coasters: The Ounce Rule That Stops You Running Out Mid-Pour
A poured paint coaster is four ounces of mixed acrylic, one tilt, and a day of leaving it alone. The first one most people try does not go that way. The paint reaches two thirds of the way across the tile and stops, so the tilt gets steeper, the colors drag through each other, and what dries is a gray slab with a bald corner. The usual conclusion is that fluid art needs a knack.
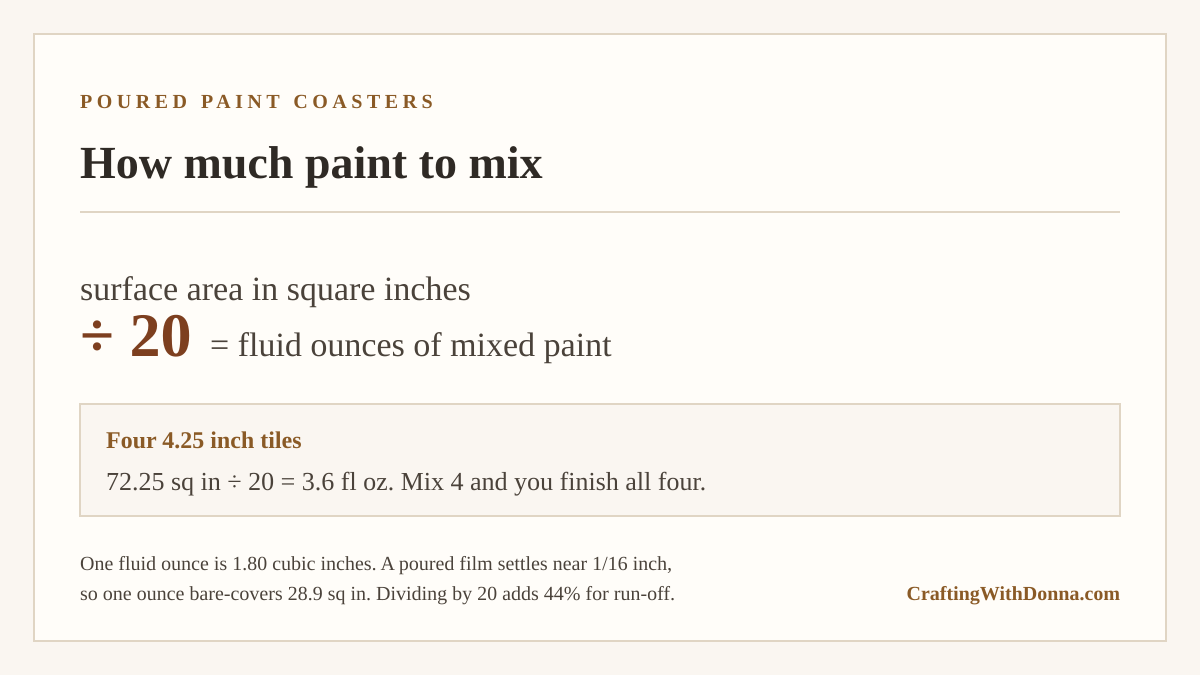
It needs a measuring cup. How much paint a pour takes is arithmetic with one number in it, and you can do the whole calculation before you open a bottle. A poured film settles at about a sixteenth of an inch. One fluid ounce of mixed paint is 1.80 cubic inches. Divide one by the other and an ounce covers about 29 square inches of surface, so a four-tile coaster set at 72 square inches wants about three and a half ounces plus margin.
Get that number right and the pour stops being a gamble. Below is the rule, the ten-second check that catches paint mixed too thin or too thick, and an honest account of the curing and sealing that most tutorials skip past.
What we are making
Four square coasters on plain ceramic wall tiles, poured in one session, felt-backed and sealed. Standard 4.25 inch tiles from the hardware store cost under a dollar each and come with a glazed face that the paint grips without any priming. The finished set reads as a bought thing, which is most of why it works as a gift.
Hands-on time runs about ten minutes for the whole set once the paint is mixed. Then the tiles sit untouched for 24 to 72 hours while the film cures, and you come back for two minutes of sealing and felt pads. Anyone who tells you the drying is part of the ten minutes has not made one.
Start with coasters rather than a canvas for a reason that has nothing to do with skill. An 11 by 14 canvas is 154 square inches against 72 for four tiles, so it drinks 2.1 times the paint. A first pour that goes wrong on tiles costs you a few ounces of craft acrylic and four tiles you can wash off while the paint is wet. The same mistake on a canvas costs you the canvas.
The number that decides everything
Work out the surface area in square inches. Divide by 20. That is how many fluid ounces of mixed paint to make.
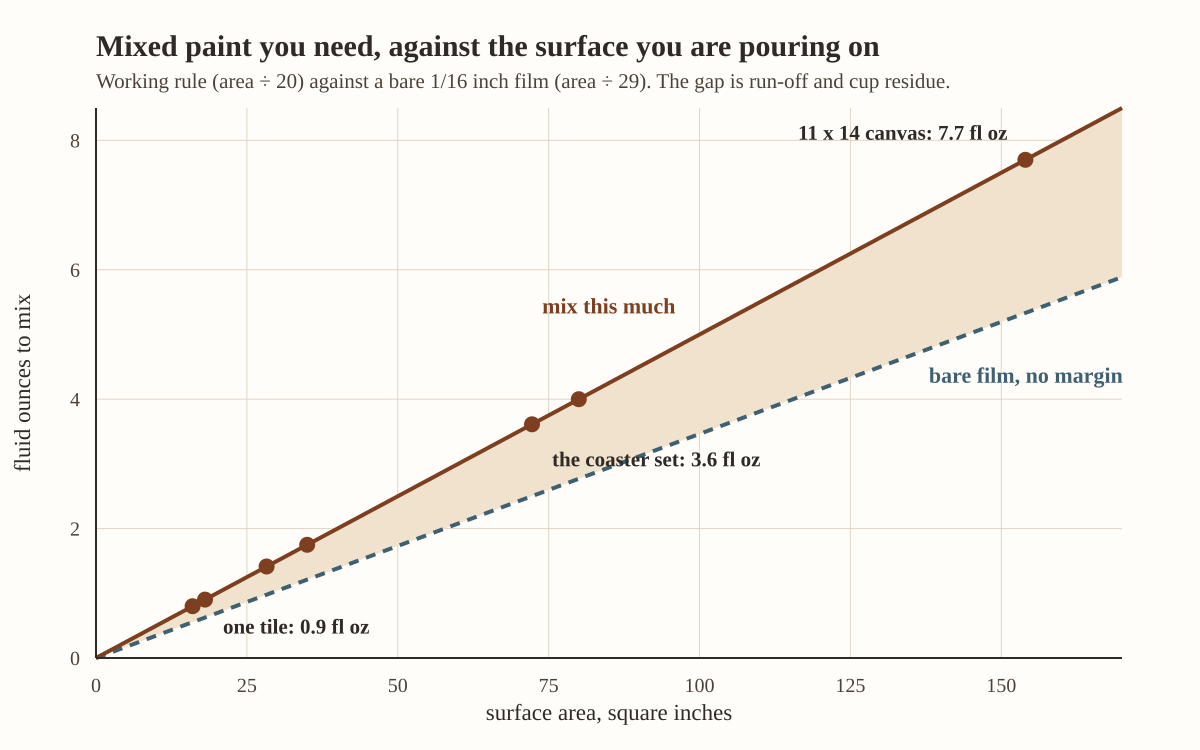
The 20 comes from two pieces. A poured acrylic film levels out at somewhere near a sixteenth of an inch, which is 0.0625 inches deep. A US fluid ounce is 1.80469 cubic inches. Spread that ounce out at that depth and it covers 1.80469 divided by 0.0625, or 28.9 square inches. So an area divided by 29 gives you a bare film with nothing spare.
Nothing spare is the trap. Paint runs over the edges of a tile and keeps going, and a useful amount stays behind in the cup and on the stir stick. Dividing by 20 instead of 29 builds in 44 percent for both, which is what the run-off takes on a flat tile with no lip. That margin is the difference between finishing the fourth coaster and watching the paint quit on the third.
The rule assumes a film about a sixteenth of an inch deep. Pour a heavier layer than that on purpose and you will need more, in direct proportion. Double the depth and you double the paint.
What the rule says for the surfaces you already own
Run the numbers once and you have them for good:
- One 4 inch square tile: 16 square inches, 0.8 ounces.
- One 4.25 inch tile: 18 square inches, 0.9 ounces. Call it one.
- A 6 inch round wood slice: 28 square inches, 1.4 ounces.
- A 5 by 7 canvas panel: 35 square inches, 1.8 ounces.
- A set of four 4.25 inch tiles: 72 square inches, 3.6 ounces. Mix 4.
- An 8 by 10 canvas: 80 square inches, 4 ounces.
- An 11 by 14 canvas: 154 square inches, 7.7 ounces.
For a four-tile set, four ounces splits into four colors at an ounce each, which keeps the mixing simple. Make white the largest single share, around a third of the total, because white is what holds the other colors apart as they spread. Cut the white back and the greens and blues run into each other and land on the same muddy brown every time.
The second check: how thick is thick enough
Volume gets the paint across the tile. Consistency decides whether it stays where you put it.
Craft acrylic straight from the bottle is too stiff to pour and too stiff to level. Pouring medium thins it without weakening the film the way water does, and how much you need depends on what you started with. Fluid craft acrylic, the thin kind in squeeze bottles, takes about one part medium to one part paint. Heavy body acrylic from a tube takes two or three parts medium to one part paint. Those are starting points, and paint bodies vary enough between brands that you should treat them as a first guess.
The check is what matters. Stir until the mix is uniform, lift the stir stick a few inches above the cup, and let the paint fall back in. Watch the little mound it makes on the surface and count how long it takes to melt flat.
Three to five seconds is the window. Under two seconds and the mix is too thin, which lets the colors bleed into each other on the tile and can leave the dried film crazed with fine cracks. Past eight seconds, or if the ribbon breaks into blobs instead of falling unbroken, it is too thick and will sit in ridges rather than leveling.
The test works because leveling is a race between gravity pulling the mound flat and the paint’s own viscosity resisting. Time the mound and you have measured the viscosity, near enough, without any equipment. Time it with your phone the first few times rather than judging by eye, because eyes are generous about this.
What you need
Disclosure: The product links in this supply list are paid affiliate links. Crafting With Donna may earn a commission at no extra cost to you.
- Acrylic pouring medium. Buy the quart rather than the small bottle. Four ounces of finished mix is more medium than paint, so the little bottle covers one set and then you are out mid-project.
- Fluid craft acrylic in 2 ounce bottles. The squeeze-bottle kind, not tubes. It is already close to pourable, so it needs less medium and less guessing. Get a white in the set or buy one separately.
- 4.25 inch glazed ceramic wall tiles. The glaze is what lets you rinse off a pour that goes wrong. Unglazed or porous tile soaks the paint in and gives you one attempt.
- Silicone oil for pouring. Optional, and only if you want cells. Two or three drops per color, stirred in with three slow turns and no more.
- Graduated mixing cups and stir sticks. Get cups with the ounce marks printed on the side. The whole rule above depends on measuring rather than eyeballing, and unmarked cups put you straight back to eyeballing.
- Clear acrylic sealer spray in gloss. Two or three light coats over a fully cured pour.
- Self-adhesive felt pads. Four small rounds on the back of each tile. A bare tile edge scratches a table, and the pads also lift the coaster enough to let air move under it.
Set up so the run-off does not ruin the coaster
Most of the mess in a pour happens after the paint leaves the cup, and one setup step handles all of it.
Line a baking tray or a shallow box with foil or a plastic bag. Stand each tile on something small so it sits clear of the tray floor: a plastic bottle cap, a shot glass, a spare tile stood on its edge. Anything about an inch tall and narrower than the tile works. Leave a couple of inches between tiles so the run-off from one does not pool into its neighbor.
Raising the tile does the real job. Paint runs over all four edges and has somewhere to go, so it drips clear instead of climbing back up under the tile and gluing it to the tray. A tile that dries stuck down comes free with a scraper and takes a chunk of the finished edge with it.
Wipe the glazed face with rubbing alcohol before you pour and let it flash off. Tile ships with a fine dust and sometimes a wax film, and either one makes the paint pull back into islands as it spreads.
The pour, start to finish
Mix each color in its own cup and pass all of them through the ribbon test before anything touches a tile. Fixing consistency after you have poured is not a thing you can do.
Pour the colors into one clean cup, one on top of another, in whatever order appeals. Do not stir. That stack of layers is the pattern, and stirring it now costs you the whole point.
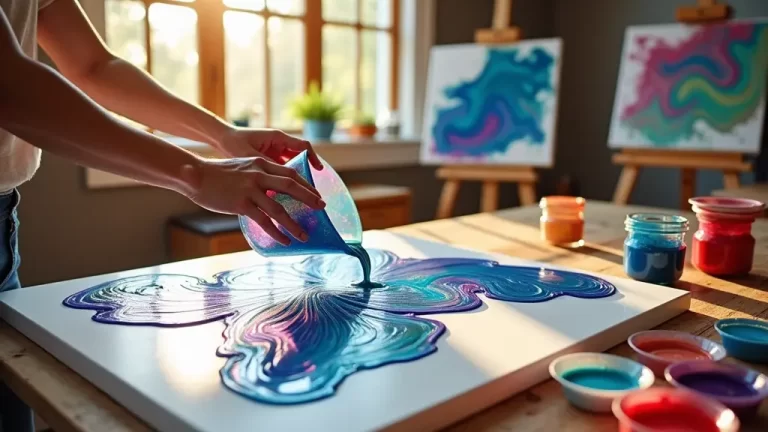
Hold the cup an inch above the middle of the first tile and pour in a steady line, moving in a slow spiral out from the center. Keep going until you have laid down about a quarter of the cup, then move to the next tile. Pouring a quarter into each in turn keeps the four coasters looking related, which matters more for a gift set than any single tile does.
Now tilt. Lift one corner of a tile an inch, let the paint walk to the far edge, set it down, and repeat around the four corners. Watch the bare glaze disappear and stop the moment it does. Every extra tilt after full coverage stretches the colors thinner and pulls them through each other, and that stretching is what turns a pour gray.
If you added silicone, pass a lighter or a small torch across the surface once, four to six inches up and moving the whole time. The heat thins the top film and lets the silicone break through as cells. One pass. A second pass scorches the paint and leaves a dull brown patch that does not come out.
Then leave the tray somewhere flat, level and out of the way, and walk off.
Curing, sealing, and what these coasters can take
Poured acrylic is touch-dry in a few hours and nowhere near cured. Give it 24 hours in dry warm air and up to 72 in a humid house, and check by pressing a fingernail into a corner of the run-off underneath rather than into the face. If it dents, wait.
Once it is hard, trim the drips. The run-off dries into a skirt hanging off the tile edges, and a craft knife run flat along the edge takes it off in one strip. Then two or three light coats of clear acrylic spray, ten minutes apart, outdoors or by an open window. Felt pads on the back last.
Here is the part worth being straight about. Acrylic sealer spray gives you water resistance, not waterproofing, and no version of this survives a hot mug. A cold glass sweating on one of these is fine. Set a fresh cup of coffee down and the heat will soften the film and print the base of the mug into it. If you want a coaster that shrugs off heat, you pour a two-part epoxy resin over the cured acrylic instead of spraying it, which is a different project with a longer cure and a respirator. Gift these as they are and say they are for cold drinks.
Where it goes wrong
Muddy gray covering everything means over-tilting, near enough every time. You kept going after the tile was covered. Next pour, stop at coverage.
Bald patches that reappear after you tilt them closed point at contamination on the glaze. Wipe with alcohol next time.
Fine cracks across the dried surface, called crazing, come from a mix that was too thin or a film that was too thick, both of which make the top skin over while the paint underneath is still moving. The ribbon test catches the first. The volume rule catches the second.
No cells despite the silicone points at silicone stirred in too well. Three slow turns is the whole instruction. Beyond that the oil breaks into droplets too small to rise.
Colors that looked bright in the cup and dull on the tile were fighting each other. Add more white to the next set and put it in as one of the thicker layers in the stack.
Making a set for craft night
The arithmetic scales without any thinking. Six people making four coasters each is 24 tiles, 24 times 18 square inches, so 433 square inches. Divide by 20 and you need 22 ounces of mixed paint for the table, which is most of a quart of pouring medium and around 8 ounces of color.
Mix the paint before anyone arrives. Mixing to the ribbon test is the slow part and the part that goes wrong in a crowd, and it is no more work for 24 tiles than for four. Set out the cups already tested, and each guest spends their ten minutes stacking, pouring and tilting, which is the enjoyable part.
Give everyone their own lined tray and their own tile risers. Shared trays turn into shared puddles, and two people’s run-off flowing together is how someone’s tile ends up glued down.
Get the free pour chart
The arithmetic in this post fits on one page, so it is on one page. The free Pour Volume and Ratio Chart gives you the worked volume table for eight common surfaces, the mixing ratios by paint type, the three-to-five second ribbon test with the failure signs on either side of the window, and the setup checklist for the tray. Print it, tape it inside a cupboard door, and stop doing the division.
Grab it below and it lands in your inbox in a couple of minutes. Then go buy four tiles.
Keep the ten-minute craft nights coming
If quick wins like this one are your speed, the printable Craft Night Kit Planner from the craft table lays out the supplies, timing, and shopping list for a whole month of ten-minute craft nights — print it once, plan four cozy nights. It’s $7 in the Crafting With Donna shop.