10-Minute Cereal-Box Drawer Dividers: The Half-Height Slot Rule That Makes Them Lock Instead of Wobble
My craft drawer gets tidied about once a month, and it stays tidy for roughly four days. Then the seed beads are back in with the washi tape, the glue sticks have migrated under the scissors, and I am tipping the whole drawer onto the table to find one bead cap. I have bought two drawer organisers in my life and returned both, because no stocked size fits a drawer that is 11 1/2 inches wide and 8 inches front to back, and the adjustable ones cost more than the drawer unit did.
So I did what you have probably already done. I cut some strips off a cereal box, stood them up in the drawer, and called it solved. It was solved for about a day. Then the strips leaned. Then one popped up above the rim and the drawer would not shut. By the weekend they were lying flat underneath everything they were supposed to be separating.
I got one thing wrong, and it took me far too long to see it. The cardboard was never too flimsy. A cereal box is stiff enough to hold back a pile of beads all day. What was missing was a joint. A loose strip standing in a drawer has nothing holding it square, so the first thing that slides knocks it over. Cut a joint into the same free cardboard and the whole grid locks itself together.
What we are making
A grid. Two sets of cardboard strips that slot into each other, egg-crate fashion, and stand up on their own with nothing glued and nothing taped. Drop it into the drawer and it braces against its own corners. Nothing leans, because every strip is holding two other strips square.
It costs nothing and it takes about ten minutes. Best of all, it fits your drawer, because every measurement in it comes off your drawer rather than off a package.
The one number everybody gets wrong
Slotting two strips together sounds like the fiddly part. It is the easy part, but only if you know the number, and nobody ever tells you the number.
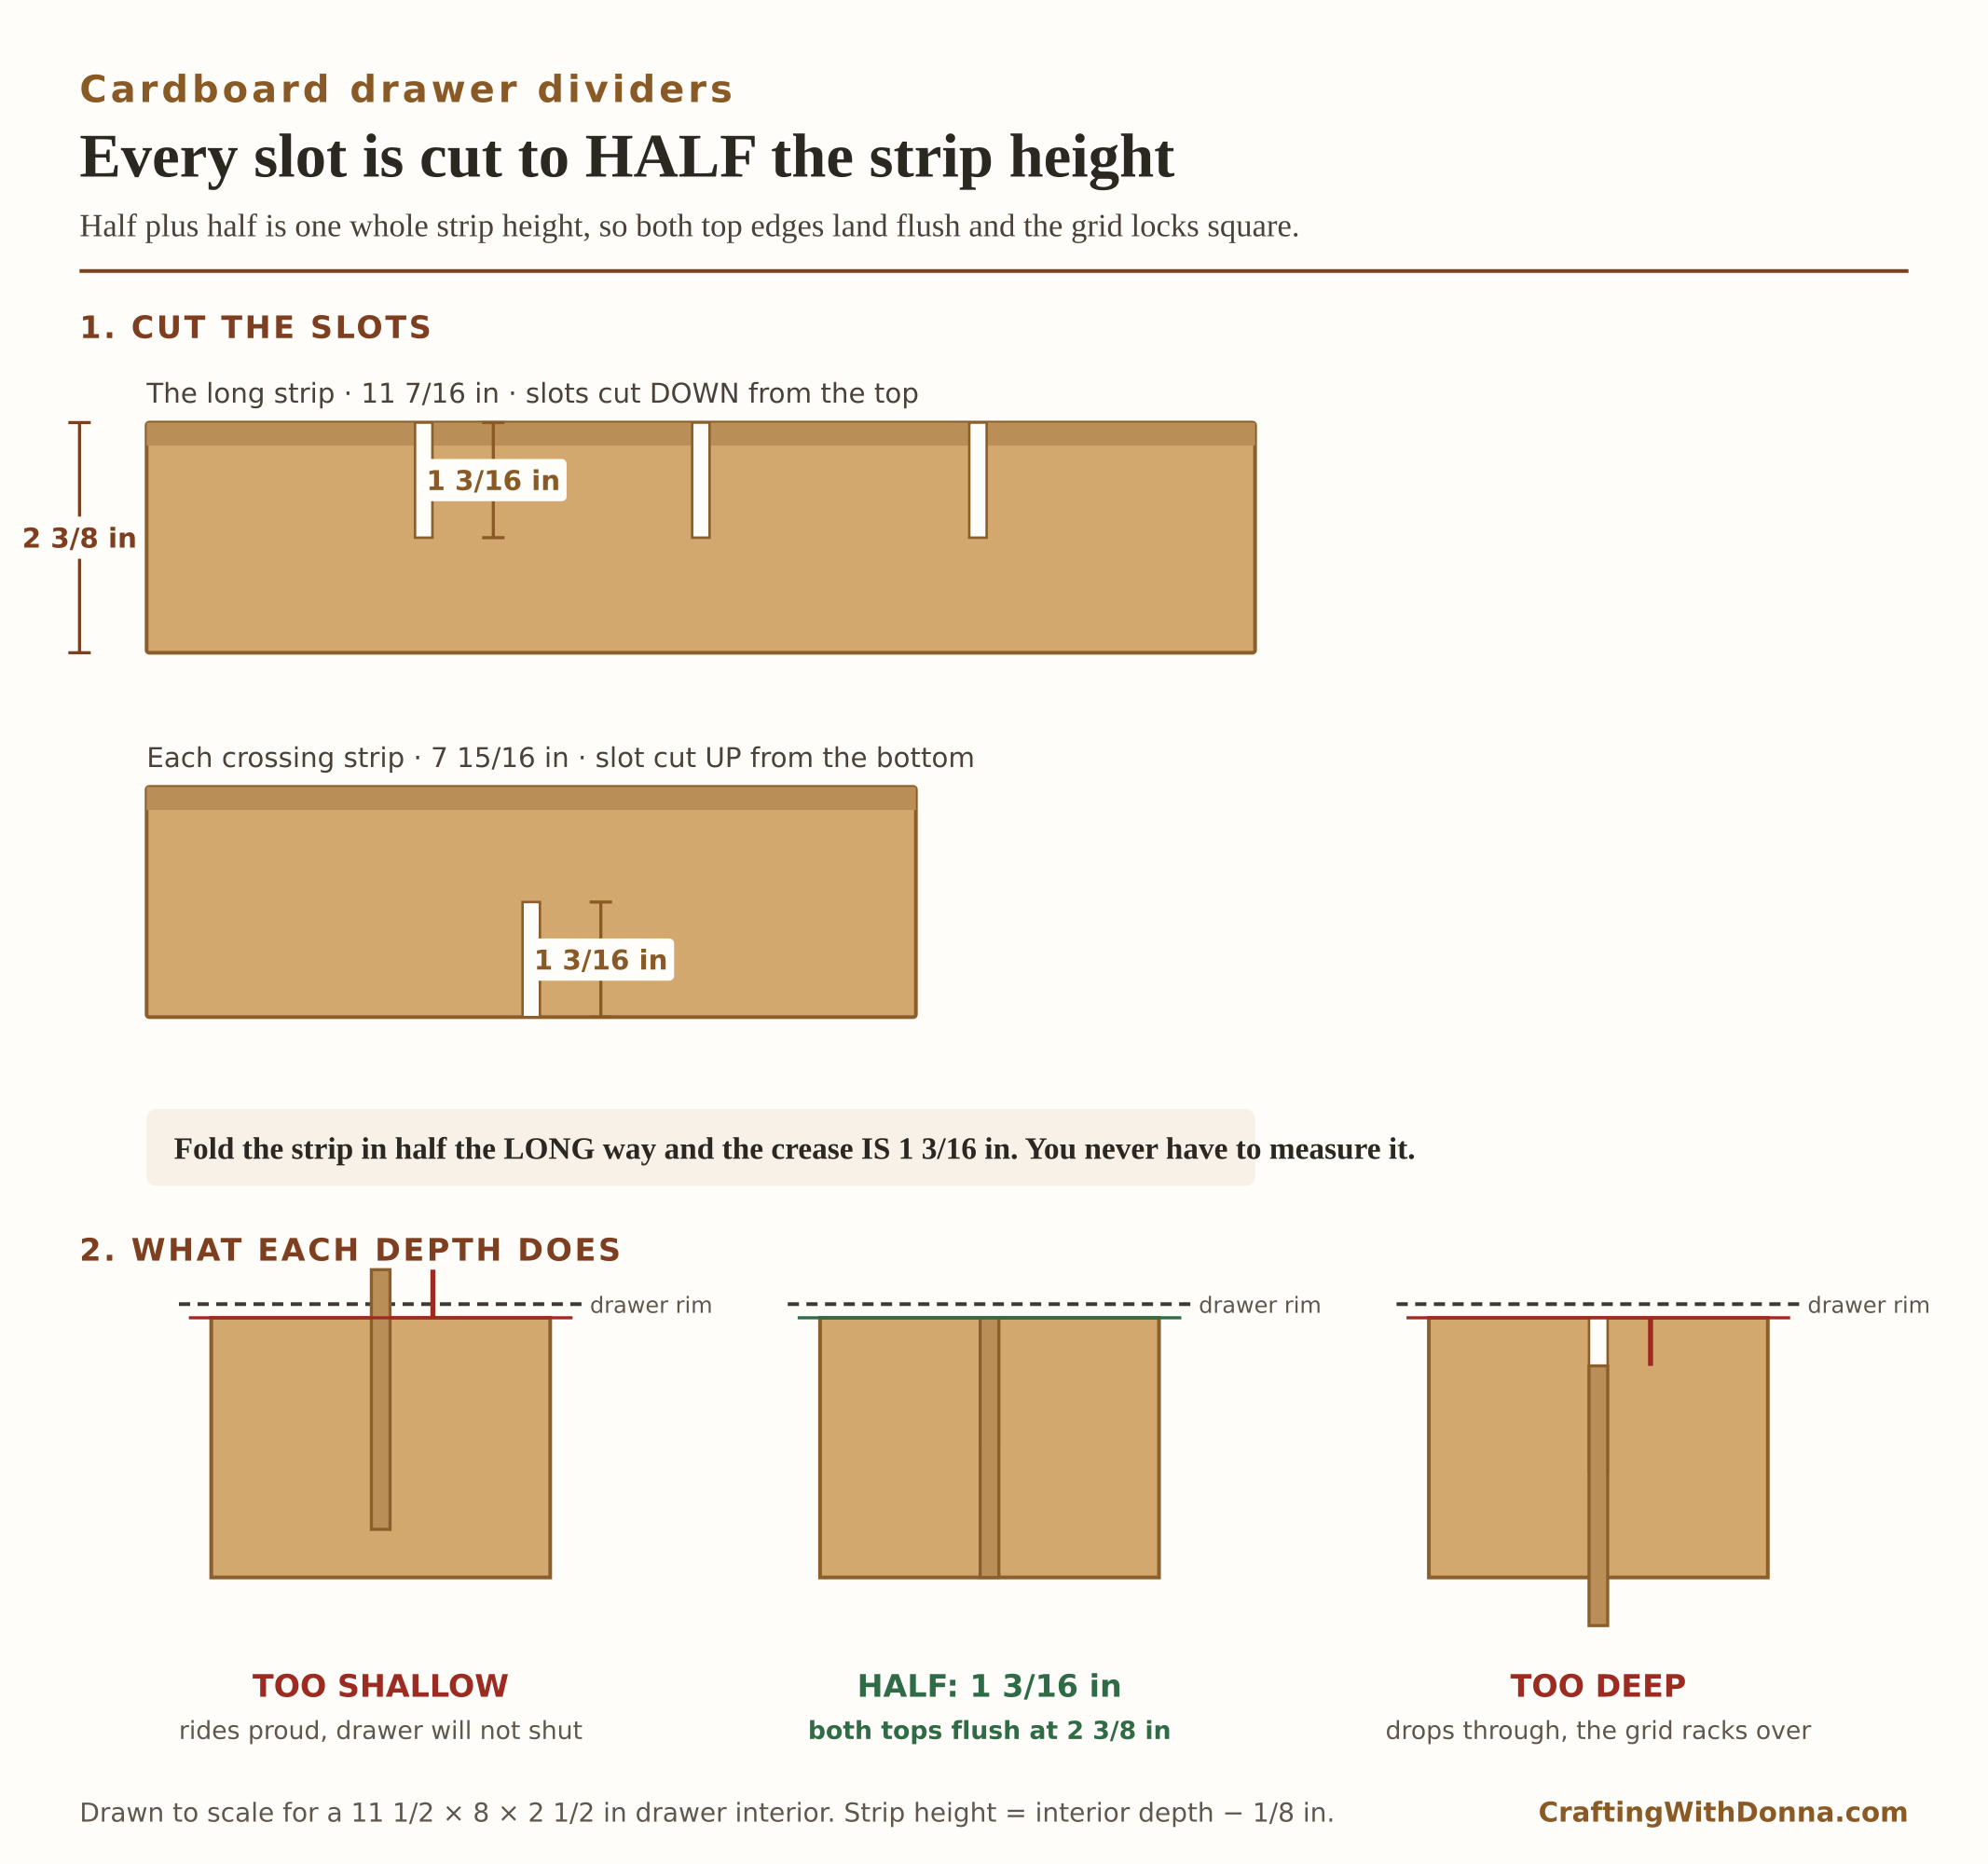
Every slot is cut to half the strip height. Not roughly half. Half.
The reason is arithmetic you can do in your head. One strip gets a slot cut down from its top edge, half the height deep. The strip that crosses it gets a slot cut up from its bottom edge, also half the height deep. Half plus half is one whole strip height, so when you push them together they pass through each other and both top edges land dead level. The joint uses up the exact height you have, with nothing left over and nothing missing.
Get it wrong in either direction and you get one of the two failures you have already had:
- Slots too shallow. The strips cannot seat all the way, so the crossing strip rides proud of the top. That is the one that stops the drawer closing.
- Slots too deep. The crossing strip drops past level, the joint goes slack, and the grid racks over sideways like a gate with a tired hinge. That is the leaning one.
Eyeballed slots land in one of those two camps every time. I would not call that clumsiness. Halfway up a 2 3/8 inch strip is hard to judge by eye, and being 3/16 of an inch out is enough to do it.
Both numbers come off your own materials
You need two measurements to cut a slot: how deep, and how wide. Neither one needs a ruler, which is what keeps this to ten minutes instead of a maths lesson.
How deep: fold the strip in half the long way. Bring one long edge over to meet the other, all the way down the strip, and pinch the fold. That crease runs the whole length of the strip and sits at the exact half-height line, whatever height your strip happens to be. Cut down to the crease and stop. No dividing 2 3/8 by two, no hunting for 1 3/16 on a ruler, no chance of being out by a sixteenth.
How wide: trace your own cardboard. Stand an offcut of the same board upright on your strip where the slot goes, and pencil down both sides of it. The gap you have just drawn is one thickness of the board you are holding, which is the right answer whether you are cutting cereal box or foam board. Cut just inside those two lines. A slot cut a whisker narrow is right, because the board squeezes in and grips. A slot cut wide wobbles for ever.
Measure the drawer, cut the strips
Three measurements, taken inside the drawer. Mine is 11 1/2 inches wide, 8 inches front to back, and 2 1/2 inches deep inside, and every number below comes from those three. Yours will be different, and that is the point.
Strip height = interior depth minus 1/8 inch. So mine are 2 3/8 inches tall. That eighth of an inch is headroom on purpose. It keeps the finished grid under the rim so the drawer still closes, and so a lid or the drawer above never catches a corner. I would rather sit an eighth low than a thirty-second proud. Low still works, proud does not work at all.
Strip length = the span it crosses, minus 1/16 inch. A strip cut to the exact interior measurement has to be bowed to get it in, and a bowed strip pushes the grid out of square. A sixteenth of play, a thirty-second at each end, drops in cleanly and leaves no gap you can see. My long strips come out at 11 7/16 inches and the front-to-back ones at 7 15/16.
If your board has a direction to it, cut so the flutes or the grain run vertically. Corrugated especially. A strip cut the other way folds over the first time something leans on it.
How many compartments, and where the slots go
Now decide what you are dividing. I went with four compartments across the width and two front to back, which gives eight boxes. That needs one long strip running the full width and three shorter ones crossing it.
The folding trick pays for itself a second time here. To find the slot positions, fold the strip end to end instead, short end round to meet the other short end. That crease falls in the middle of its length, so two compartments. Fold again for quarters, so four. Once more for eighths. Every crease is a slot centre, and they land even no matter how odd your drawer’s measurements are.
That matters more than it sounds. My long strip is 11 7/16 inches, and dividing that into four by arithmetic puts the slot centres at 2 7/8, 5 23/32 and 8 19/32 inches. Those are the real numbers, and they are horrible. Two folds give you the same three positions in four seconds, with no ruler involved and nothing to get wrong.
Which is why I would nudge you towards 2, 4 or 8 compartments in a direction rather than 3 or 5. Odd numbers are not wrong, and the grid does not care. Odd numbers are just the ones you have to measure.
The chart for an 11 1/2 inch drawer
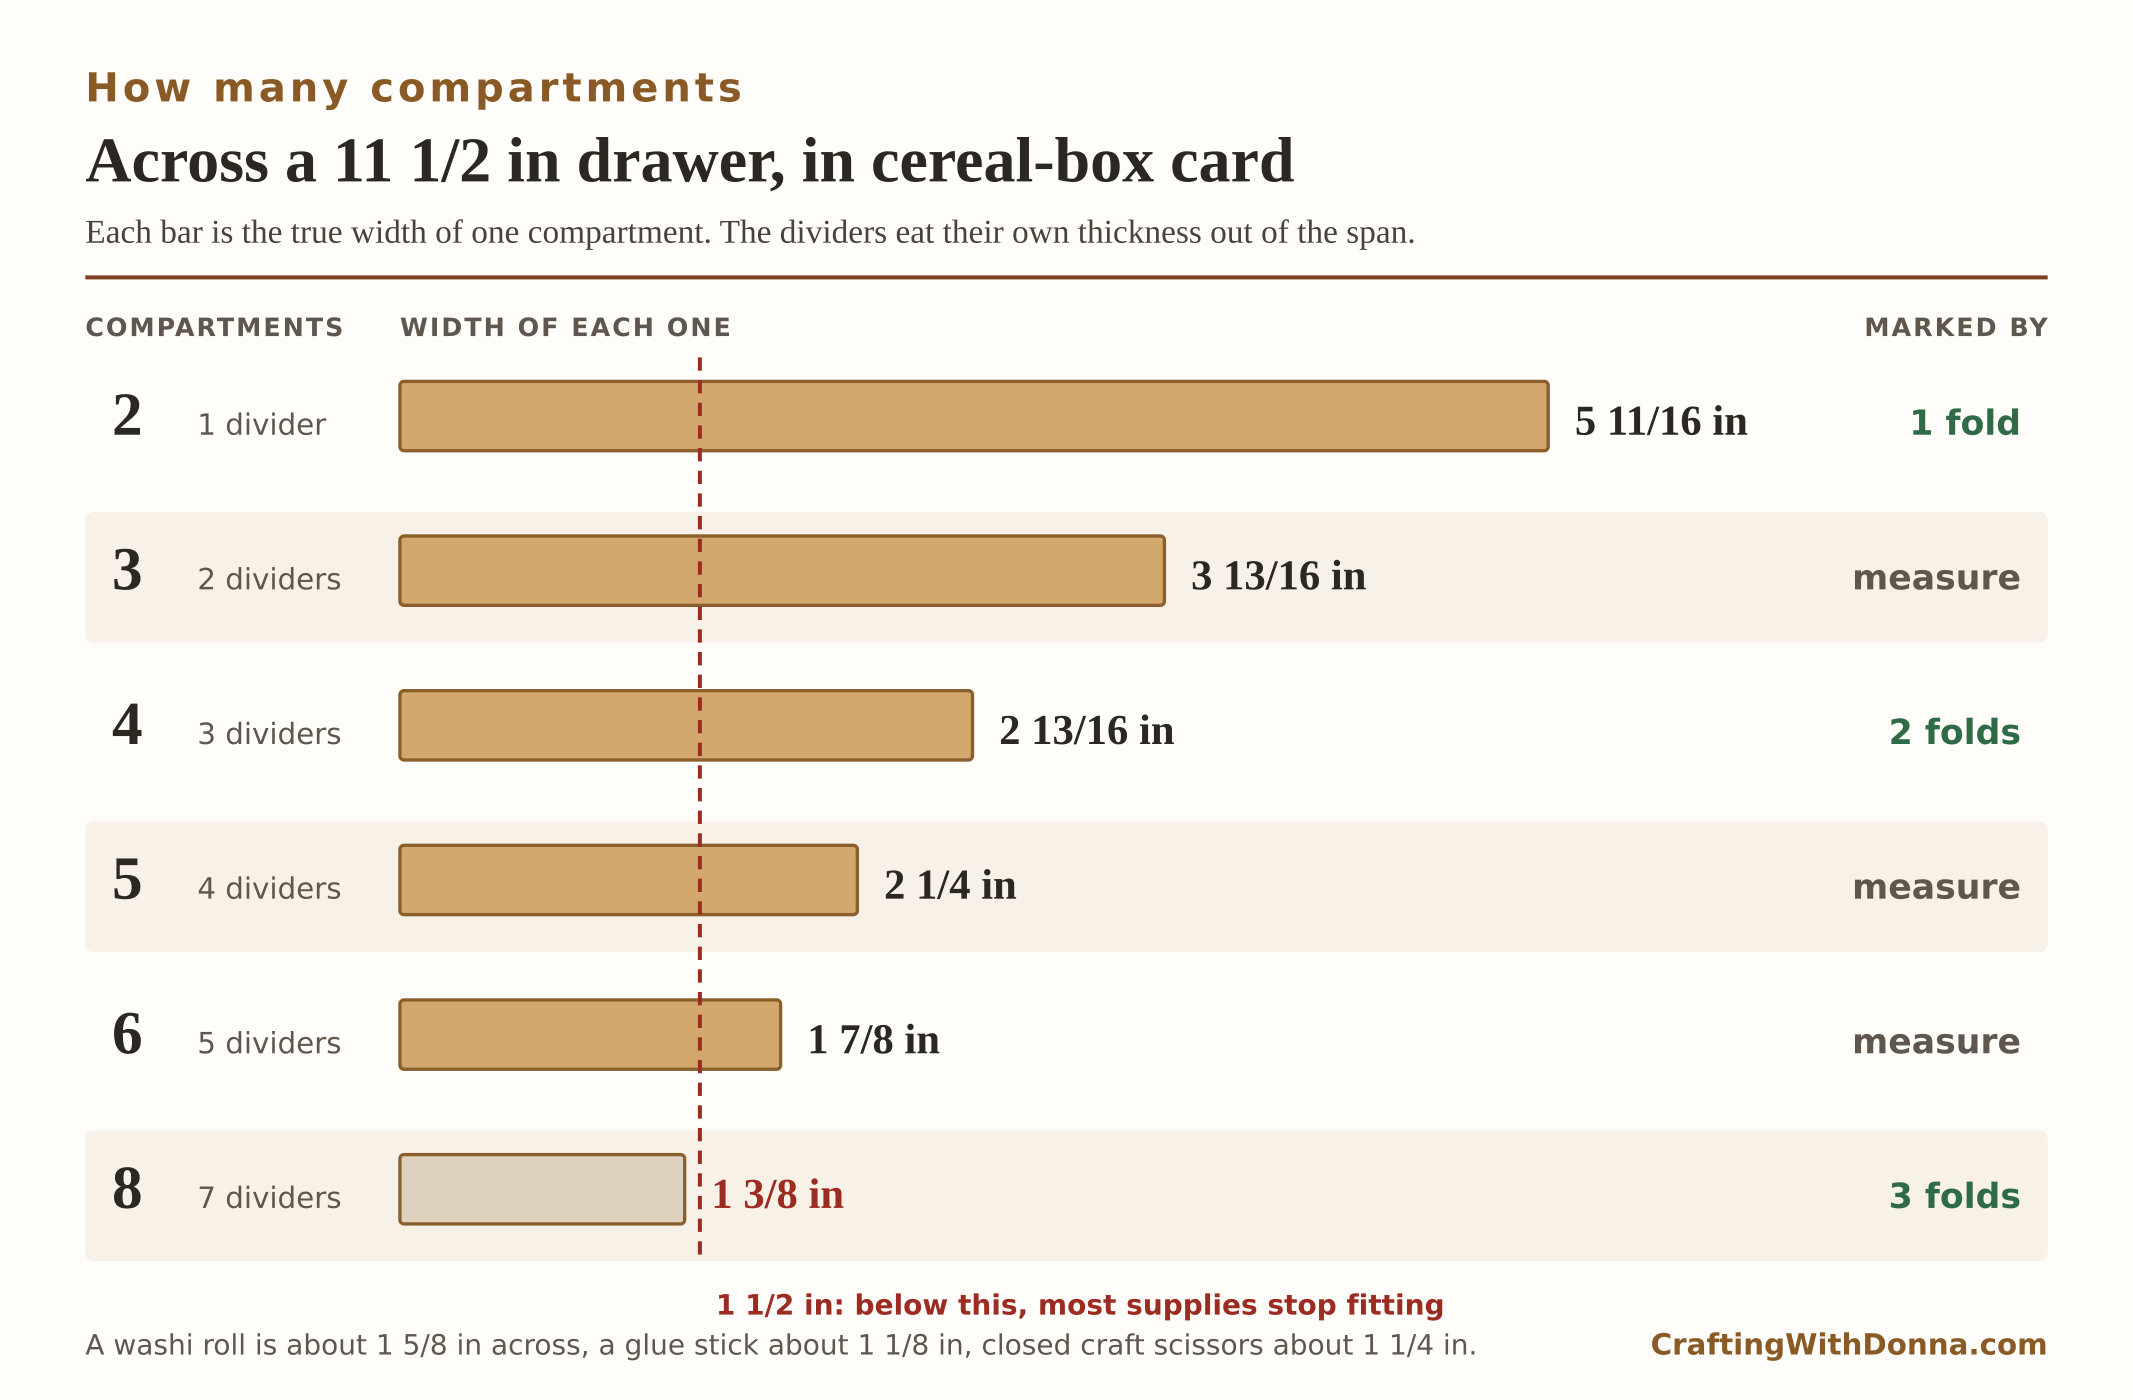
How wide each compartment ends up, across the width of my drawer, in cereal-box cardboard. The dividers eat a little of the span themselves, which is why these are not 11 1/2 divided by the count:
| Compartments | Dividers needed | Each one ends up | Found by folding? |
|---|---|---|---|
| 2 | 1 | 5 11/16 in | Yes, 1 fold |
| 3 | 2 | 3 13/16 in | No, measure |
| 4 | 3 | 2 13/16 in | Yes, 2 folds |
| 5 | 4 | 2 1/4 in | No, measure |
| 6 | 5 | 1 7/8 in | No, measure |
| 8 | 7 | 1 3/8 in | Yes, 3 folds |
Front to back, across my 8 inches: two compartments gives 3 15/16 inches each, three gives 2 5/8, four gives 1 15/16.
One rule of thumb about that last row. Once a compartment drops below about 1 1/2 inches it stops earning its place for most craft supplies, so eight across an 11 1/2 inch drawer is one divider too many. The grid is every bit as strong at that width. The trouble is what fits. A roll of washi tape measures about 1 5/8 inches across, a glue stick about 1 1/8, and a closed pair of craft scissors wants around 1 1/4 inches to lie flat instead of wedging. At 1 3/8 inches you have built a very tidy grid that your things do not go in. I have done that too.
Slot depths for other drawers
If your drawer is a different depth, the two numbers move together. Strip height first, then halve it:
| Drawer interior depth | Strip height | Slot depth |
|---|---|---|
| 1 1/2 in | 1 3/8 in | 11/16 in |
| 2 in | 1 7/8 in | 15/16 in |
| 2 1/2 in | 2 3/8 in | 1 3/16 in |
| 3 in | 2 7/8 in | 1 7/16 in |
| 3 1/2 in | 3 3/8 in | 1 11/16 in |
| 4 in | 3 7/8 in | 1 15/16 in |
You do not need this table if you fold. It is here for the times you are cutting six strips at once and want to mark them all off a ruler in one pass, which is faster.
Which cardboard
Cereal box is my default and the one I would start with, because it is free and stiff enough at drawer height. The method is identical for anything flat. The only thing that changes is how much span the dividers eat:
- Cereal-box chipboard, about 1/64 in. Cuts with scissors. Fine for a 2 1/2 inch drawer.
- Mat board or greyboard, about 1/16 in. Stiffer, and it cuts a squarer edge, but you want a knife rather than scissors.
- Single-wall corrugated from a shipping box, about 1/8 in. Free and rigid. Cut with the flutes vertical.
- Foam board, about 3/16 in. The stiffest, the tidiest looking, and the one where the dividers eat into your compartments. Seven of them take nearly an inch and a third out of the width.
Ten minutes, honestly
Measuring the drawer is one minute. Marking and cutting four strips is about five with scissors. The slots take three, because there are only four of them and you are cutting to a crease you already made. Dropping it in is ten seconds. Then you spend the rest of the evening putting things into boxes, which does not count as work.
The first one is the slow one. The second drawer takes about four minutes, because by then you know that everything you need is already marked on the cardboard.
If yours still is not right
The grid rocks when you press a corner. Your slots are wider than your board. Either you traced wide or you cut on the outside of your pencil lines. Cut a fresh strip and cut just inside the lines this time.
One strip sits higher than the rest. That slot is shallow. Push a pencil down the slot to find where it stops, then take it down to the crease. The crease was right. The cut fell short of it.
The whole grid leans one way. Slots cut past half. This one is a re-cut, because a deep slot cannot be un-deepened. It is also the cheapest mistake in crafting.
The drawer will not close. Your strips are the full interior depth rather than the interior depth minus an eighth. Trim the top edge of every strip. You can do this with the grid still assembled, and nobody will ever look at the top edge.
It fits, but it slides about as a whole. Your strips are too short for the span. A sixteenth of play is right. A quarter of an inch is a grid that travels.
Make it look like you meant it
Two minutes of finishing turns a cereal box into something you are happy to open. Run a strip of washi tape along the top edge of every divider before you assemble. It hides the grey printed core, and the top edge is the one you see every time you open the drawer. You can paint the strips instead, in which case dry them flat under a book or they curl and stop being straight.
What you need
Some of the links below are affiliate links. If you buy through one, Crafting With Donna may earn a small commission at no extra cost to you.
- A self-healing cutting mat, the one thing here that makes the job faster
- A craft knife and spare blades, for mat board and corrugated, because a dull blade tears the slot edges
- A cork-backed metal ruler, so the blade cannot climb up over the edge
- A bone folder, for a crisp crease on thicker board. The crease is a cut line here, so it wants to be sharp
- Wide washi tape, for edging the top of the dividers
- Foam board, if you want the tidy version rather than the free version
Get the free slot guide
I made you the sheet I wish I had had the first time. It carries a cardboard thickness gauge printed at true size, so you slide your own board into the slots until you find the one it fills, and that settles your slot width without a single measurement. The slot-depth chart covers every common drawer depth, the fold sequence is drawn out step by step, and there is a 1:1 ruler along the bottom for the times you would rather mark than fold.
Print it at 100% rather than “fit to page”, or the gauge slots stop being the widths they say they are. The sheet says so across the top, so you cannot forget.
Go and measure the drawer. Then go and eat the cereal, because that is the only supply you are short of.
Keep the ten-minute craft nights coming
If quick wins like this one are your speed, the printable Craft Night Kit Planner from the craft table lays out the supplies, timing, and shopping list for a whole month of ten-minute craft nights — print it once, plan four cozy nights. It’s $7 in the Crafting With Donna shop.