10-Minute Mosaic Gem Coasters: The N-Plus-One Rule That Stops the Sliver Tile
I want to tell you about the coaster that taught me to count. I had a four-inch cork-backed blank, a bag of glass mosaic tiles in about nine colours, and a free evening. I started laying tiles in the top left corner, worked across, worked down, and it all went well right up until the far edge, where I was left with a strip too narrow to take another tile and too wide to pretend I meant it. So I nipped a sliver to fill it. That sliver was the only thing anybody looked at.
Then I made a second coaster more carefully, and it did the same thing. Same strip, same edge. That is when I stopped blaming my hands, sat down with a ruler, and found the mistake in my arithmetic. Arithmetic mistakes repeat.
What we are making
A set of small mosaic coasters, laid on ready-made blanks, where the border around the outside reads the same width as the joints between the tiles. That is the difference between a coaster that looks laid and one that looks crammed. No cut slivers, no bald strip along one edge. You will also know before you buy the tiles whether they fit the blank.
I will be straight with you about the clock, because the headline covers one part of it. Laying the tiles takes ten and a half minutes. Then the coaster sits while the adhesive cures, and grouting is a separate short session on another day. I come back to that near the end. I would rather tell you now than have you find out at bedtime.
Why yours ended in a sliver
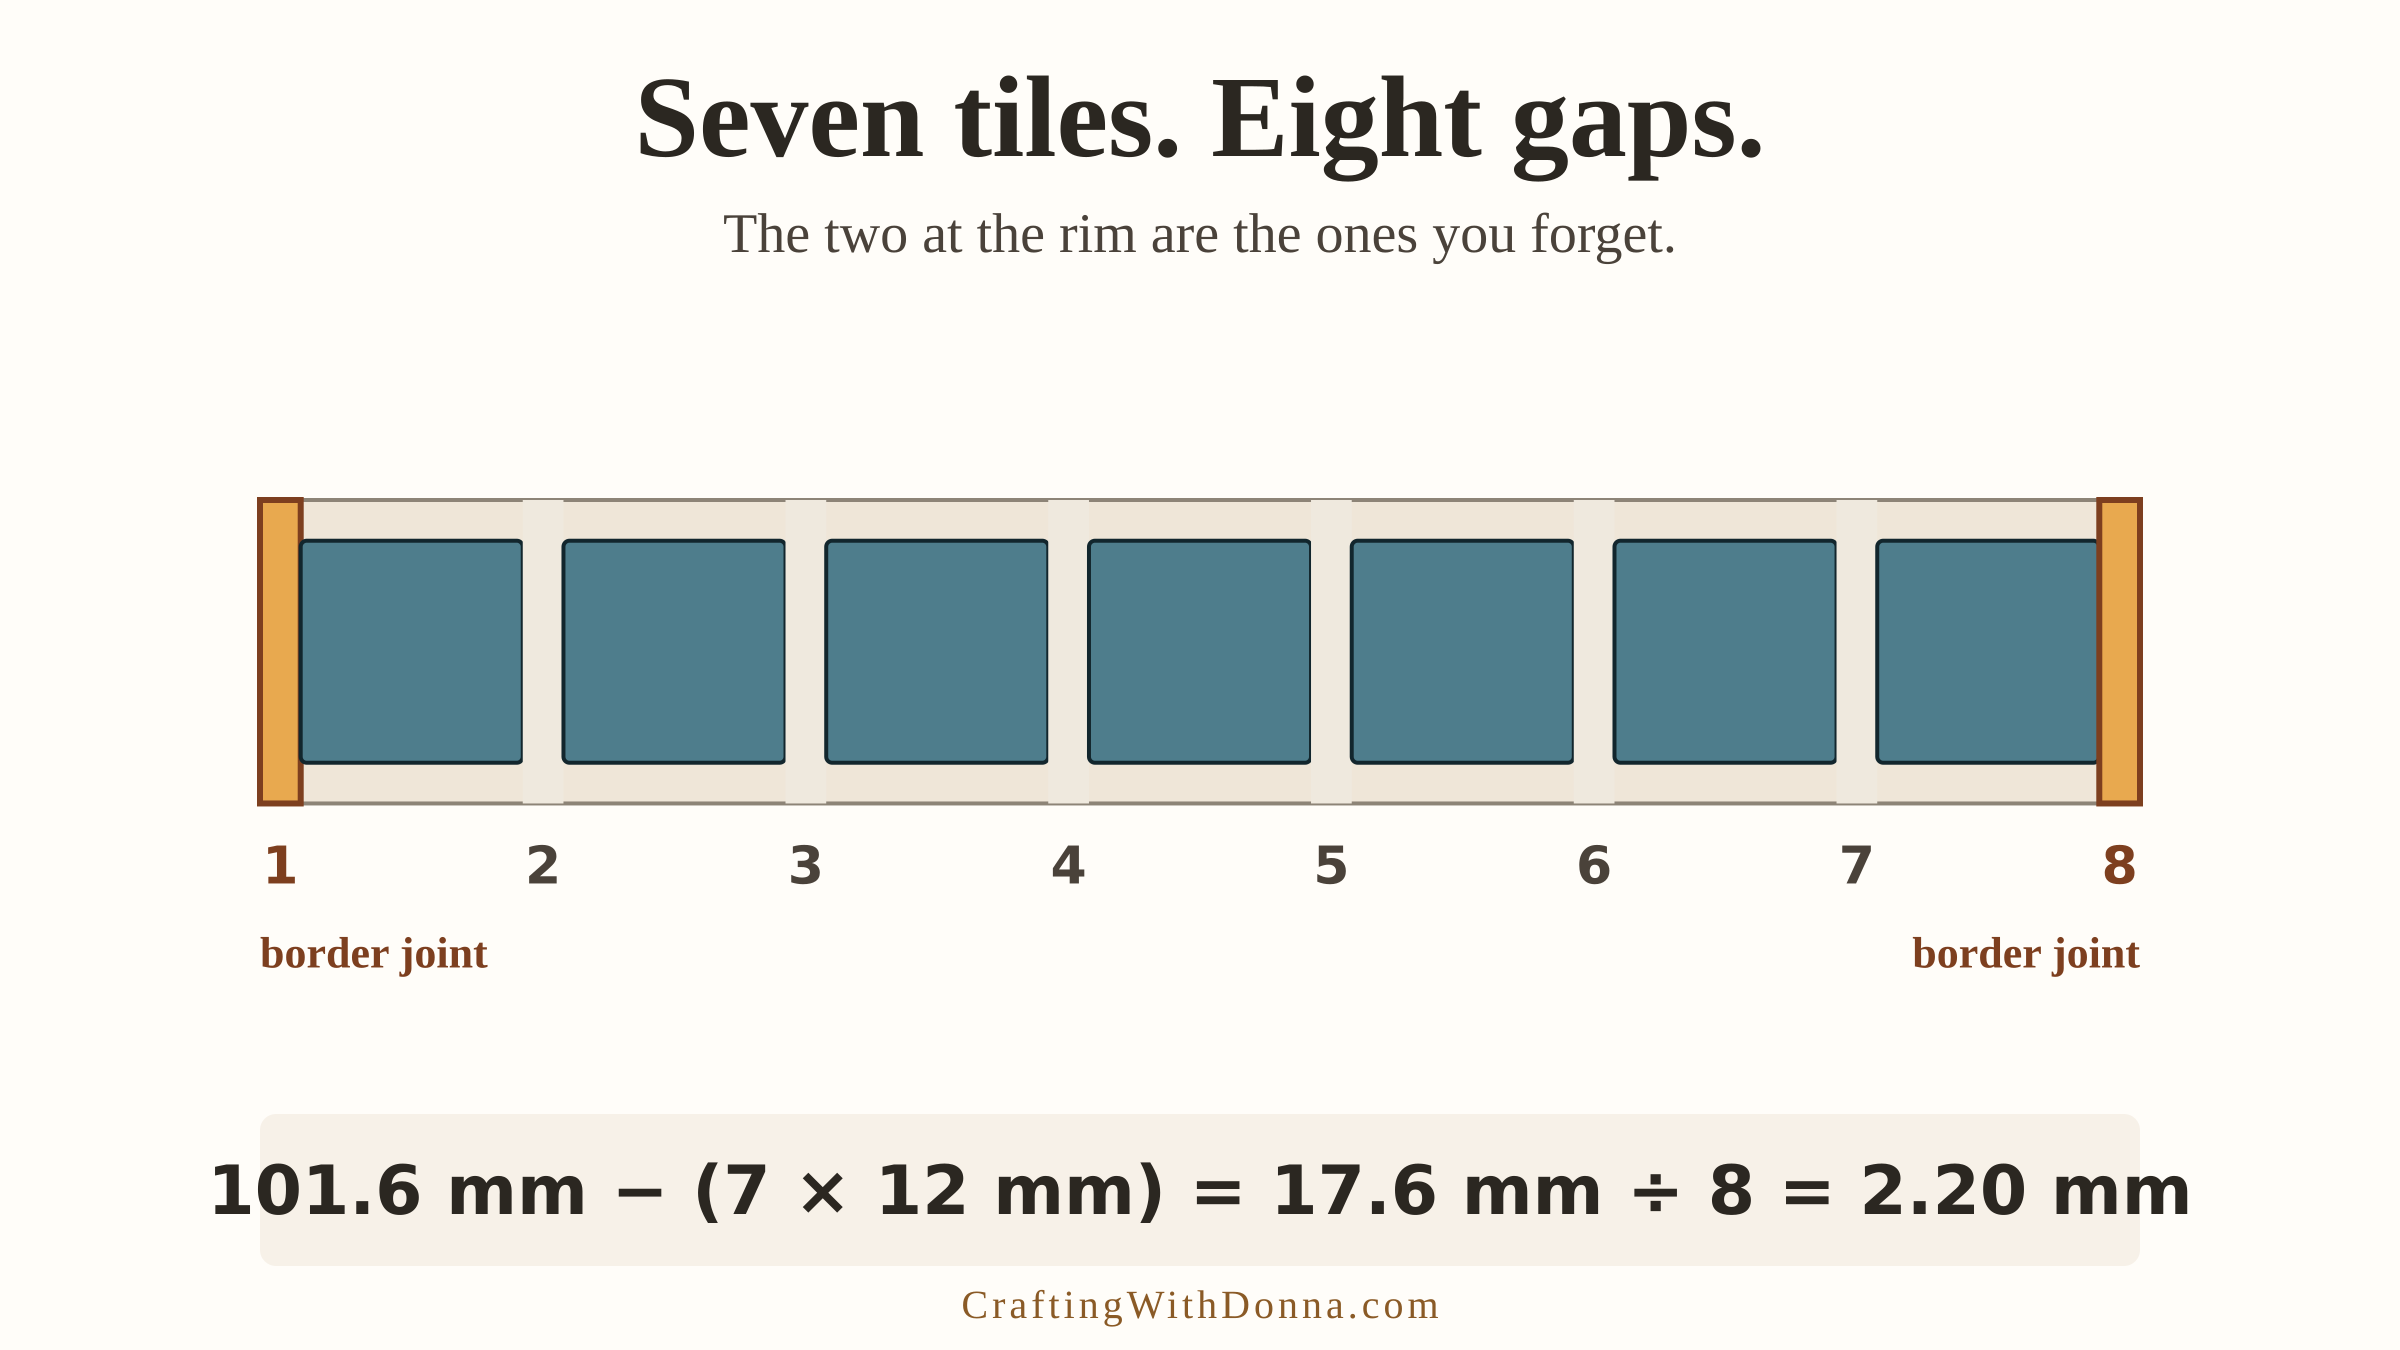
Picture a row of tiles sitting inside your blank. Between the tiles there are gaps, and those are the gaps you can see, so those are the gaps you plan for. With seven tiles across you can see six gaps between them, and it feels natural to take the leftover space and share it out between those six.
The blank charges you for two more. There is a gap at the left rim before the first tile, and a gap at the right rim after the last one. Those border joints are as real as the ones in the middle. Seven tiles do not sit in six spaces. They sit in eight.
This is not a small error that widens your joints a touch. Work it through. If you divide all the leftover space between the interior gaps, then by definition nothing is left, so the border comes out at zero. Every time. Your outer tiles end up pressed against the rim with no grout line at all, and that is the edge that lifts first once the coaster starts meeting wet glasses.
The n-plus-one rule
The whole thing fits on one line.
Count your tiles across. Add one. That is how many gaps you divide the leftover between.
Written out: measure the inside width of your blank, subtract all the tile widths, and divide what is left by the number of tiles plus one. That number is your joint, and it is also your border, which is the point. Match the border to the joint and the coaster reads as one piece.
Take the layout I use most. A four-inch blank is 101.6 mm. Seven 12 mm tiles take up 84 mm, so 17.6 mm of slack is left. Divide by eight, seven tiles plus one, and every gap including the two at the rim comes to 2.20 mm.
Divide that same 17.6 mm by six instead and you get 2.93 mm joints and a border of nothing. That is the sliver coaster. Now I know why I made two of them.
The tiles that do not fit a four-inch blank
I wish someone had told me this at the shop counter, because working it out saved me money.
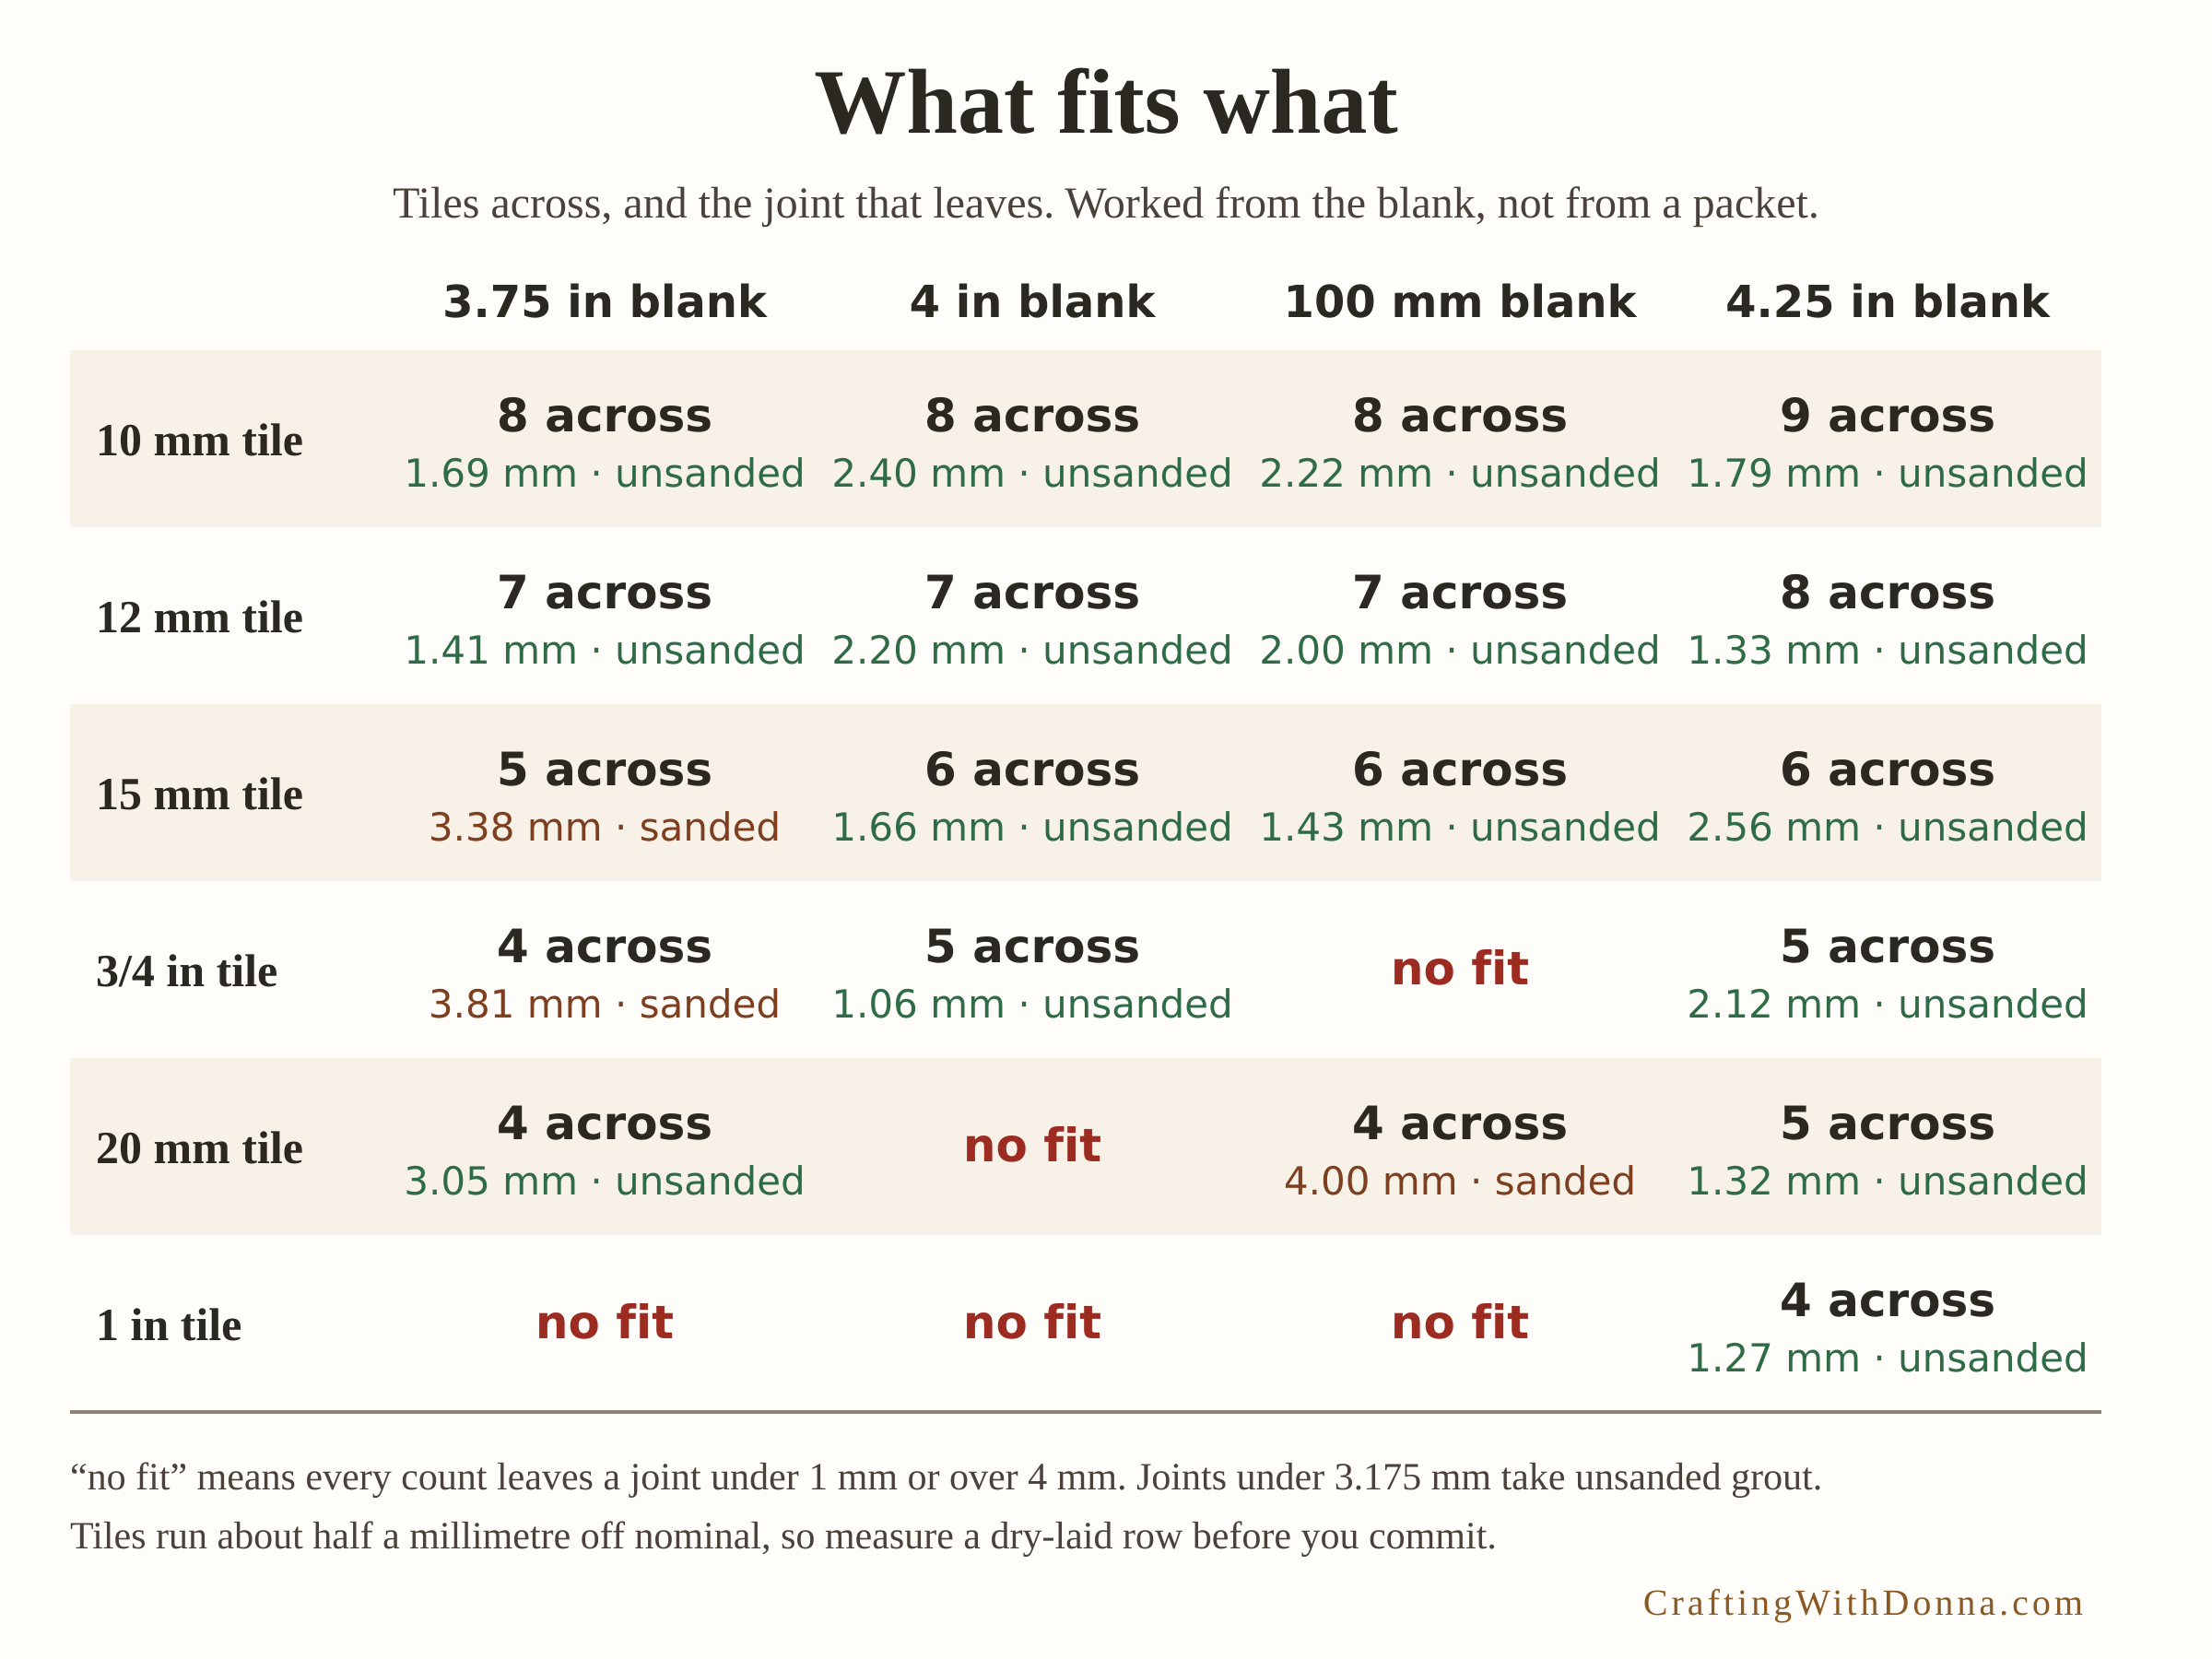
The 20 mm square is the mosaic tile you will see most often on a shelf. It has no good layout on a four-inch coaster. Five across leaves you 0.27 mm of joint, which will not hold grout. Four across leaves 4.32 mm, which is a lot of grout and very little glass. There is nothing in between, because tiles come in whole numbers.
The one-inch ceramic is sneakier, because it looks like a triumph. Four of them measure 101.6 mm, and a four-inch blank is 101.6 mm. A flawless fit, edge to edge. The joint is zero. All four sides are zero. Grout has nowhere to key in and you have no border at all, so the layout that felt like the tiles were made for the blank is the one guaranteed to fail.
What works on a four-inch blank is the 12 mm mini glass at seven across, on a 2.20 mm joint. For a finer line, 15 mm at six across gives 1.66 mm, and three-quarter-inch at five across gives 1.06 mm. The full chart, four blank sizes against six tile sizes, is on the free printable at the bottom.
Your joint width picks your grout for you
Once you have the number you have also chosen your grout. The trade line sits at an eighth of an inch, which is 3.175 mm. Joints narrower than that take unsanded grout. Joints at that width or wider take sanded grout, because the sand stops a wide joint shrinking and cracking as it dries.
So the 2.20 mm joint from our seven-across layout is unsanded, with room to spare. If you went four across with 20 mm tiles and landed on 4.32 mm, that is sanded. One fewer decision to make in the shop.
Do not trust the packet, measure the row
Now the caveat, and it matters more than it sounds.
Glass mosaic tiles are not the size printed on the bag. Half a millimetre either way is ordinary. The errors do not cancel along a row, they stack. Seven tiles that each run half a millimetre oversize make a row 3.5 mm too long, which eats 1.75 mm off each border. That is bigger than the 2.20 mm joint you were aiming for. The bag undoes your careful arithmetic.
The fix takes ninety seconds. Lay one row of the tiles you own edge to edge, tight together, and measure the whole row with a ruler. Use that measured length instead of seven-times-twelve. My real row came to 87.5 mm, so the slack was 14.1 mm, and dividing by eight gave a 1.76 mm joint. Still usable, still unsanded, still even all the way round. That is the difference between a rule and a guess.
Laying it, start to finish
Ten and a half minutes. I timed each bit rather than rounding the total down:
- Dry-lay one row edge to edge and measure the actual row: 95 seconds.
- Read your count and joint off the card, or divide by tiles-plus-one: 25 seconds.
- Pencil the border square on the blank, one joint width in from each rim: 50 seconds.
- Spread adhesive out to the pencil line and no further: 70 seconds.
- Place the tiles, dropping the gauge in between each one: 255 seconds.
- Walk all four borders and nudge anything that drifted: 85 seconds.
- Lift the squeeze-out back out of the joints while it is soft: 55 seconds.
Do that last one thoroughly. Adhesive that dries proud in a joint keeps grout out of it, and you find that out at the grouting stage when it is too late to be charming about it.
Start from the border, not the middle. Set your first tile against the pencil line in one corner and work along. The pencil line does the job your eye cannot.
The part that is not ten minutes
Three waits, and I am not going to bury them.
The adhesive needs to cure before you grout, so give it a full day. Grouting is its own short session: spread it in, work it across the joints diagonally, then let it set for ten to fifteen minutes before you wipe the faces with a damp sponge rather than a wet one. The grout wants another day before the coaster meets a cold glass.
So the honest version reads: ten and a half minutes of laying, a day, ten minutes of grouting, another day. This is a weekend project with two very short hands-on parts, not an evening. All the fiddly thinking sits inside the ten and a half minutes, and that is the bit this rule fixes.
What you need
Some of the links below are affiliate links. If you buy through one, Crafting With Donna may earn a small commission at no extra cost to you.
- 12 mm glass mosaic tiles, assorted colours, the size that fits a four-inch blank
- Four-inch cork-backed coaster blanks
- White PVA mosaic adhesive
- Unsanded grout, for joints under an eighth of an inch
- Small grout float and sponge
- Wheeled tile nippers, for the day you do want a shaped piece
- Self-adhesive felt pads for the underside, so it never scratches a table
Get the free layout card
I made you the sheet I wanted on that first evening. It carries a 1:1 tile gauge, so you can lay a tile you own straight onto the paper and find out what size it really is. It has a 1:1 joint comb with the sanded and unsanded crossover marked on it, so you can set your spacing against a printed line. And it has the full fit chart, four blank sizes against six tile sizes, with the count and the joint worked out for each.
Print it at 100% rather than “fit to page”, or the 1:1 gauges stop being 1:1. The sheet says so at the top, so you cannot forget the way I did.
Keep the ten-minute craft nights coming
If quick wins like this one are your speed, the printable Craft Night Kit Planner from the craft table lays out the supplies, timing, and shopping list for a whole month of ten-minute craft nights — print it once, plan four cozy nights. It’s $7 in the Crafting With Donna shop.