10-Minute Wire-Wrapped Rings: The Bands-Plus-One Rule That Stops You Running Out of Wire
A wire-wrapped ring is ten inches of wire, four minutes of winding, and two minutes of tucking the ends. The first one most people make does not go that way. The bands wind on fine, the ring looks like a ring, and then the wire runs out halfway through the coils that hold the whole thing together. Nothing about that failure can be rescued. The bands unwind, the wire is kinked where the mandrel held it, and the usual conclusion is that wire work needs a knack.
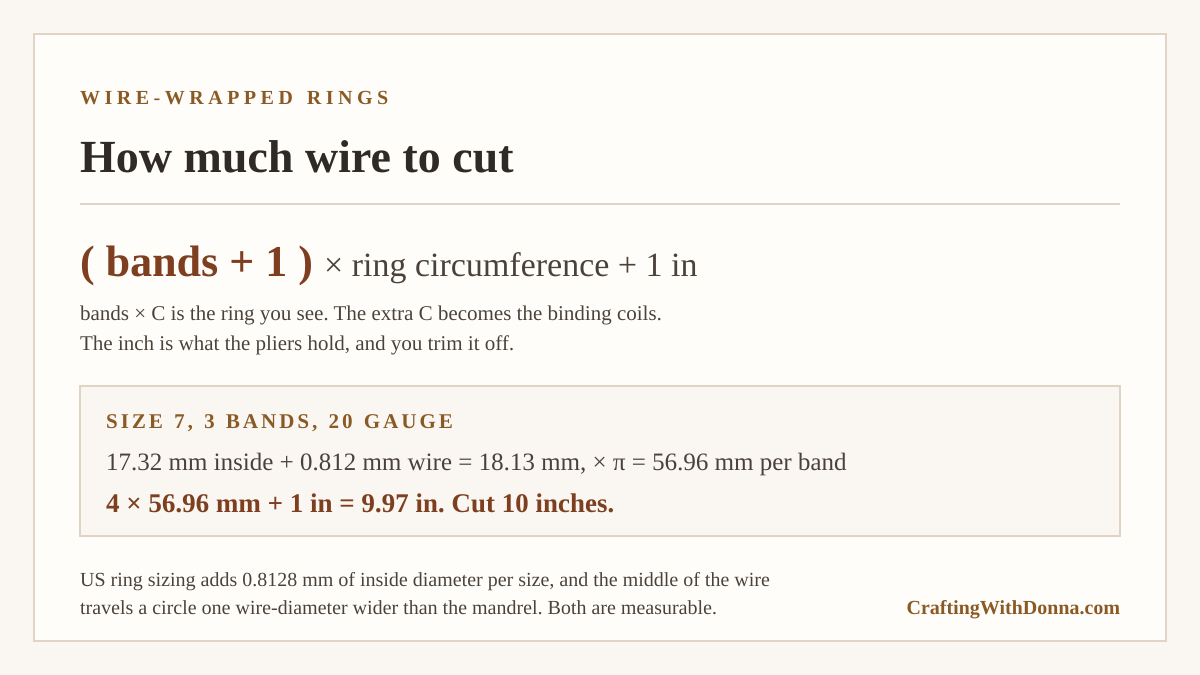
It needs one multiplication. US ring sizes climb in a straight line, a thirty-second of an inch of inside diameter per size, so a size 7 measures 17.32 mm across. Wire has thickness, and the middle of the wire travels a circle one wire-diameter wider than the mandrel it wraps. In 20 gauge that puts one band at 56.96 mm. Three bands, one more circumference for the binding coils, and an inch for the pliers to hold comes to 9.97 inches.
Ten inches. That is the number every good tutorial gives for a size 7 and almost none of them explains. Below is where it comes from, the second check that decides whether the finished ring will pass your knuckle, and the gauge advice that saves a beginner from buying wire they cannot bend.
Quick start: the three essentials
Already have basic jewelry pliers? Start with 20-gauge non-tarnish craft wire and a marked ring mandrel. Add flush cutters for a flat cut that will not scratch.
As an Amazon Associate I earn from qualifying purchases. Prices and availability can change.
What we are making
A three-band wrapped ring on plain round wire, bound in the middle with a coil of the same wire, with the tails tucked flat against the inside. No solder, no torch, no glue. A spool of 20 gauge craft wire runs about eight dollars and holds enough for 36 rings, so each one costs you somewhere near a quarter.
Hands-on time runs about ten minutes for your second ring. Your first will take twenty, because the tucking step is the part you learn with your fingers rather than from a page. There is no drying, no curing and no waiting, which makes this the rare craft you can start and finish while dinner is in the oven.
Start with wire rather than sheet or solder for a reason that has nothing to do with skill. Wire is the only jewelry material you can take apart and reuse. A ring that goes wrong at any point before the final trim straightens back out and winds again on the same ten inches, as long as you have not work-hardened it by bending the same spot four times.
The number that decides everything
Count your bands. Add one. Multiply by the ring circumference. Add an inch. That is how much wire to cut.
Each piece of that has a job. The bands are the ring you can see, so three bands need three circumferences. The extra circumference becomes the binding coils, the short wraps at the middle that clamp the three bands into one object. The inch is straight wire at the ends for your pliers to grip, and you trim it off at the finish.
Measure the circumference rather than your finger. US ring sizing runs 11.63 mm of inside diameter at size 0 and adds 0.8128 mm per whole size, which is a thirty-second of an inch. Size 7 lands at 17.32 mm. Check that against any printed sizing chart and it will match.
Then add the wire. When you wind wire around a mandrel, the inside face of the wire touches the mandrel and the outside face sits one wire-diameter further out. The middle of the wire, which is the part whose length you are measuring, travels a circle of 17.32 plus 0.812, or 18.13 mm. Times pi, that is 56.96 mm per band.
So a size 7 in three bands of 20 gauge wants 4 times 56.96 mm, which is 227.8 mm or 8.97 inches, plus the inch of grip. Cut ten and you have a third of an inch to spare.
The binding allowance is worth checking on its own, because a whole circumference for a few short coils sounds generous until you measure it. Three wires side by side make a bundle about three wire-diameters wide and one thick, so one coil around it runs 2 times 0.812 times 4, or 6.5 mm. Half a circumference per side buys 4.4 coils. Four to five coils on each side of the ring is what a bound wire ring uses, which is how you know the rule is sized right rather than padded.
What the rule says for the sizes you are likely to make
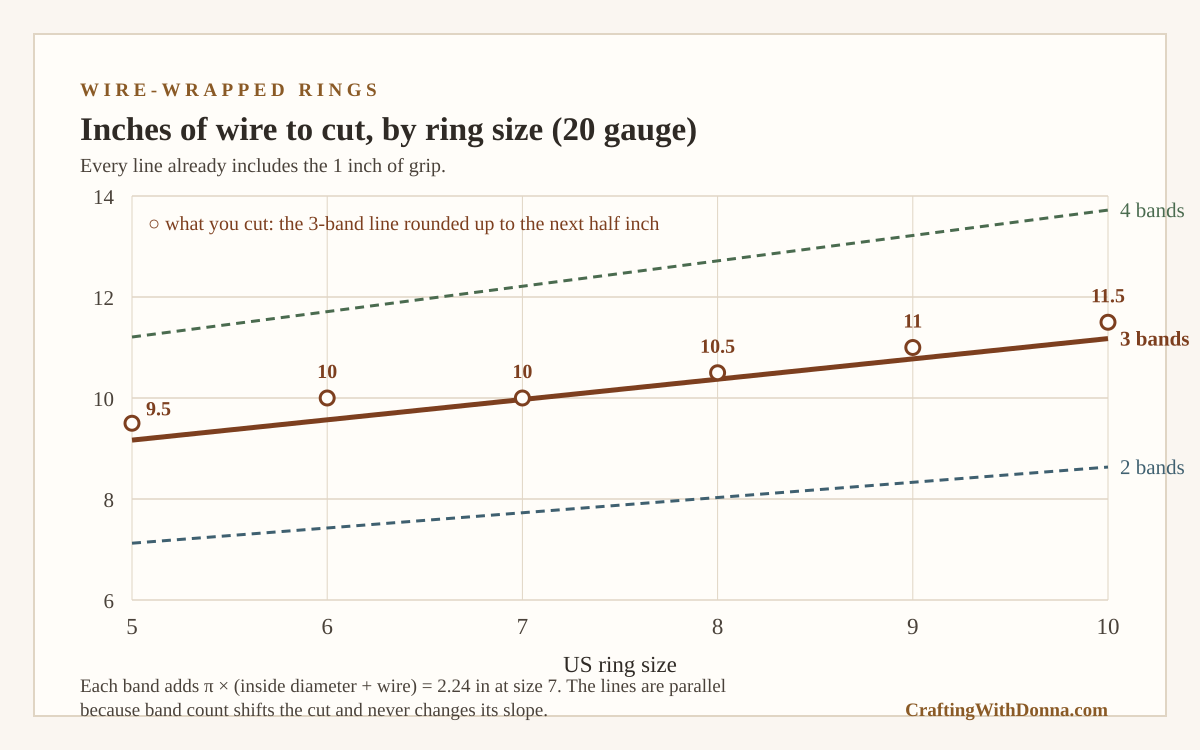
Three bands of 20 gauge, the combination this post is built on, rounded up to the next half inch:
- Size 5: 15.69 mm inside, 9.17 inches exact, cut 9.5 inches.
- Size 6: 16.51 mm inside, 9.57 inches exact, cut 10 inches.
- Size 7: 17.32 mm inside, 9.97 inches exact, cut 10 inches.
- Size 8: 18.13 mm inside, 10.37 inches exact, cut 10.5 inches.
- Size 9: 18.95 mm inside, 10.77 inches exact, cut 11 inches.
- Size 10: 19.76 mm inside, 11.18 inches exact, cut 11.5 inches.
Five sizes span less than two and a half inches of wire, which is the useful thing to notice. If you are making rings for a family and you are not sure of everyone’s size, cutting 11.5 inches for all of them costs you a few inches of scrap per ring and removes the guessing.
Adding a fourth band adds one more circumference, so about 2.24 inches at size 7. Dropping to two bands takes the same amount off. The rule scales with band count and nothing else.
The second check: how wide is too wide
Cut the right length and you can still make a ring that will not go on. That failure comes from band width, and it has a threshold you can measure before you start.
Your bands sit side by side, so the finished band is as wide as the band count times the wire diameter. Three bands of 20 gauge come to 2.44 mm, which is narrow. Five bands of 16 gauge come to 6.45 mm, which is not.
Six millimeters is the line. Below it, a ring rides over the knuckle joint by tilting a few degrees as it passes. At 6 mm and above the band is too wide to tilt, so it has to clear the knuckle straight on, and a ring that fits the base of your finger will stop dead at the joint. Jewelers have handled this for a century by going up a half size on wide bands, and the same fix works here: wrap on the half size above your measured size and the finished ring passes.
Which combinations cross the line:
- 16 gauge at 1.291 mm: five bands hit 6.45 mm, so five or more needs the half size.
- 18 gauge at 1.024 mm: six bands hit 6.14 mm, so six or more needs it.
- 20 gauge at 0.812 mm: seven bands reach 5.68 mm, still under.
- 22 and 24 gauge: no band count you would want to wear gets there.
Three bands of 20 gauge sits well clear, which is another reason to start there. Wrap at your measured size and the ring goes on.
Which gauge your hands can bend
Gauge numbers run backwards, so a bigger number means thinner wire. Craft wire is sold dead soft, which means it has been annealed and will bend under your fingers rather than under tools.
24 gauge at 0.511 mm and 22 at 0.644 mm wind with no effort and hold nothing. A ring in either will bend out of round in a pocket. Use them for the binding coils on a heavier ring, not for the bands.
20 gauge at 0.812 mm is the beginner size. Your fingers can wind it around a mandrel, your pliers can tuck it, and the finished ring holds its shape through normal wearing.
18 gauge at 1.024 mm makes a substantial ring and asks for chain-nose pliers on every coil. Doable for a second project. 16 gauge at 1.291 mm is stiff enough that the binding coils fight you, and three bands of it makes a ring wider than most people want. Skip it until you have made a few.
One more thing about wire that nobody mentions until it happens. Bare copper and brass tarnish, and on some people they leave a green mark where the ring sits. The mark washes off and does nothing to you, but it surprises people who were not warned. Non-tarnish coated craft wire has a clear coating that stops both. If you are making rings as gifts, buy the coated kind and say so on the tag, because anyone with a nickel sensitivity will want to know what they are putting on.
What you need
Disclosure: The product links in this supply list are paid affiliate links. Crafting With Donna may earn a commission at no extra cost to you.
- 20 gauge non-tarnish craft wire. Buy the coated kind rather than bare copper. A ten yard spool is 360 inches, which is 36 size 7 rings, so one spool covers a craft night with wire left over.
- A ring mandrel with size markings. The whole rule above depends on wrapping at a known diameter. A marker barrel or a dowel will hold a shape, but you will not know what size you made until someone tries it on.
- Flush cutters. These leave a flat cut end instead of a wedge. The cut end sits against the inside of a finger for the life of the ring, so the flat one matters more here than on most projects.
- Nylon-jaw pliers. Pull the wire through these once before you wrap and the spool curve comes out. Steel jaws do the same job and leave tooth marks down the length of the band.
- Chain-nose pliers. For the binding coils and the final tuck. Get the ones with a smooth inner jaw.
- A ring sizer set. Under five dollars, and it turns the sizing question into a reading rather than a guess. Measure at the end of the day when fingers are at their largest.
- 6 mm glass or stone beads. Optional. One bead threaded onto the middle band before you bind turns a plain ring into a focal one and adds no time.
- A jewelry polishing cloth. Ten seconds at the end takes off the finger oil and the dullness from handling.
Setting up so the wire does not fight you
Straighten the wire first. Cut your length, hold one end, and draw the whole piece through closed nylon jaws twice. Wire off a spool holds the spool’s curve, and a curved piece wraps into bands that sit at different diameters. You will see it as a ring that looks stepped instead of stacked.
Mark your mandrel spot with a strip of tape at the size you want, on the side away from where you will be winding. Stepped mandrels taper, so a wrap that drifts a quarter inch along the cone comes off a quarter size wrong.
Work over a tray or a towel. Trimmed wire ends are short, springy and sharp, and they travel. A rolled towel on the table catches them.
The ring, start to finish
Find the middle of your straightened wire and set that point against the mandrel at your tape mark. Wind one half around, then the other half in the opposite direction, so the two ends finish pointing away from each other on the same side. Working from the middle out keeps the bands even and leaves both tails the same length.
Wrap until you have three bands lying side by side. Keep them touching. A gap between bands turns into a gap you can never close, because the binding coils lock the spacing in.
Slide the ring off the mandrel and hold the three bands together between finger and thumb. Take one tail and wind it around the bundle four or five times, moving away from the band stack, pulling snug on each turn. Do the same with the other tail on the other side. These coils are the whole structure of the ring, so pull them tight enough that nothing shifts when you squeeze.
Trim both tails with the flush cutters, leaving about 2 mm. Grip each stub with chain-nose pliers and press it flat against the coil, tucking it toward the inside of the ring. Run a fingertip around the inside. If it catches anywhere, press harder. This is the step that separates a ring someone wears from a ring someone puts in a drawer.
Slide it back on the mandrel and give it one gentle push to true the shape, then polish. Ten minutes, once you have done one.
Where it goes wrong
The ring came out too small. You wrapped on a tapered mandrel and drifted toward the narrow end, or you pulled the bands tight enough to compress them onto the mandrel. Wrap snug rather than strangling, and keep the wire at the tape.
The wire snapped while you were tucking. That is work hardening. Every bend rearranges the metal grain, and enough bends in one spot makes it brittle. Bending the same place three times leaves the wire sound. Five times does not. If a spot has been worked that hard, cut a fresh piece rather than nursing it.
The binding coils slide. They were wound loose, or the tail was wound toward the band stack instead of away from it. Winding away from the stack lets each turn seat against the last one.
The ring turns a finger green. Bare copper or brass. Harmless, and it comes off with soap, but coated wire prevents it.
You ran out of wire anyway. Check which circumference you used. The mandrel diameter alone, without the wire thickness added, shorts you 2.55 mm per band, which is 10 mm over a three-band ring plus binding. That is the gap that shows up at the last coil.
Making a set for craft night
Six people making two rings each is twelve rings. At 11.5 inches apiece, cutting for the largest size across the table, that is 138 inches, so a ten yard spool covers it with 222 inches spare.
Cut every length before anyone arrives, and straighten them while you are at it. Cutting and straightening is the slow, fiddly part and it is no more work for twelve than for two. Set the pieces out in a fan and each guest spends their ten minutes on the winding and tucking, which is the part worth doing together.
Put out one mandrel per two people and a ring sizer at each end of the table. Sizing is the only step that needs a shared tool and the only one that stalls when there is one to pass around.
Get the free wire length card
The arithmetic in this post fits on one page, so it is on one page. The free Wire Length and Ring Size Card gives you the cut table for six sizes across five gauges, the band-width chart with the 6 mm line marked, the gauge guide, and the five-step wrapping sequence in order. Print it, tape it inside your craft cupboard, and stop doing the multiplication.
Grab it below and it lands in your inbox in a couple of minutes. Then go cut ten inches.
Keep the ten-minute craft nights coming
If quick wins like this one are your speed, the printable Craft Night Kit Planner from the craft table lays out the supplies, timing, and shopping list for a whole month of ten-minute craft nights — print it once, plan four cozy nights. It’s $7 in the Crafting With Donna shop.