10-Minute Stretch Bracelets: The Divide-by-Eight Rule That Beats “Add an Inch”
A stretch bracelet is the shortest route there is from a bag of beads to a finished gift. No clasp to fiddle with, no crimping, no findings. String, knot, done, and it fits a wrist you never had to measure in front of the person you are making it for.
Which is why the first failure is so deflating. We measured a wrist at six and a half inches, strung six and a half inches of 8 mm beads, tied it off, and could not get it over a hand. So we made a second one, slower, checking each step. That one was tight too. When the same mistake happens twice in a row, it is not carelessness, and it is not the cord.
It is that a ring of beads has two different circumferences, and we had measured the wrong one. Below is which one matters, the number that fixes it, and why the advice you have already read – add an inch to your wrist – is exactly right for the beads most people start with and wrong for every other size.
What we are making
One beaded stretch bracelet, sized properly the first time, on elastic cord with a knot that will not creep open. Any round bead from 4 mm up to the chunky 14 mm ones works, and the bead size you choose changes exactly one number, which is the whole point of this article.
Hands-on it runs about eight minutes. There is one thing about it that is not eight minutes, and we will get to that honestly rather than bury it at the bottom.
Why yours came out too tight
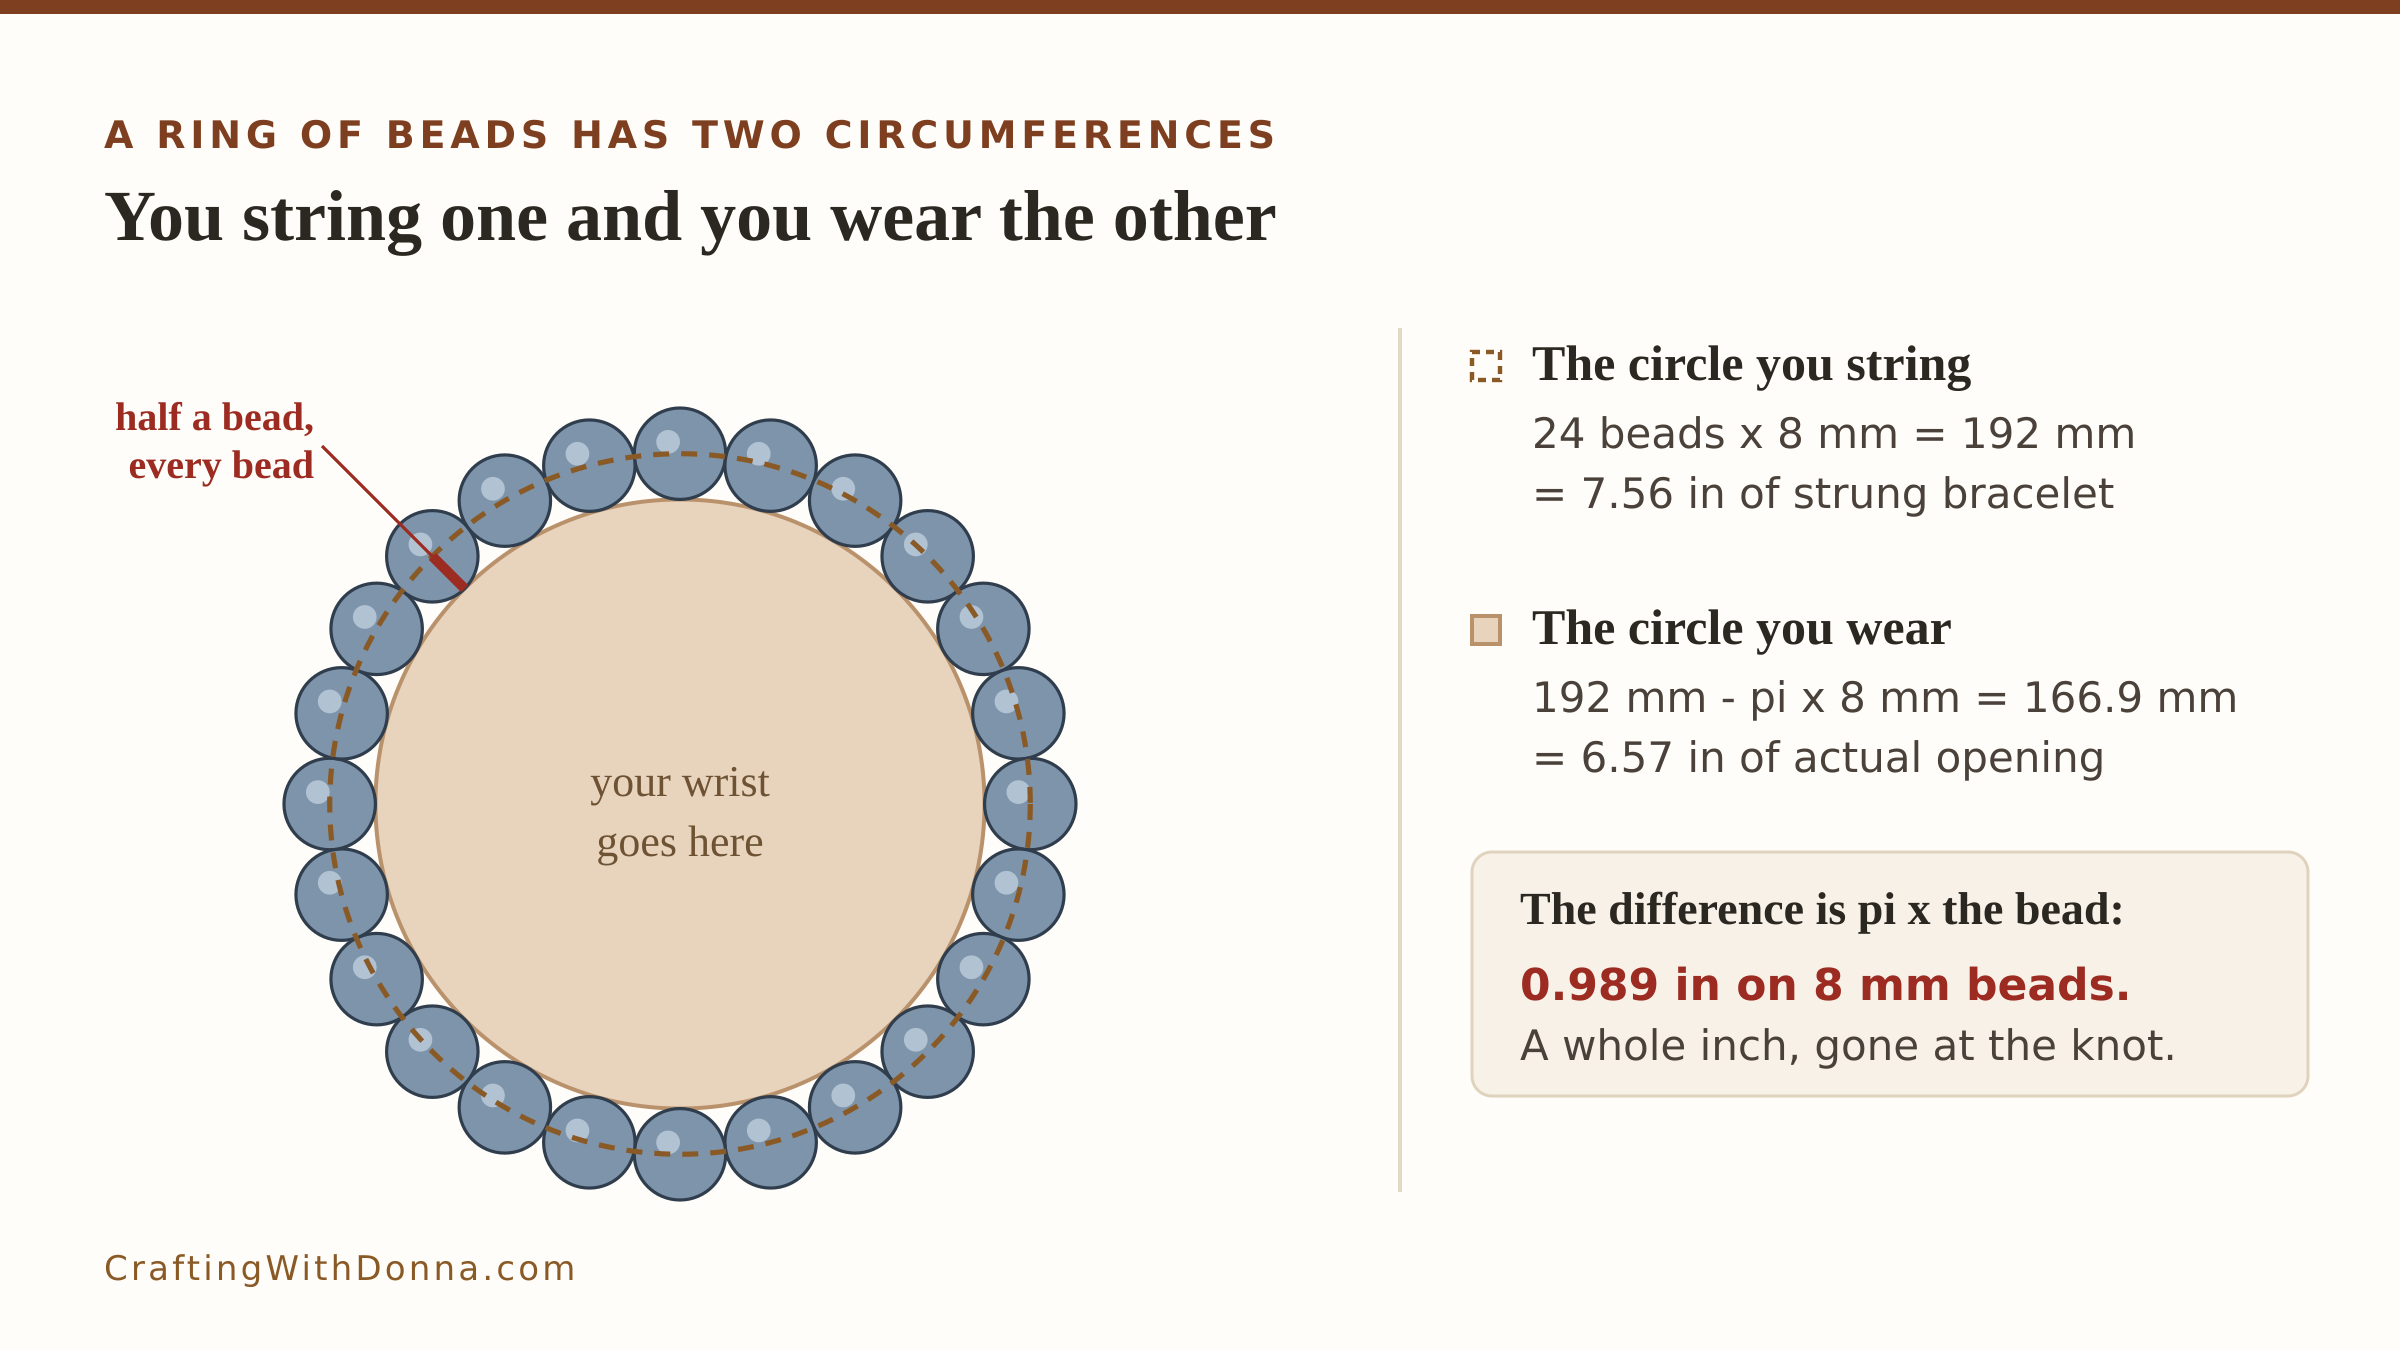
Look at where the elastic actually goes. It runs through the hole, which means it runs through the middle of every single bead. So when you pull the bracelet snug and measure it, the length you are measuring is the circle that passes through the bead centres.
Your wrist does not go through the bead centres. Your wrist goes through the opening in the middle, and every bead sticks half of itself into that opening, all the way around the ring.
That is the whole problem in one sentence. The circle you string is bigger than the hole you wear.
How much bigger is not a mystery, and it is not a fudge factor either. If every bead pokes half its thickness inward, the opening’s radius is smaller by half a bead. Multiply a radius by two times pi to get back to a circumference, and the opening comes out shorter than the strung length by pi times the bead thickness. Every time. On any wrist.
On 8 mm beads, pi times 8 mm is 25.13 mm. That is 0.989 inches. A whole inch of fit, gone the moment you tie the knot, on a bracelet you measured right.
So that is where “add an inch” comes from
The advice that circulates everywhere – measure your wrist, add an inch – is not a rough rule that happens to work out. It is exact arithmetic, and it holds at one bead size only.
Ask which bead makes pi times its thickness come to exactly one inch. Divide 25.4 mm by pi and the answer is 8.085 mm. That is the 8 mm round bead: the most-sold size on the whole rack, the one in every starter kit, the one almost everybody learns on.
So a generation of beaders learned a rule that is correct to within one percent for the beads in front of them, and has no idea it is a bead-size rule at all. It works, so nobody questions it. Then they buy a strand of chunky 12 mm rounds, add their inch, and the bracelet grips.
For 12 mm beads, pi times 12 mm is 37.70 mm, or 1.484 inches. Adding one inch leaves you 0.484 inches short, close to half an inch of missing bracelet. That is not a subtle difference you might get away with. That is a whole extra bead you never strung.
You will also find a second piece of advice out there, aimed at chunky beads: measure the bead hole to hole, multiply by three, add that to your length. That one is closer, because it is the same rule with pi rounded down to 3. Rounding pi down costs you 0.14 of a bead every time, which is 1.13 mm on 8 mm beads and 1.98 mm on 14 mm ones. Small – but always short, never long. It is the right idea filed down.
The divide-by-eight rule
You do not need pi and you do not need a calculator, because of a coincidence that works in your favour if you measure in inches.
Pi millimetres per millimetre of bead, converted to inches, is 0.1237. One eighth is 0.125. Those two numbers are 1.06 percent apart.
One rule, and it is the only thing here worth memorising:
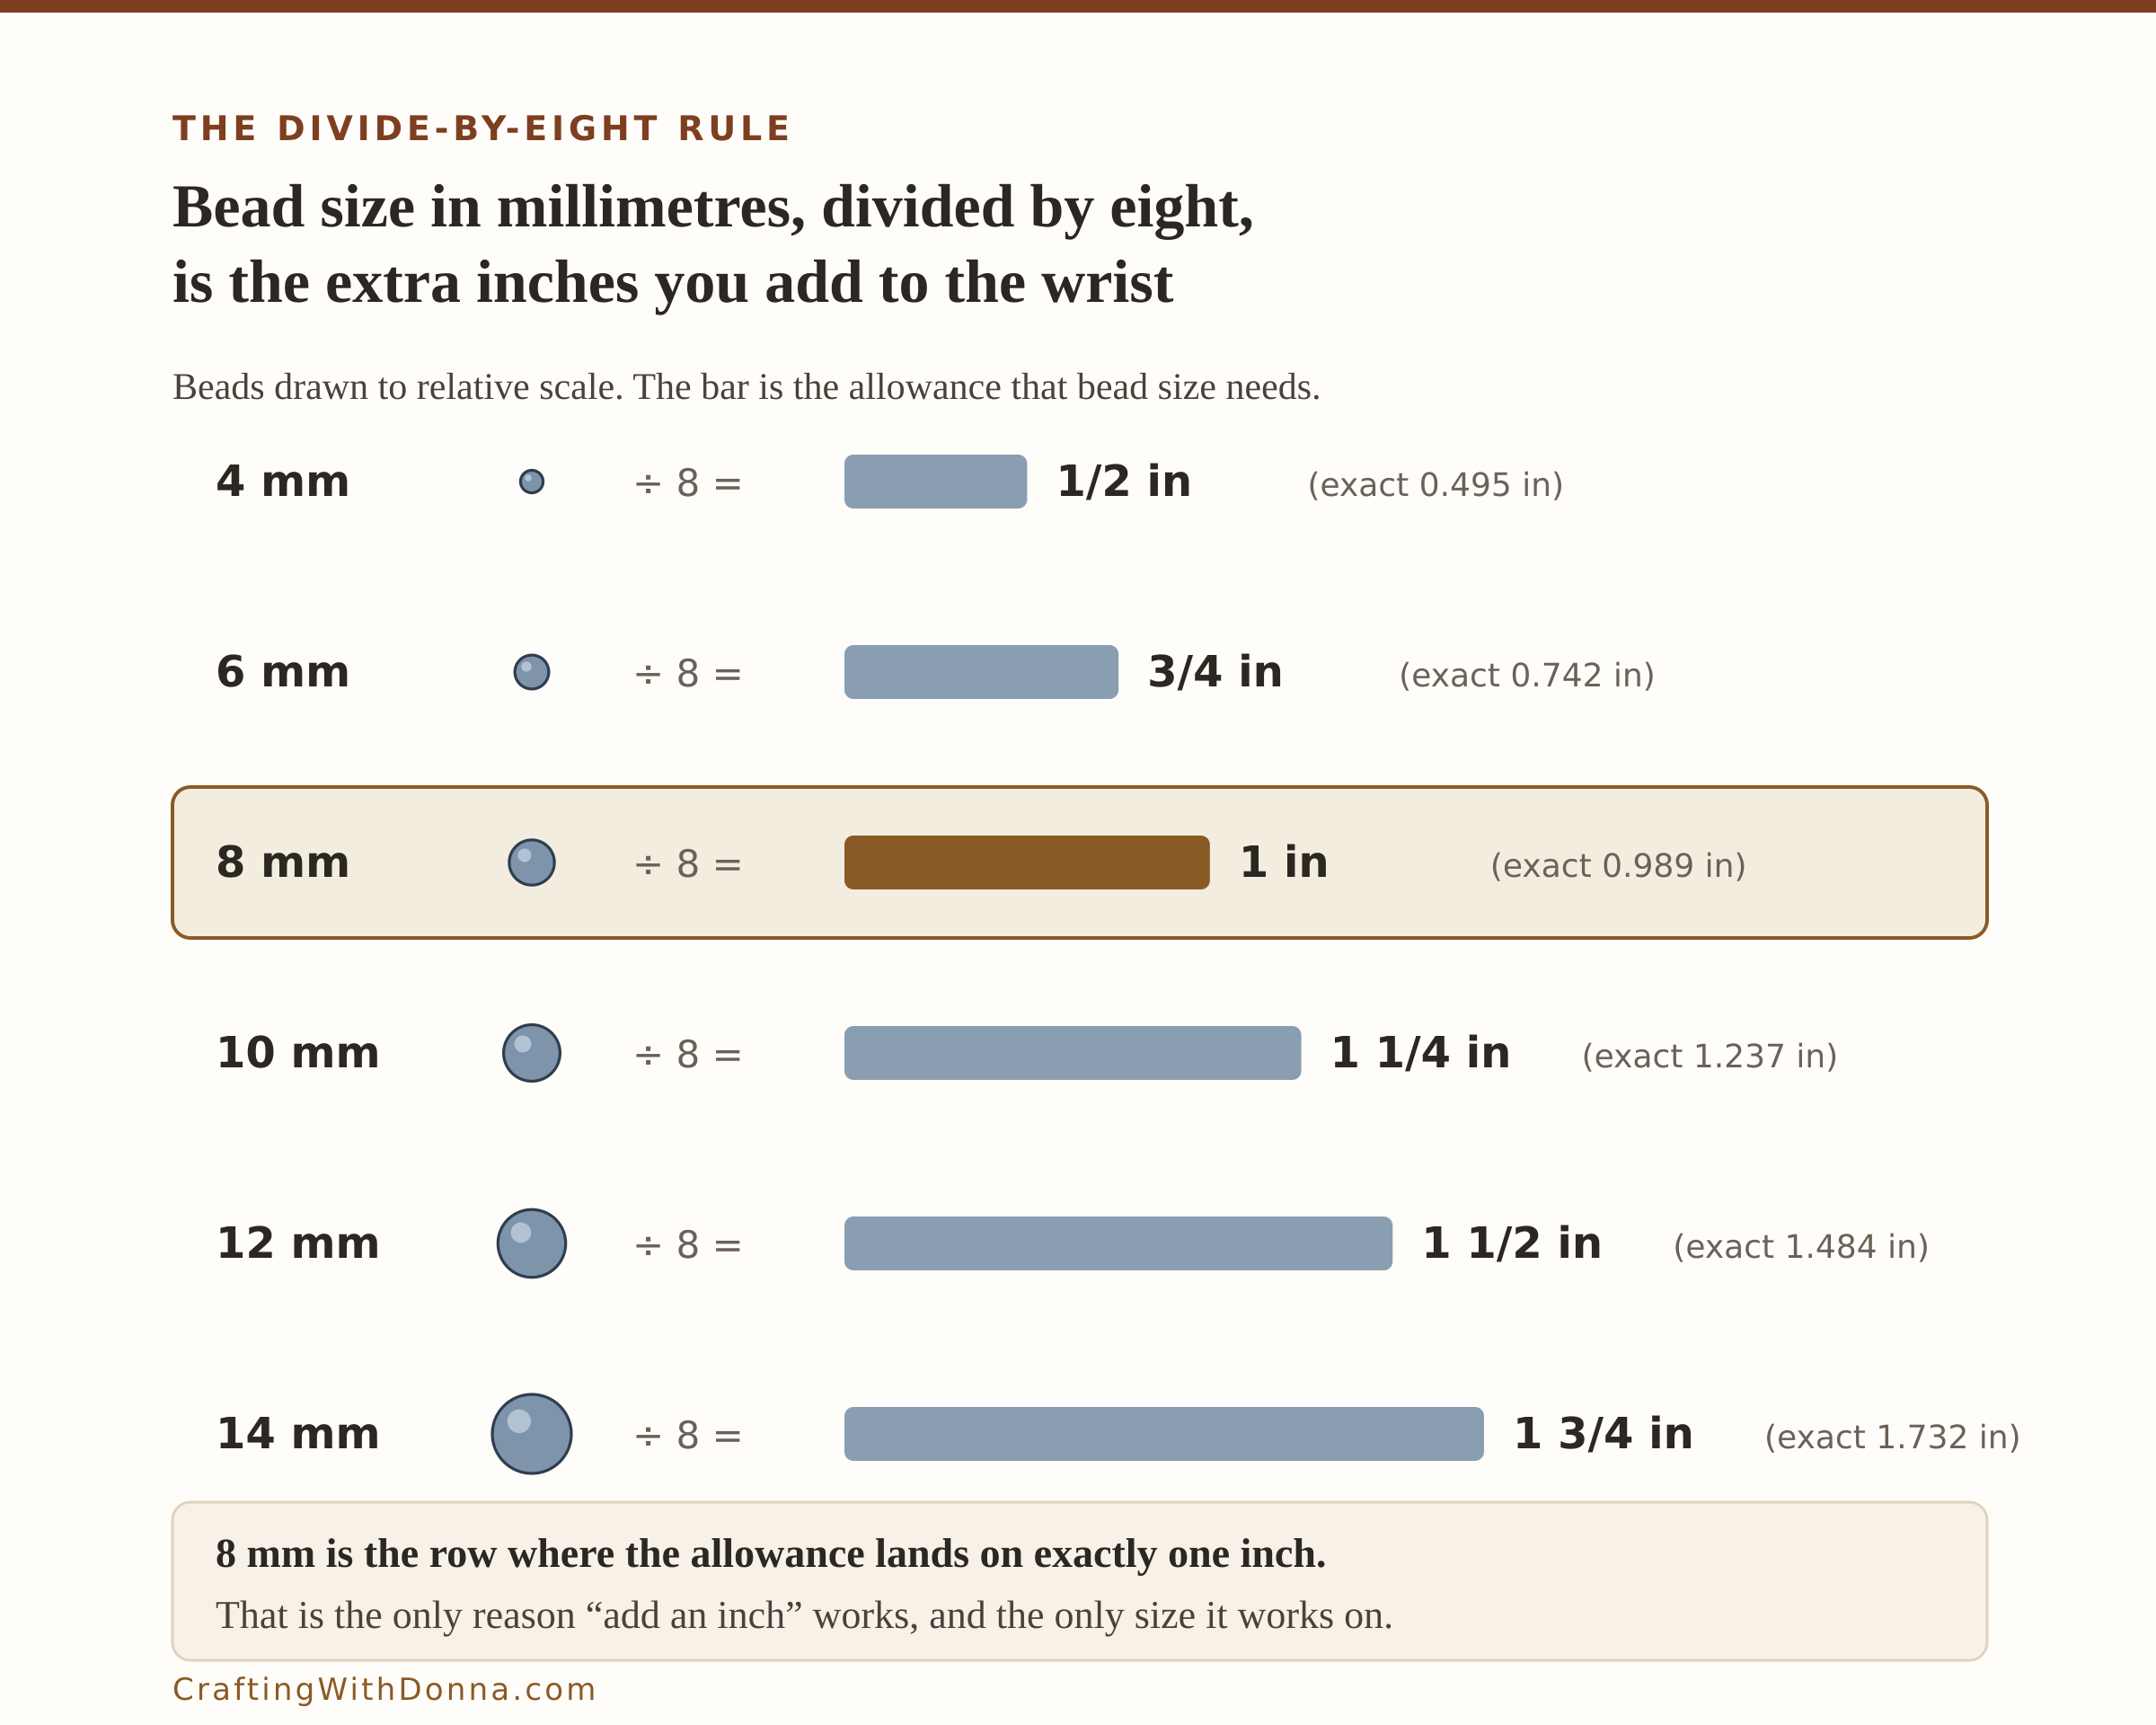
Take your bead size in millimetres. Divide it by eight. That is how many extra inches you add to your wrist measurement.
- 4 mm beads: add 1/2 inch
- 6 mm beads: add 3/4 inch
- 8 mm beads: add 1 inch
- 10 mm beads: add 1 1/4 inches
- 12 mm beads: add 1 1/2 inches
- 14 mm beads: add 1 3/4 inches
Every one of those is a fraction you can eyeball on a tape measure, and across that whole range the rule never differs from the exact pi figure by more than half a millimetre. When it does differ it runs long rather than short, which is the direction you want to be wrong in – a stretch bracelet a whisker roomy still wears well, and one a whisker tight does not wear at all.
Notice what the rule says about “add an inch”: it is divide-by-eight for 8 mm beads. It was never wrong. It was only ever a rule about one bead size.
Counting beads instead of measuring
If you would rather count than measure, there is an easier version of the same fact, and it has a property worth pausing on: it does not depend on your bead size at all.
Lay beads along your wrist measurement until they span it. Then add three more, and a bit.
The exact figure is pi beads – about 3.14 – and it is pi whatever size beads you are using, because the bead size cancels out. Four millimetre seed beads or fourteen millimetre chunks, the answer is the same: a little over three extra beads. Since you cannot string 0.14 of a bead, round your count up, which lands you between three and four extra. That is why a bracelet that is one bead short feels tight and one bead over feels fine.
Sizing it, start to finish
Four steps, and only the second one is new.
- Measure the wrist right where the bracelet will sit, with a flexible tape or a strip of paper you mark and then hold against a ruler. Snug, not tight, and not over a watch.
- Measure the bead along the hole. This matters and we will come back to it. For a round bead that is the diameter.
- Add bead millimetres divided by eight, in inches. That total is your strung length.
- Divide the strung length by the bead size to get your count, and round up.
A worked example, because it makes the arithmetic obvious. A 6.5 inch wrist, 8 mm beads. Eight divided by eight is one, so add one inch: the strung length is 7.5 inches. That is 190.5 mm, and at 8 mm a bead, 190.5 divided by 8 is 23.8, so round up to 24 beads. Twenty-four beads makes 192 mm of bracelet, and the opening you actually wear comes out at 6.57 inches. Which is the wrist, with a hair to spare.
We ran that same calculation across every wrist from 5.5 to 8 inches and every bead from 4 to 14 mm, then checked the results against the published sizing charts that bead shops hand out. At a 6.5 inch wrist in 8 mm beads it gives 7.56 inches, and the charts say 7.25 to 7.75. At a 7 inch wrist in 10 mm it gives 8.27 against a charted 8 to 8.5. At a 6 inch wrist in 6 mm it gives 6.85 against 6 5/8 to 7. It agrees with the charts everywhere the charts go – and then it keeps working at 12 and 14 mm, which is exactly where most charts stop.
The trap that catches people twice
Say you make a 6.5 inch wrist a bracelet in 6 mm beads. Thirty-one beads, 7.32 inches strung, and it fits. So next month you make the same person the same bracelet in 10 mm beads for a chunkier look, and you string it to the same 7.32 inches.
It will fit a 5.89 inch wrist. You have made a bracelet 15.6 mm too tight for the person you made it for, and you did it by being consistent.
Bigger beads eat more of the opening, so the same wrist needs a longer bracelet in chunkier beads – 14 mm longer, in that example. The strung length is not a property of the wrist. It is a property of the wrist and the bead.
There is a pleasing symmetry hiding in this, if you like that sort of thing. The opening you wear is pi times a bead shorter than the strung length, and the outside of the bracelet is pi times a bead longer than it. So the length you string is exactly halfway between the inside and the outside. The inch you lose on the inside is the inch you see on the outside.
Where the rule needs care: rondelles and discs
Everything above says “bead thickness”, not “bead size”, and that is deliberate.
Round beads are easy, because the thickness along the hole and the width across the face are the same number. Rondelles, discs, heishi and squashed nuggets are not. A rondelle sold as “8 by 5 mm” is 8 mm across its face and 5 mm along its hole – and it is the 5 mm that governs, because that is the spacing the cord sees.
Size that rondelle off the 8 mm face and you over-allow by pi times 3 mm, which is 9.42 mm. More than a third of an inch of slack you did not ask for, and a bracelet that slides down over the hand.
So: measure the dimension the hole runs through. On a mixed-shape bracelet, measure each type and add them up rather than averaging – the total strung length is what matters, and the pi allowance is set by the average bead, so err toward the chunkiest ones.
Stringing it, and the knot
Cut your cord about four inches longer than the bracelet at each end, so about sixteen inches for a typical wrist in 8 mm beads. That leaves enough tail to hold on to and to tie with. A five metre spool will make a dozen bracelets at that rate.
Then, in order:
- Pre-stretch the cord. Hold both ends and give it a few hard pulls before a single bead goes on. New elastic has slack in it that will otherwise come out later, on someone’s wrist, as a bracelet that has gone baggy.
- String your count on a bead mat so nothing rolls off the table.
- Tie a surgeon’s knot, then a second one on top. A surgeon’s knot is a square knot with the first pass wrapped twice instead of once. That extra wrap is what stops the knot slipping open while you are still tightening it, and it is the knot every experienced beader lands on.
- Glue the knot with a dot of jeweller’s cement worked right into the knot itself, not smeared over the beads.
- Hide it. Ease the knot into the hole of one bead if the hole is generous, or cover it with a crimp cover. Do not try to thread the doubled cord back through a neighbouring bead – 0.7 mm cord passes a 1 mm hole on its own, but doubled it is 1.4 mm and it will not go. That is why beaders hide knots rather than weave them in.
- Trim the tails close once the glue has set enough to hold.
The part that is not ten minutes
Adding it up honestly: measuring 30 seconds, reading off the count 20, pre-stretching 20, stringing 3 1/2 minutes, two knots 90 seconds, glue 30, burying and trimming a minute. That is 460 seconds – seven minutes and forty seconds of hands-on work, and it is a genuine eight-minute craft.
But the glue needs to cure before the bracelet is worn, and that is not eight minutes. Give it twelve hours. Every beader who ties elastic for a living says the same thing, and the reason is that stretch cord under tension will pull a soft knot apart when the wearer’s hand goes through it. Make these the evening before you need them, not on the way out of the door.
So: eight minutes of making, and a night of leaving it alone. That is the honest version, and it is still the fastest handmade gift we know.
What you need
Some of the links below are affiliate links. If you buy through one, Crafting With Donna may earn a small commission at no extra cost to you.
- 8 mm round bead strands. Start here if you are starting anywhere. Eight millimetre is the size the whole hobby is calibrated around, it is the size the one-inch rule fits, and a strand is usually about 15 inches, which is a shade under two bracelets.
- 0.7 mm stretch cord. Thick enough to trust and thin enough for a standard 1 mm bead hole. Thinner cord is easier to thread and snaps sooner, which is a bad trade on something you are giving away.
- A bead mat or design board. Beads roll. A board with channels also lets you lay your count out and read the length against its printed ruler before you commit.
- A flexible tape measure. The soft sewing kind, not a steel one. This is the whole first step and it costs a couple of dollars.
- Jeweller’s cement with a needle applicator. The needle is the point – it puts glue inside the knot instead of on the beads, where it dries shiny and shows.
- Crimp covers. The tidy answer to a knot that will not fit inside a bead. They close over it and read as a deliberate metal accent.
- Small flush cutters. Scissors leave a tail that pokes. Flush cutters get you level with the knot.
You do not need callipers to measure a bead. The printable below has a bead gauge printed at actual size – lay your bead on the page and read its size off.
Get the sizing card
We put the whole thing on one printable page: the wrist-by-bead chart from 5.5 to 8 inches and 4 to 14 mm, a bead gauge printed at actual size so you can identify a bead without a ruler, a cut-out wrist strip so you can measure without a tape measure at all, and the knot-and-cure checklist. Print it at one hundred percent – two of those things are drawn at true size and will lie to you at any other scale.
Get the free Stretch Bracelet Sizing Card, and we will send it straight to your inbox.
Make one for yourself first, in the bead size you actually own. Once you have felt the difference a properly sized bracelet makes going over your hand, you will never string to your wrist measurement again.
Keep the ten-minute craft nights coming
If quick wins like this one are your speed, the printable Craft Night Kit Planner from the craft table lays out the supplies, timing, and shopping list for a whole month of ten-minute craft nights — print it once, plan four cozy nights. It’s $7 in the Crafting With Donna shop.