10-Minute Decoupaged Tin Can Desk Cups: The Paper Grain Rule
A decoupaged tin can is a ten inch strip of paper, a coat of glue, and about ten minutes at the kitchen table. The first one we made came out of the afternoon covered in blisters. Not creases from a clumsy hand, but a row of raised ridges that ran from top to bottom of the can and would not press flat, no matter how hard we rolled them. We blamed the brush. We bought a brayer. We saved bubble wrap the way the tutorials say to. The blisters kept coming.
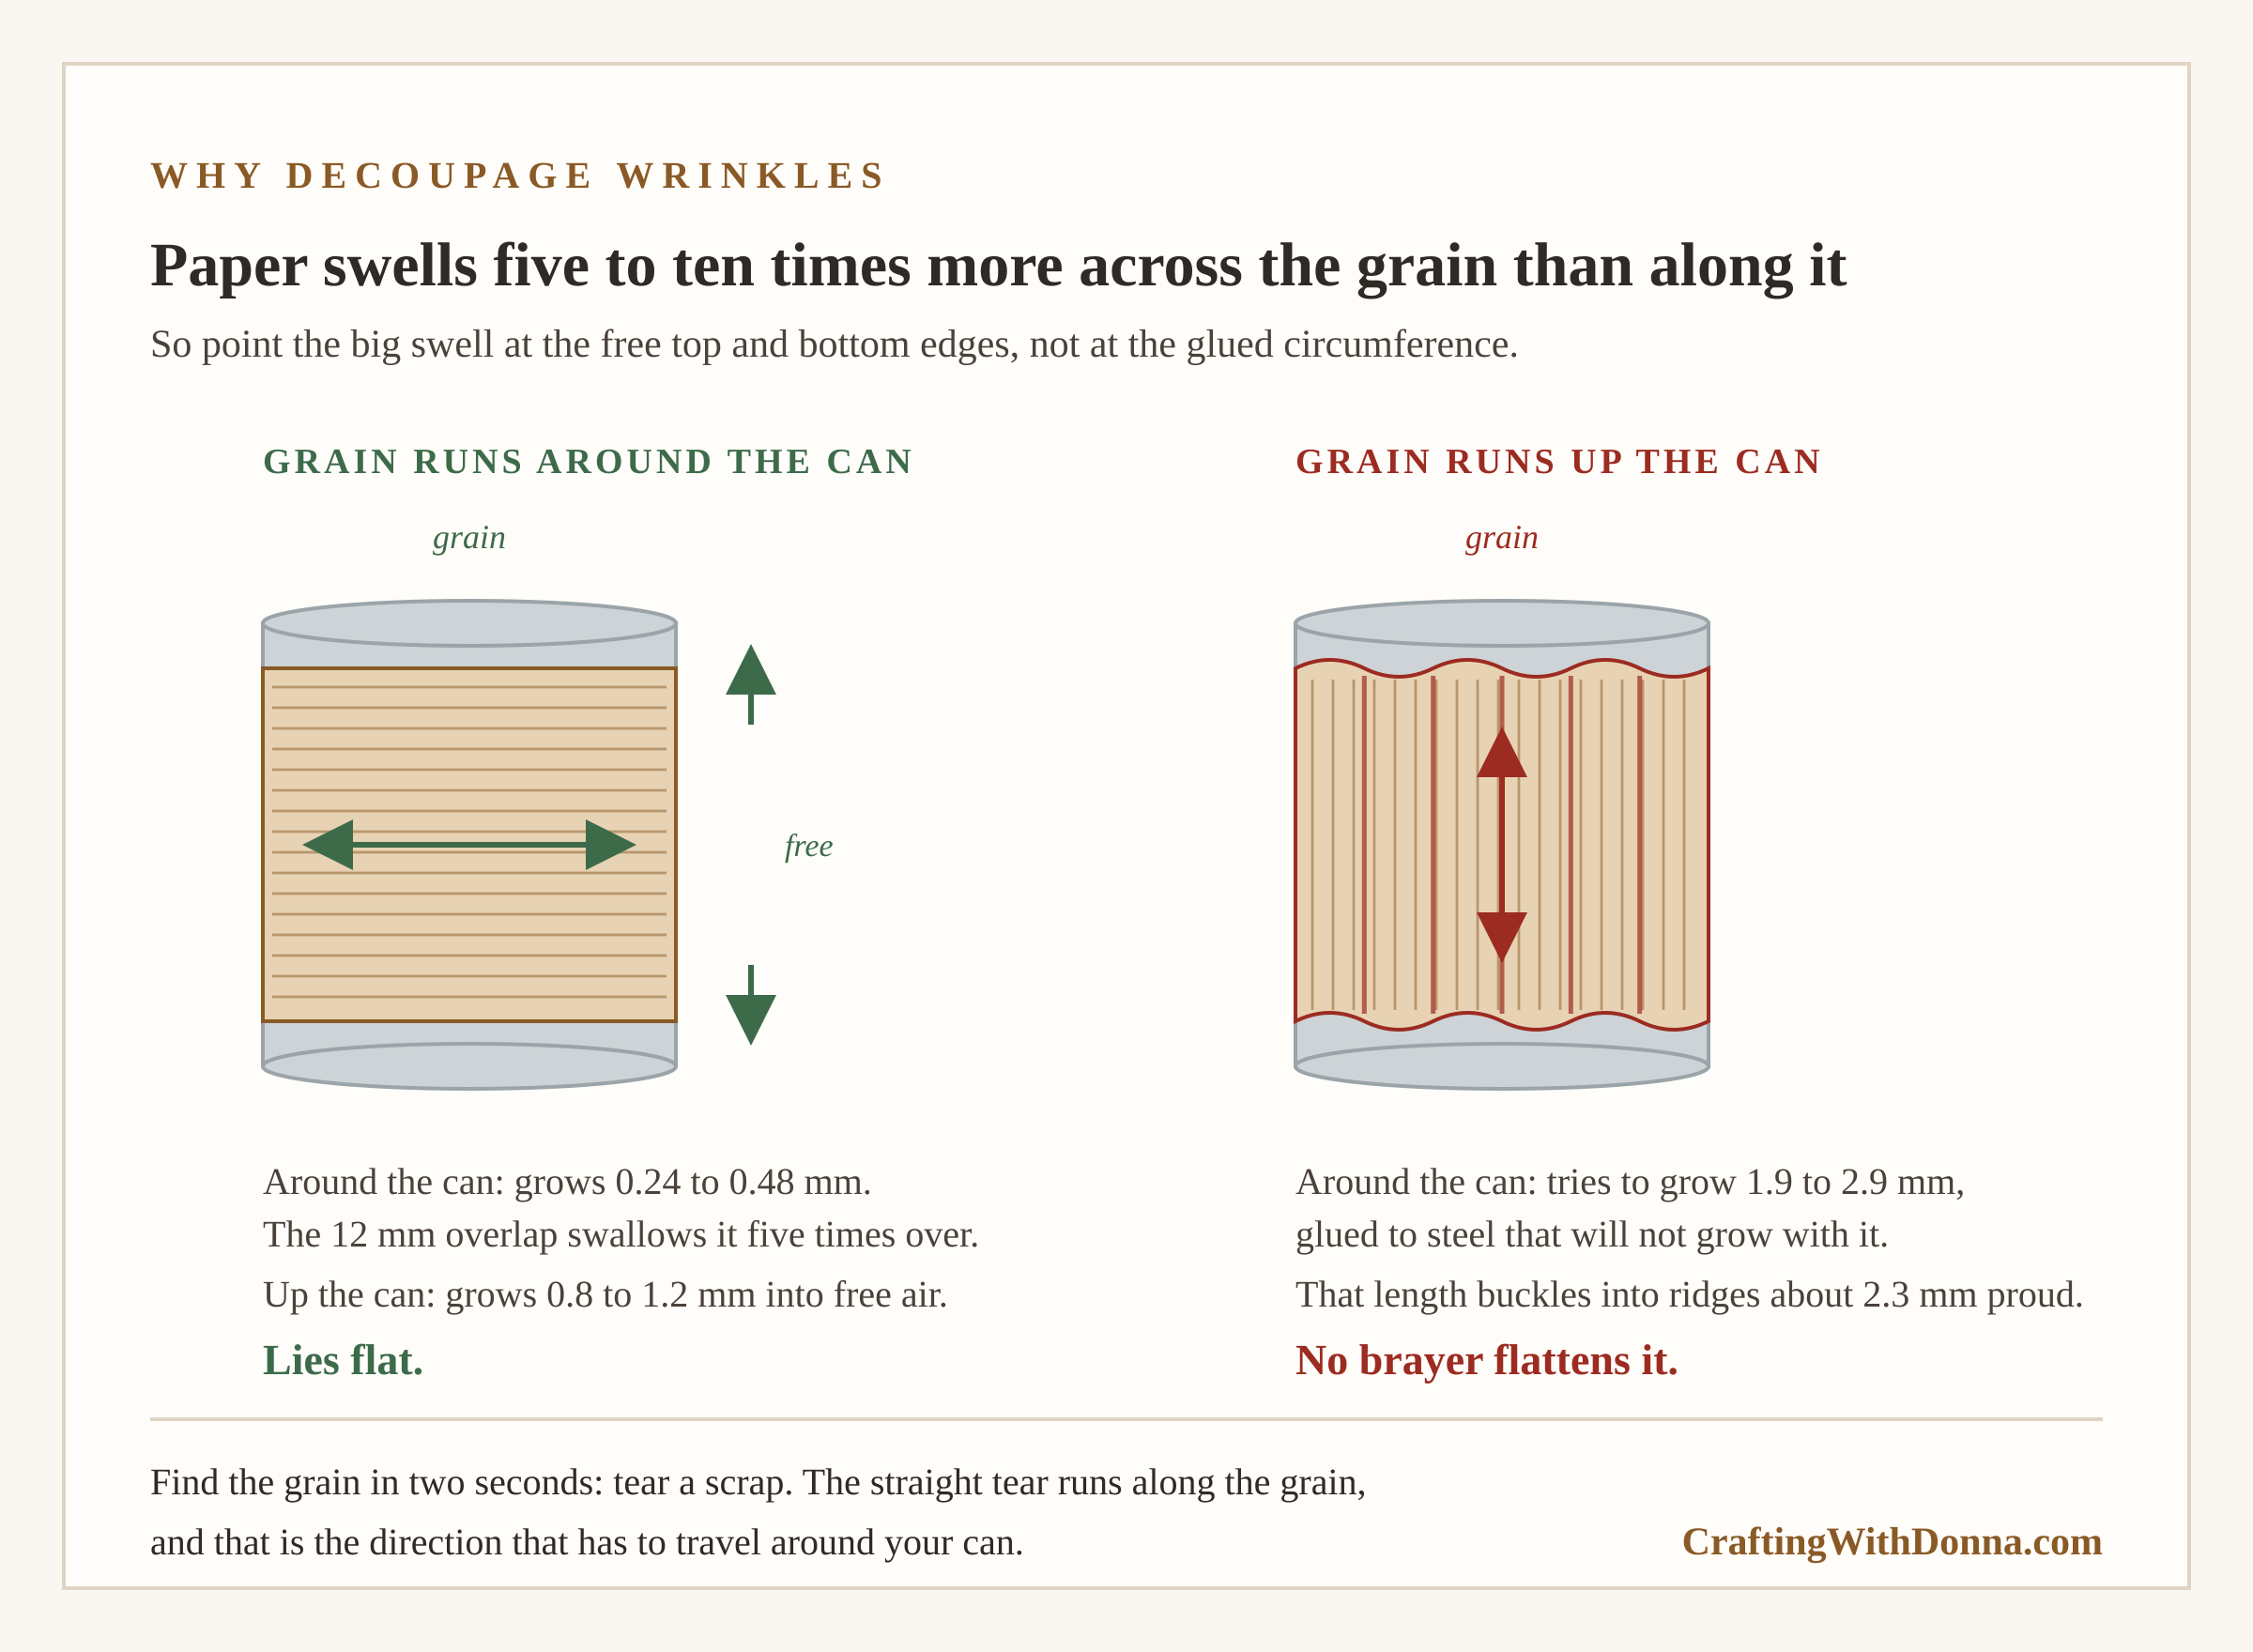
They were not a technique problem. Paper has a direction, and we were cutting it the wrong way. A sheet of cardstock swells when glue wets it, and it swells several times more across its grain than along it. Cut a can wrap so the grain runs up the can, and about two and a half millimetres of extra length has to fit into a circumference that cannot grow. That length has nowhere to go, so it lifts off the tin and stands there, two or three millimetres proud, for as long as the can exists.
Turn the strip ninety degrees before you cut and the swelling points at the top and bottom edges instead, where nothing is holding it. That is the whole fix. Below is where it comes from, the tear test that tells you the grain in two seconds, and the one measurement that stops the seam drying open with a stripe of bare tin showing.
What we are making
A straight sided food can, cleaned, wrapped in one strip of scrapbook cardstock, sealed, and finished with felt pads on the base so it does not scratch a desk. No cutting tools beyond scissors or a rotary cutter. No sanding, no priming, no spray booth.
Hands-on time runs about ten minutes per can once you have done one, plus an hour of drying you do not have to watch. A 12 by 12 sheet of cardstock costs under a dollar and yields two wraps for a standard bean can, so a set of six cups comes to about four dollars of paper and whatever the beans cost you in the first place.
Cans suit this better than jars or boxes for one reason. The surface is a true cylinder with no taper, so a rectangle of paper wraps it with no gaps and no darts. A tapered flower pot needs a curved strip cut from a template. A can needs a rectangle you can measure with arithmetic and cut six of at once.
The measurement that closes the seam
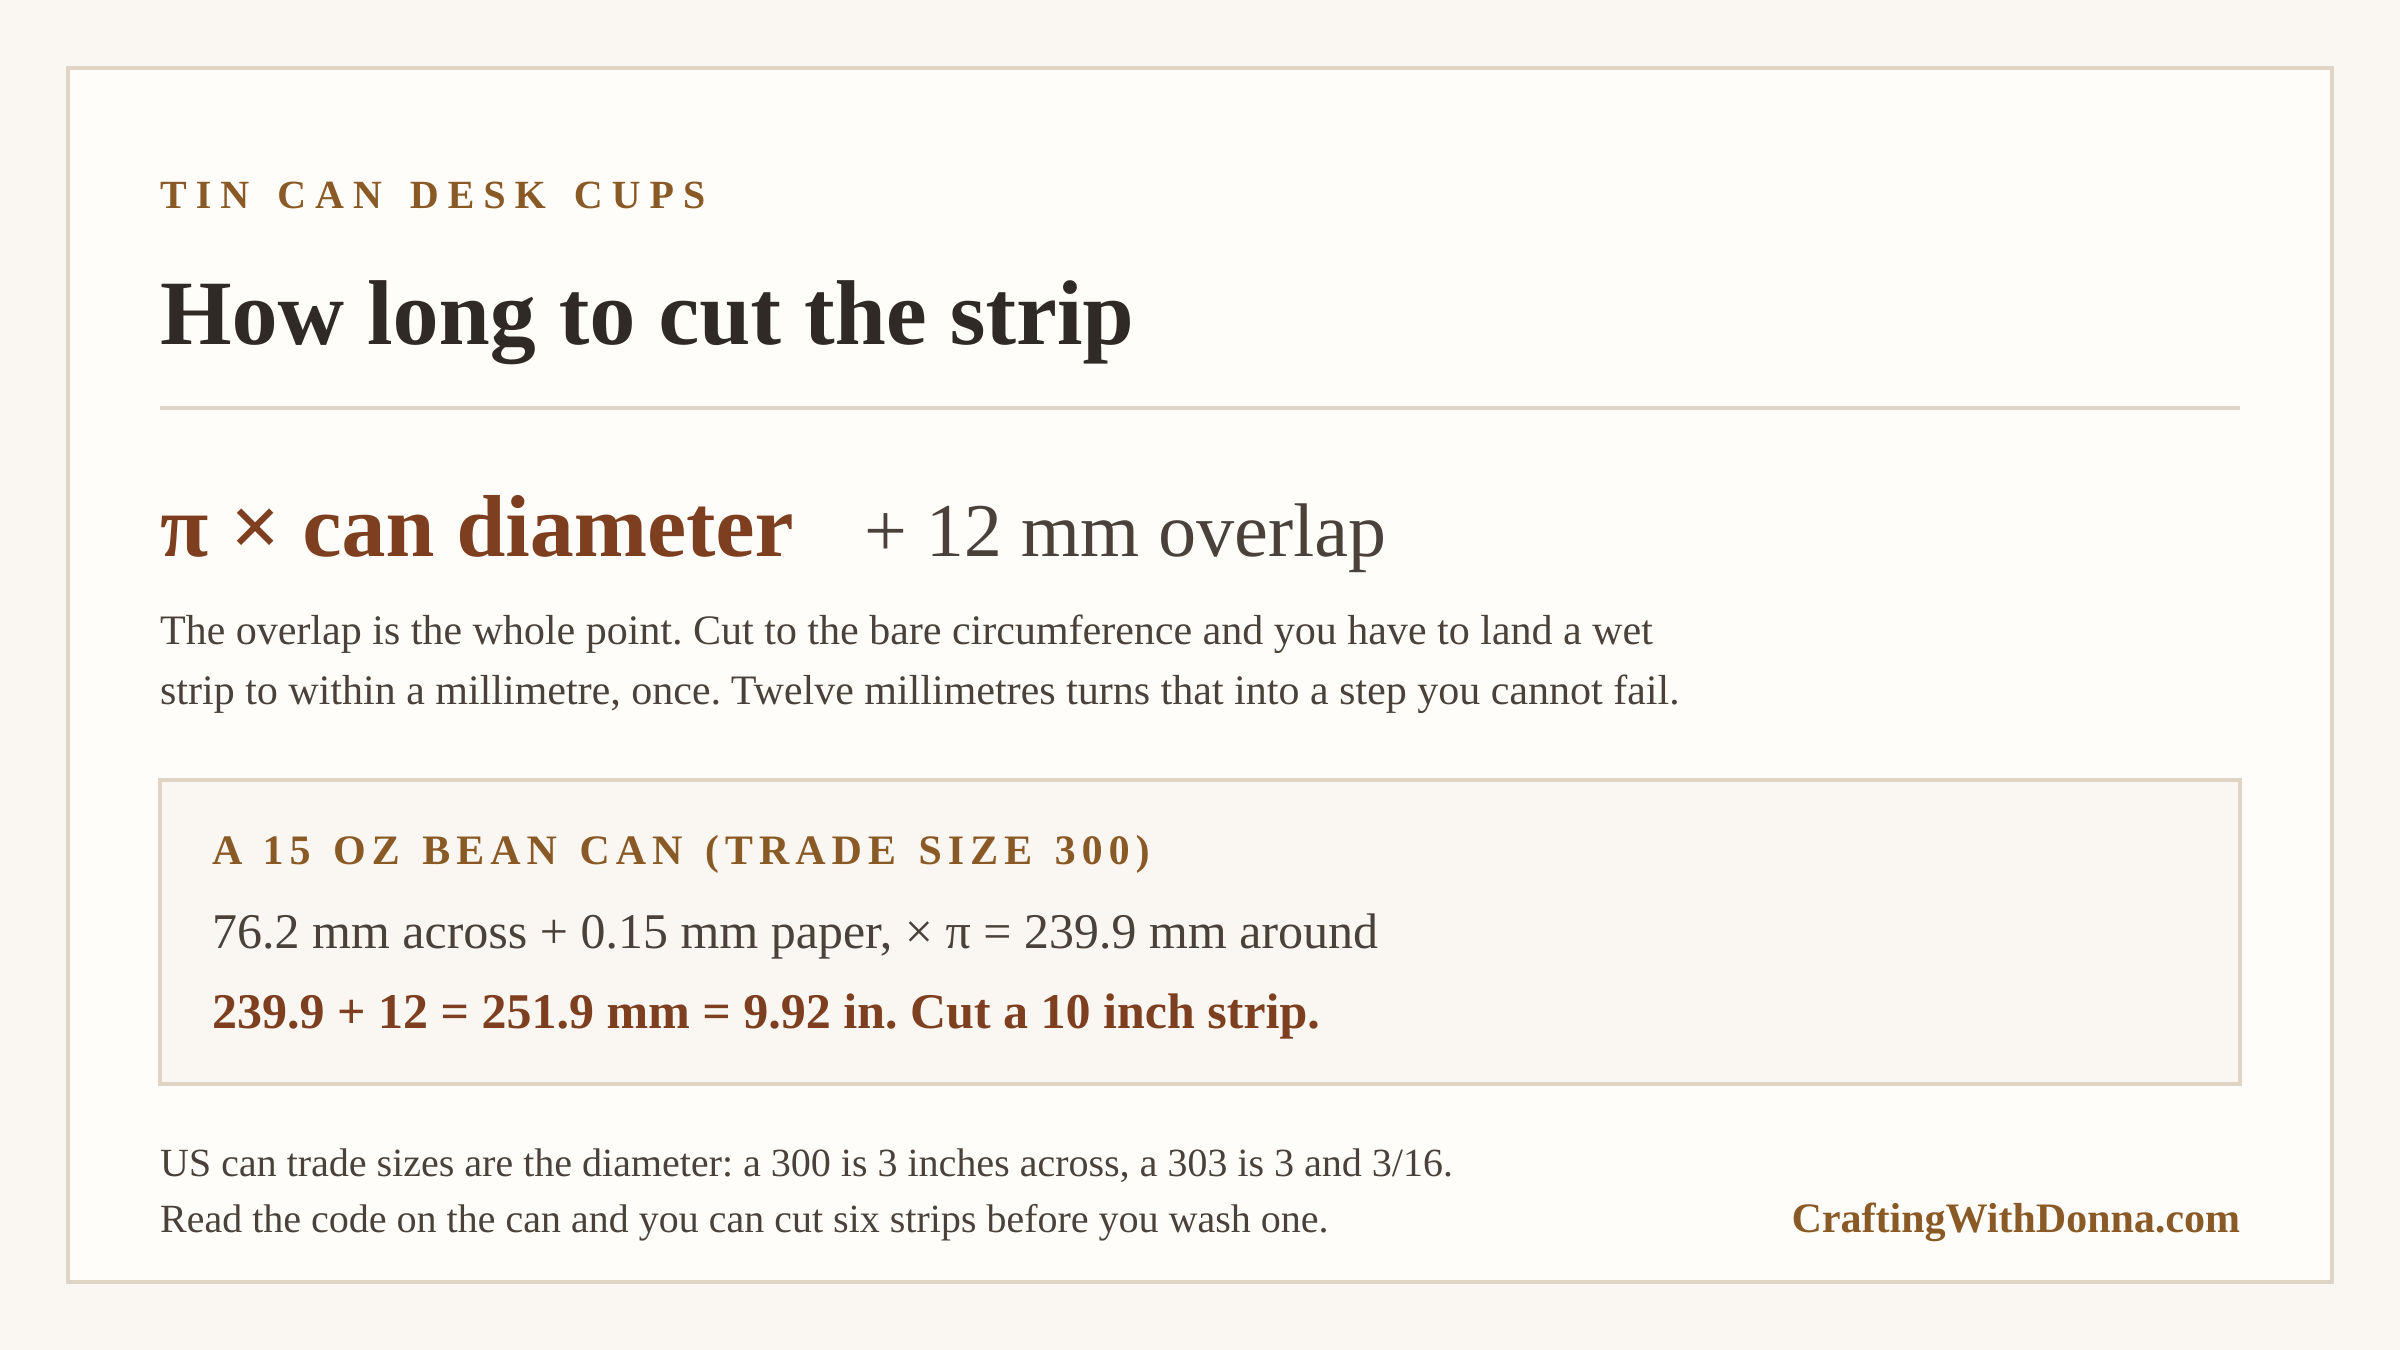
Cut your strip to pi times the can’s diameter, then add twelve millimetres for the overlap.
The first part is the circumference and nobody argues with it. The twelve millimetres is where beginners lose the seam. Wrap a tape measure round the can, cut to exactly that number, and you have left yourself no room at all. You then have to land a wet, slippery strip on a curved surface to within a millimetre, once, with glue already grabbing. Miss by two millimetres and the can dries with a stripe of bare tin down one side.
Twelve millimetres of overlap turns that into a step you cannot fail. You lay the leading edge down wherever you like, roll the can along, and the tail arrives on top of the start with room to spare. The seam becomes a deliberate double thickness instead of a race.
Paper thickness is in the formula too, since the strip wraps around the outside of the can rather than through it. The middle of a sheet of cardstock travels a circle one paper thickness wider than the tin. At 0.15 mm that adds pi times 0.15, or 0.47 mm, to the cut length. It is worth naming so you know it has been counted rather than forgotten. It is also small enough that the overlap swallows it whole, which is not true of every craft. Wrap wire round a ring mandrel and the same thickness term is the difference between a ring that closes and one that runs out of wire.
Cut lengths for the cans in your cupboard
US can sizes are a code, and the code is the diameter. A 303 can measures three and three sixteenths of an inch across. A 300 measures three inches. Read the number and you know the size without measuring, which is how you cut six strips before you have washed a single can.
- 211, condensed soup, 10.75 oz. Diameter 68.3 mm, wrap 214.9 mm. Cut 9 inches.
- 300, beans, 14 to 15 oz. Diameter 76.2 mm, wrap 239.9 mm. Cut 10 inches.
- 303, vegetables, 15 to 16 oz. Diameter 81.0 mm, wrap 254.8 mm. Cut 10 and 5/8 inches.
- 307, tomatoes, 14.5 to 20 oz. Diameter 87.3 mm, wrap 274.8 mm. Cut 11 and 3/8 inches.
- 404, large fruit, 29 oz. Diameter 107.9 mm, wrap 339.6 mm. Cut 13 and 7/8 inches.
- 603, the #10 catering tin. Diameter 157.2 mm, wrap 494.2 mm. Cut 20 inches.
Every figure above rounds up to the next eighth of an inch on purpose. Surplus disappears into the overlap and costs you nothing. A shortfall opens the seam and costs you the can.
Check your own tins before you trust the table, because manufacturers narrow the body of a can to save steel and the trade size is nominal. Hold a ruler across the widest part of the straight side. If it reads within a millimetre of the table, cut from the table.
For height, measure the can and take off six millimetres, three at each end. That keeps the cut edge of the paper off the rolled rim at the top and the seamed bead at the bottom. Paper laid over either one bridges a curve instead of sticking to a flat, and a bridged edge lifts within a week.
Why the wrinkles are a cutting problem
Search for decoupage wrinkles and you will find dozens of videos, four of the seven we watched with the word in the title. Every one of them answers with something you do after the glue is on. Use a brayer. Squeegee with an old gift card. Roll it with saved bubble wrap. Lay parchment over it and press. Spritz the paper with water first.
Those work on napkins, and napkins are what those videos are mostly about. A napkin has almost no grain and no stiffness, so it will go where you push it. Cardstock will not. It is stiff enough to resist your brayer and grainy enough to grow in one direction and not the other, so on cardstock the fix has to happen before you cut.
Here is the mechanism. Paper is a mat of wood fibres, and machines lay those fibres down mostly pointing one way. When water reaches a fibre it swells in diameter far more than it grows in length. Fibres pointing along the sheet make the sheet a fraction longer. Fibres lying across it make the sheet noticeably wider. Wet a sheet of cardstock with a water-based glue and it grows roughly a tenth to two tenths of a percent along the grain, and roughly a full percent across it. Call it five to ten times the movement in one direction.
Now put those numbers on a bean can. The wrap is 240 mm around and about 100 mm tall.
Cut with the grain running around the can, and the circumference grows a quarter to half a millimetre. Your twelve millimetre overlap covers that five times over and you never see it. The height grows 0.8 to 1.2 mm, and the top and bottom edges are free, so the paper gets a hair taller and lies flat.
Cut with the grain running up the can and you swap them. The height barely moves. The circumference tries to grow between 1.9 and 2.9 mm, glued to a steel cylinder that will not grow with it. Trapped length buckles out of plane. Spread across three or six blisters, that surplus stands 2.3 to 3.2 mm off the surface, which is exactly the defect people photograph and post about.
No brayer flattens that, because the paper is not lifted. It is too long for the distance it has to cover.
The two-second tear test
You do not need to know which mill made your paper. Tear a scrap.
Take an offcut, hold it in both hands, and tear it top to bottom. Then tear another in the other direction. One tear runs straight and clean, near enough to follow a line you did not draw. The other wanders and comes out ragged and feathered.
The straight tear runs along the grain. That is the direction that has to travel around your can.
Lay the sheet down so the straight tear runs left to right, cut your ten inch strip left to right, and the grain is where it needs to be. Write a small pencil arrow on the back of the sheet before you cut so you are not tearing a fresh scrap for every strip in a set of six.
A second check that costs nothing. Hold the sheet by one edge and let it flop, then turn it and do the same. It hangs stiffer along the grain and floppier across it. When the tear test is ambiguous, and on some smooth double sided cardstock it is, the flop test breaks the tie.
What you need
Disclosure: The product links in this supply list are paid affiliate links. Crafting With Donna may earn a commission at no extra cost to you.
- Matte decoupage medium. Matte over gloss for a desk cup, because gloss stays faintly tacky in a warm room and picks up fingerprints where hands grab it. Matte also hides the seam, which gloss lights up.
- A 1 inch flat glue brush. Wide enough to coat a ten inch strip in four passes. A narrow round brush lays the glue in stripes, and the thin lines dry before the thick ones, which pulls the paper.
- 12 by 12 scrapbook cardstock. The 12 inch sheet is the reason to buy this size. It covers every can up to a 404 in one piece with no join.
- A rotary cutter and self-healing mat. The grid on the mat is what makes a set of six match. Scissors work for one can and drift by a couple of millimetres over six.
- A small brayer. Still worth owning. It will not rescue a strip cut the wrong way, and it does seat a correctly cut one against the tin and push out trapped air at the seam.
- A fine sanding sponge. One pass round the rim knocks the burr off the cut edge of the tin. Do this before anything else touches the can.
- Clear matte acrylic sealer. Decoupage medium alone stays porous, so a mug parked against a cup leaves a ring. Two light coats of sealer make it wipeable.
- Self-adhesive felt pads. Three small ones on the base. A bare can rim scratches a wooden desk, and this is the step that turns a craft into a gift someone keeps.
Prepping the can
Open the can with a smooth-edge opener if you own one, the kind that cuts the side seam instead of the lid. It leaves no sharp edge at all. With an ordinary opener, run the sanding sponge round the inside of the rim four or five times, then run a folded paper towel round it. If the towel snags, keep sanding.
Wash in hot water with dish soap and dry it fully, including the inside. A can that feels dry can still hold water in the rim channel, and it will weep out onto your paper an hour later.
Peel the label. If the glue leaves a gummy band, a little cooking oil on a paper towel lifts it in about a minute. Wash the oil off afterwards or your decoupage medium will slide instead of stick.
Leave the tin bare. Cardstock is opaque, and a coat of primer under an opaque wrap buys you an extra hour of drying for nothing. Primer earns its place under thin paper or napkins, where the label print would ghost through.
The wrap, start to finish
Cut the strip to your table length by your measured height, with the straight tear running the long way.
Dry fit it. Roll the strip round the can with no glue and check that the tail overlaps the head, and that the top and bottom edges sit clear of both rims. Fixing a length now takes one cut. Fixing it in thirty seconds’ time takes a new strip.
Brush a thin even coat of medium onto the can, not onto the paper. This is backwards from most decoupage instructions and it matters here. Glue on the paper wets the whole sheet at once and starts the swelling before you have any control of it. Glue on the tin wets the strip progressively as you roll it on, so each section is held before the next one gets damp.
Lay the leading edge down straight, then roll the can away from you along the strip, smoothing with the flat of your hand as you go. Do not lift the paper to reposition. A lifted strip stretches and comes back a different length.
When the tail lands on the overlap, run the brayer along the seam a few times, then round the whole can twice. Wipe any squeeze-out at the seam with a damp fingertip while it is wet, because dried medium at a seam dries shiny and shows.
Give it an hour, then brush one thin coat of medium over the outside of the paper to seal it. Another hour, then two light passes of acrylic spray, ten minutes apart. Felt pads on the base last.
Where it goes wrong
Ridges running top to bottom that will not flatten. The grain ran the wrong way. Nothing rescues that can, and the next one takes two seconds to get right.
A single round bubble in the middle of a panel. Trapped air rather than swelling. Prick it with a pin at the edge of the bubble, press the air out toward the hole, and add a dab of medium underneath through the pinhole.
The seam lifted after a few days. Not enough medium under the overlap, since the tail lands on paper rather than on the tin you coated. Brush a little under the tail before you close it.
The paper edge peeled up at the rim. The strip was cut too tall and rode onto the rolled rim. Take three millimetres off each end next time.
The wrap darkened or went blotchy. Too much medium under a light coloured sheet. Thin coats, and let the can rather than the paper carry the glue.
The finished cup feels tacky in warm weather. Gloss medium with no topcoat. Two light passes of matte acrylic sealer fix it on a cup you have already finished.
Making a matching set
Six cups is one evening. Cut all six strips first, from the same table row, in one session with the rotary cutter. Batch cutting is where a set stops looking homemade and starts looking made.
Save the cans over a fortnight and wash them as they empty, since the prep is the slow part and it spreads out for free. Six clean dry cans on a shelf turn the craft itself into an hour.
Mix two or three papers rather than six. A set reads as a set when it repeats, and buying six different sheets is how a gift ends up looking like whatever was on the shelf.
For a teacher gift, three cups of graduated size hold pens, scissors and rulers, and a 211, a 300 and a 404 give you that spread from cans you already have. Tie them with a ribbon round all three and the set travels as one thing.
Get the free tin can wrap card
The arithmetic in this post fits on one page, so it is on one page. The free Tin Can Wrap Card gives you the cut table for all six standard can sizes, the tear test drawn out so you can see which tear is which, the rim clearance rule, and the wrapping sequence in order. Print it, tape it inside your craft cupboard, and stop doing the multiplication.
Grab it below and it lands in your inbox in a couple of minutes. Then go raid the recycling.
Keep the ten-minute craft nights coming
If quick wins like this one are your speed, the printable Craft Night Kit Planner from the craft table lays out the supplies, timing, and shopping list for a whole month of ten-minute craft nights — print it once, plan four cozy nights. It’s $7 in the Crafting With Donna shop.