
crochet-tutorials
How to Crochet: Essential Techniques and Stitches for Every Project
If you’ve ever watched someone crochet and thought, “I want to do that,” you’re in the right place. I’m Donna, and I’ve been crocheting for more years than I care to count — through late nights with a new baby, long road trips, rainy weekends, and just about every holiday season. Crochet has been my constant companion, and I honestly believe it’s one of the most rewarding crafts you can pick up.
Whether you’re a complete beginner looking for crochet instructions for beginners or someone who already knows the basics and wants to expand your stitch library, this guide is for you. I’ve put together everything I wish someone had handed me when I first picked up a hook — from the foundational stitches and essential techniques to project ideas, tool recommendations, and answers to the questions I hear most often.
This is the main hub for all of my crochet tutorials, and I’ll be adding new posts and patterns here regularly. Think of it as your home base. Bookmark it, come back often, and let’s work through these stitches together.
What You’ll Find in This Guide
- Beginner-friendly basics — how to hold your hook, make a slip knot, and work your first chain
- Essential crochet stitches — from single crochet to double crochet, half double crochet (HDC), treble, and beyond
- Key techniques — the magic ring, working in the round, changing colors, reading crochet patterns, and using stitch markers
- Popular project types — blankets, hats, scarves, amigurumi, bags, garments, and home décor
- Tools and supplies — what you actually need (and what you can skip)
- Common mistakes and how to fix them — so you don’t have to learn the hard way like I did
- Featured project ideas — specific, practical projects to try at every skill level
- FAQ — real answers to the questions beginners (and experienced crocheters) ask most
Getting Started: Crochet Basics for Beginners
Learning how to crochet step by step doesn’t have to be intimidating. You need exactly two things to start: a crochet hook and a ball of yarn. That’s it. No sewing machine, no loom, no complicated setup. Just you, a hook, and some yarn.
Holding Your Hook and Yarn
There are two common ways to hold a crochet hook: the pencil grip (holding it like a pencil) and the knife grip (holding it like a butter knife). Neither is “correct” — use whichever feels natural. I use the knife grip myself, but I’ve taught plenty of people who prefer the pencil hold. Your tension hand (the one holding the yarn) matters just as much. Wrap the yarn around your index finger and let it flow smoothly. Consistent tension is the single biggest factor in making your stitches look even.
The Slip Knot and Foundation Chain
Every crochet project starts with a slip knot followed by a foundation chain. The chain is your starting row — it’s the base that everything else builds on. Make a loop, pull the yarn through, and tighten it on your hook. Then yarn over and pull through to create each chain stitch. Count your chains carefully; getting the count right here saves headaches later.
Essential Crochet Stitches Every Crocheter Should Know
Once you have your foundation chain, it’s time to learn the core stitches. These are the building blocks for virtually every crochet pattern out there. Master these, and you can tackle just about anything.
Chain Stitch (ch)
You already learned this one with your foundation chain. The chain stitch is also used throughout patterns to create spaces, turning chains, and decorative elements. It’s the simplest stitch, but it shows up everywhere.
Slip Stitch (sl st)
The slip stitch is the shortest crochet stitch. Insert your hook, yarn over, and pull through both loops at once. It’s used to join rounds, move across stitches without adding height, and create surface details. You’ll use it constantly when working in the round.
Single Crochet (sc)
Single crochet creates a short, tight, dense fabric. Insert your hook into the stitch, yarn over, pull up a loop (two loops on hook), yarn over again, and pull through both loops. This is the stitch I recommend every beginner learn first. It’s easy, forgiving, and produces a sturdy fabric that’s perfect for dishcloths, amigurumi, and bags. If you want a crochet stitch without holes, single crochet worked tightly is your best bet.
Half Double Crochet (hdc)
The half double crochet stitch (HDC) sits between single and double crochet in height. Yarn over before inserting your hook, pull up a loop (three loops on hook), then yarn over and pull through all three loops. HDC creates a slightly softer, more flexible fabric than single crochet. It’s one of my favorite stitches for hats and cowls because it works up quickly and has a nice drape. Many crocheters love the crochet stitch HDC for its versatility.
Double Crochet (dc)
Double crochet is probably the most widely used stitch in crochet patterns. Yarn over, insert hook, pull up a loop, yarn over and pull through two loops, yarn over and pull through the remaining two loops. It’s taller than HDC, works up faster, and creates a fabric with a bit more drape. Granny squares, afghans, scarves, and garments all rely heavily on double crochet.
Treble Crochet (tr) and Beyond
Treble crochet (also called triple crochet) adds another yarn over at the beginning, making it even taller. You can keep going — double treble, triple treble, even the crochet quadruple stitch — each one adding height. These taller stitches create open, lacy fabrics and are common in crochet patterns lace and decorative work. They also show up in stitch pattern combinations where you need dramatic height differences.

Key Techniques That Open Up New Possibilities
Knowing the basic stitches is essential, but these techniques are what take you from “I can make a rectangle” to “I can make anything.”
The Magic Ring (Magic Circle)
The magic ring is a technique for starting projects worked in the round — hats, amigurumi, granny squares, and round motifs. Instead of chaining and joining (which leaves a hole in the center), the magic ring lets you pull the center completely closed. It takes a little practice to get comfortable with, but once you have it, you’ll never go back. If you’re working on crochet patterns in the round, this is a must-know technique.
Working in the Round
Many crochet projects — hats, beanies, amigurumi toys, round coasters, and bags — are worked in continuous rounds or joined rounds rather than flat rows. Understanding how to increase evenly to keep your work flat (or not increase to create a tube) is fundamental. Use a stitch marker crochet tool to mark the beginning of each round so you don’t lose your place.
Changing Colors and Working with Multiple Yarns
Color changes open up a whole world of design possibilities — stripes, colorwork, tapestry crochet, and more. The key is to introduce the new color on the last pull-through of the stitch before the color change. This keeps your color transitions clean. Tapestry crochet patterns let you create pictures and geometric designs by carrying unused colors along the back of your work.
Reading Crochet Patterns
Crochet patterns can look like a foreign language at first — all those abbreviations and brackets. But once you learn the standard abbreviations (ch, sc, dc, hdc, tr, sl st, sk, rep), it clicks. Patterns come in written form, crochet stitch chart format, crochet stitch diagram format, and sometimes video. A good crochet stitch guide or crochet stitch glossary is invaluable when you’re starting out. I keep a printable reference card next to my chair. Understanding crochet patterns how to read them is one of the most empowering skills you can develop.
Using Stitch Markers and Counters
Stitch markers are small clips or rings that mark specific stitches in your work. They’re essential for tracking the beginning of rounds, marking increase/decrease points, and keeping pattern repeats straight. A crochet stitch counter (either a manual clicker or an app) helps you keep track of rows. I cannot overstate how much frustration these simple tools save. A crochet stitch holder is also handy for keeping live stitches secure when you need to set a project aside.
Gauge and Tension
Gauge is the number of stitches and rows per inch in your work. It matters most for garments and fitted items — if your gauge is off, your sweater might fit a doll or a giant. Always make a gauge swatch when a pattern specifies one. A crochet stitch calculator can help you adjust patterns to your personal gauge.
Popular Crochet Stitch Patterns and Textures
Beyond the basic stitches, there are hundreds of crochet stitch pattern combinations that create unique textures and visual effects. Here are some of the most popular ones to explore:
The Granny Square
The granny square is probably the most iconic crochet motif. It’s worked in the round with clusters of double crochet separated by chain spaces. You can make them in one color or dozens. Join them together for crochet patterns granny square blanket projects, bags, cardigans, and more. Crochet patterns using granny squares are endlessly versatile — I’ve seen everything from couch pillows to wedding dresses made from granny squares.
The V-Stitch
The crochet stitch V is made by working a double crochet, chain one, double crochet all in the same stitch. It creates a light, airy fabric with a pretty V-shaped pattern. It’s great for scarves, shawls, and lightweight blankets, and it works up quickly.
The Lemon Peel Stitch
The crochet stitch lemon peel alternates single crochet and double crochet stitches across each row, offsetting them on the next row. The result is a bumpy, textured fabric that’s reversible and looks great in solid colors. It’s one of those easy crochet stitch patterns that looks much more complex than it actually is.
The Zigzag (Chevron) Pattern
Crochet patterns zig zag (also called chevron or ripple) create a wavy, zigzag effect by strategically placing increases and decreases. They’re stunning in multi-color combinations and are a classic choice for crochet patterns zig zag blanket projects and afghans. The crochet zigzag stitch pattern is one of those designs that never goes out of style.
The Moss Stitch (Linen Stitch)
Alternating single crochet and chain stitches creates a woven-looking fabric called the moss stitch or linen stitch. It’s dense, has minimal stretch, and is perfect for bags, washcloths, and structured items. Some people say this crochet stitch looks like knit fabric, which makes it popular for people who love the knit look but prefer a hook.
The X-Stitch
The crochet X stitch pattern creates a crossed-stitch effect by working double crochets that cross over each other. It produces a dense, textured fabric with an interesting visual pattern. It’s a great intermediate stitch to try once you’re comfortable with double crochet.
The Zipper Stitch
The crochet zipper stitch creates a thick, warm fabric that’s perfect for winter accessories. It uses half double crochet stitches worked into the chain spaces of the previous row, creating a dense, interlocking texture. It’s one of those stitches that uses less yarn than you’d expect for how thick the fabric turns out — a real win if you’re watching your yarn stash.
Common Crochet Project Types
One of the best things about crochet is the sheer variety of things you can make. Here’s a rundown of the most popular project categories:
Blankets and Afghans
Crochet patterns afghans are among the most popular projects, and for good reason. There’s nothing quite like wrapping up in a blanket you made yourself. From simple striped throws to elaborate sampler blankets with different stitch patterns in each row, blankets are a great way to practice new stitches. Crochet quilt patterns combine individual squares or motifs into a larger piece, similar to quilting but with yarn.
Hats, Beanies, and Headbands
Crochet patterns hats are perfect quick projects. A basic beanie can be finished in an evening. They’re great for practicing working in the round and make wonderful gifts. Headbands are even faster — a crochet tutorial headband project is often one of the first things I recommend to new crocheters because you get a finished, wearable item in under an hour.
Scarves, Shawls, and Cowls
Scarves are the classic beginner project — they’re just a long rectangle, so you can focus on getting your stitches consistent without worrying about shaping. Shawls add some shaping with increases and are a beautiful way to showcase lace stitches and variegated yarns. Crochet patterns with variegated yarn look especially stunning in shawl patterns where the color changes can really shine.
Amigurumi and Stuffed Toys
Amigurumi — the Japanese art of crocheting small stuffed figures — has exploded in popularity. Crochet tutorials amigurumi cover everything from simple round animals to elaborate character dolls. These projects use single crochet worked tightly in the round, increases and decreases for shaping, and safety eyes or embroidered features. Crochet patterns animals, crochet patterns plushies, and crochet patterns cute characters are some of the most searched-for patterns online. You can make everything from a crochet tutorial bunny to a crochet tutorial whale to a crochet tutorial dinosaur.
Garments: Tops, Cardigans, Sweaters, and Vests
Crocheted garments have come a long way from the scratchy vests of the 1970s. Modern crochet patterns tops, crochet patterns cardigan designs, crochet patterns vest styles, and crochet tutorial sweater projects use beautiful draping stitches and soft yarns. Crochet patterns womens tops and crochet patterns clothes in general are trending heavily right now, with mesh tops, cropped cardigans, and oversized sweaters being especially popular.
Bags, Purses, and Accessories
Crocheted bags are practical and stylish. From market bags to structured purses to tiny pouches, crochet tutorials bag projects are satisfying because they’re usually quick and immediately useful. Crochet patterns accessories also include keychains, hair accessories, phone cases, and wallets. A crochet patterns keychain makes a great quick gift or craft fair item.
Home Décor
Crochet isn’t just for wearables. Dishcloths, coasters, table runners, pillow covers, plant hangers, and wall hangings are all popular home décor projects. A crochet tutorial table runner can add a handmade touch to your dining room, and crocheted pillow covers are a great way to use up yarn scraps.
Seasonal and Holiday Projects
Crochet patterns christmas ornaments, stockings, and decorations are a holiday tradition for many crafters. Crochet patterns autumn items like pumpkins and leaf garlands are popular too. And crochet xmas patterns free are widely available online if you’re looking for seasonal inspiration. If you enjoy holiday crafting, check out our holiday craft ideas for even more seasonal projects across different crafts.
Choosing the Right Yarn for Your Project
Yarn choice makes a huge difference in how your finished project looks and feels. Here’s what you need to know:
Yarn Weight
Yarn comes in standard weights from lace (very thin) to jumbo (very thick). For beginners, I recommend starting with worsted weight (#4) — it’s the most common, easiest to work with, and available everywhere. Crochet patterns with chunky yarn work up fast and are great for blankets and winter accessories. Crochet patterns with thin yarn create delicate, detailed work but require more patience. Crochet patterns with cotton yarn are ideal for dishcloths, summer tops, and amigurumi because cotton holds its shape well and is machine washable.
Yarn Fiber
Acrylic yarn is affordable, widely available, and easy to care for — it’s what I recommend for beginners and for projects that need frequent washing. Cotton is great for kitchen items and warm-weather garments. Wool is warm and has beautiful stitch definition. Crochet patterns with chenille yarn create incredibly soft, plush items — perfect for baby blankets and stuffed animals. Crochet patterns using bernat blanket yarn (a popular chenille-style yarn) are everywhere because that yarn is so soft and works up quickly. Crochet patterns variegated yarn and crochet patterns using variegated yarn create beautiful color effects without having to change colors manually.
Yarn Economy
If you’re on a budget, look for crochet patterns one skein projects — they use a single skein of yarn and are usually quick to finish. Some stitches use more yarn than others; the crochet stitch uses least yarn when you need to stretch your supply. Red Heart is a popular budget-friendly brand, and crochet patterns red heart yarn are widely available.
Common Mistakes and How to Avoid Them
I’ve made every mistake in the book, so let me save you some trouble:
- Not counting stitches. This is the number one beginner mistake. Count your stitches at the end of every row until it becomes second nature. Use a stitch counter if it helps.
- Skipping the turning chain. When you turn your work at the end of a row, you need a turning chain to bring your hook up to the correct height. Forgetting it will make your edges shrink inward.
- Inconsistent tension. If your stitches are tight in some places and loose in others, your fabric will look uneven. This gets better with practice. Try to relax your hands and let the yarn flow.
- Working into the wrong part of the stitch. Each stitch has a front loop, back loop, and both loops. Unless the pattern says otherwise, work under both loops. Working into only one loop creates a different texture (which is sometimes intentional, but not always).
- Not making a gauge swatch. For garments, skipping the gauge swatch is a gamble. Spend 15 minutes making one — it could save you hours of ripping out and redoing.
- Using the wrong hook size for your yarn. Check the yarn label for the recommended hook size. Using a hook that’s too small makes tight, stiff fabric; too large makes loose, floppy fabric.
Featured Project Ideas
Here are some specific projects to try at different skill levels. Each one teaches you something new while giving you a finished item you’ll actually use or love to give as a gift.
Beginner Projects
- Simple Dishcloth — Work a square in single crochet using cotton yarn. Practice keeping your edges straight and your stitch count consistent. This is the perfect first project.
- Chunky Infinity Scarf — Use chunky yarn and double crochet to make a wide rectangle, then join the ends. You’ll have a cozy scarf in a couple of hours.
- Basic Beanie — Start with a magic ring, increase in rounds to create the crown, then work even for the sides. A crochet tutorial beanie is one of the most satisfying beginner projects because it’s quick and wearable.
- Granny Square Sampler — Make several granny squares in different colors. Practice the magic ring, double crochet clusters, and color changes all in one small project.
Intermediate Projects
- Chevron Blanket — A crochet patterns zig zag blanket in 3-5 colors teaches you increases, decreases, and color changes while creating a stunning throw.
- Market Bag — A mesh market bag uses chain spaces and double crochet to create a stretchy, reusable shopping bag. Great practice for crochet tutorial mesh techniques.
- Amigurumi Animal — Try a simple stuffed animal like a bunny or turtle. You’ll learn tight single crochet in the round, invisible decreases, and basic assembly. Crochet patterns animals easy are a great starting point.
- Textured Throw Pillow Cover — Combine different stitch patterns (bobbles, cables, popcorn stitches) in panels to create a pillow cover with lots of visual interest.
Advanced Projects
- Crocheted Cardigan — A crochet tutorial cardigan project involves garment construction, shaping, buttonholes, and finishing. It’s a big commitment but incredibly rewarding.
- Tapestry Crochet Bag — Crochet patterns tapestry work involves carrying multiple colors and following a chart to create pictures or geometric designs. The results are stunning.
- Lace Shawl — Crochet patterns lace shawls use fine yarn and complex stitch patterns to create delicate, heirloom-quality pieces. A crochet tutorial shawl in lace weight yarn is a true test of skill.
- Detailed Amigurumi Character — Crochet patterns advanced amigurumi with jointed limbs, detailed features, and clothing pieces. These can take days or weeks but make incredible gifts or display pieces.
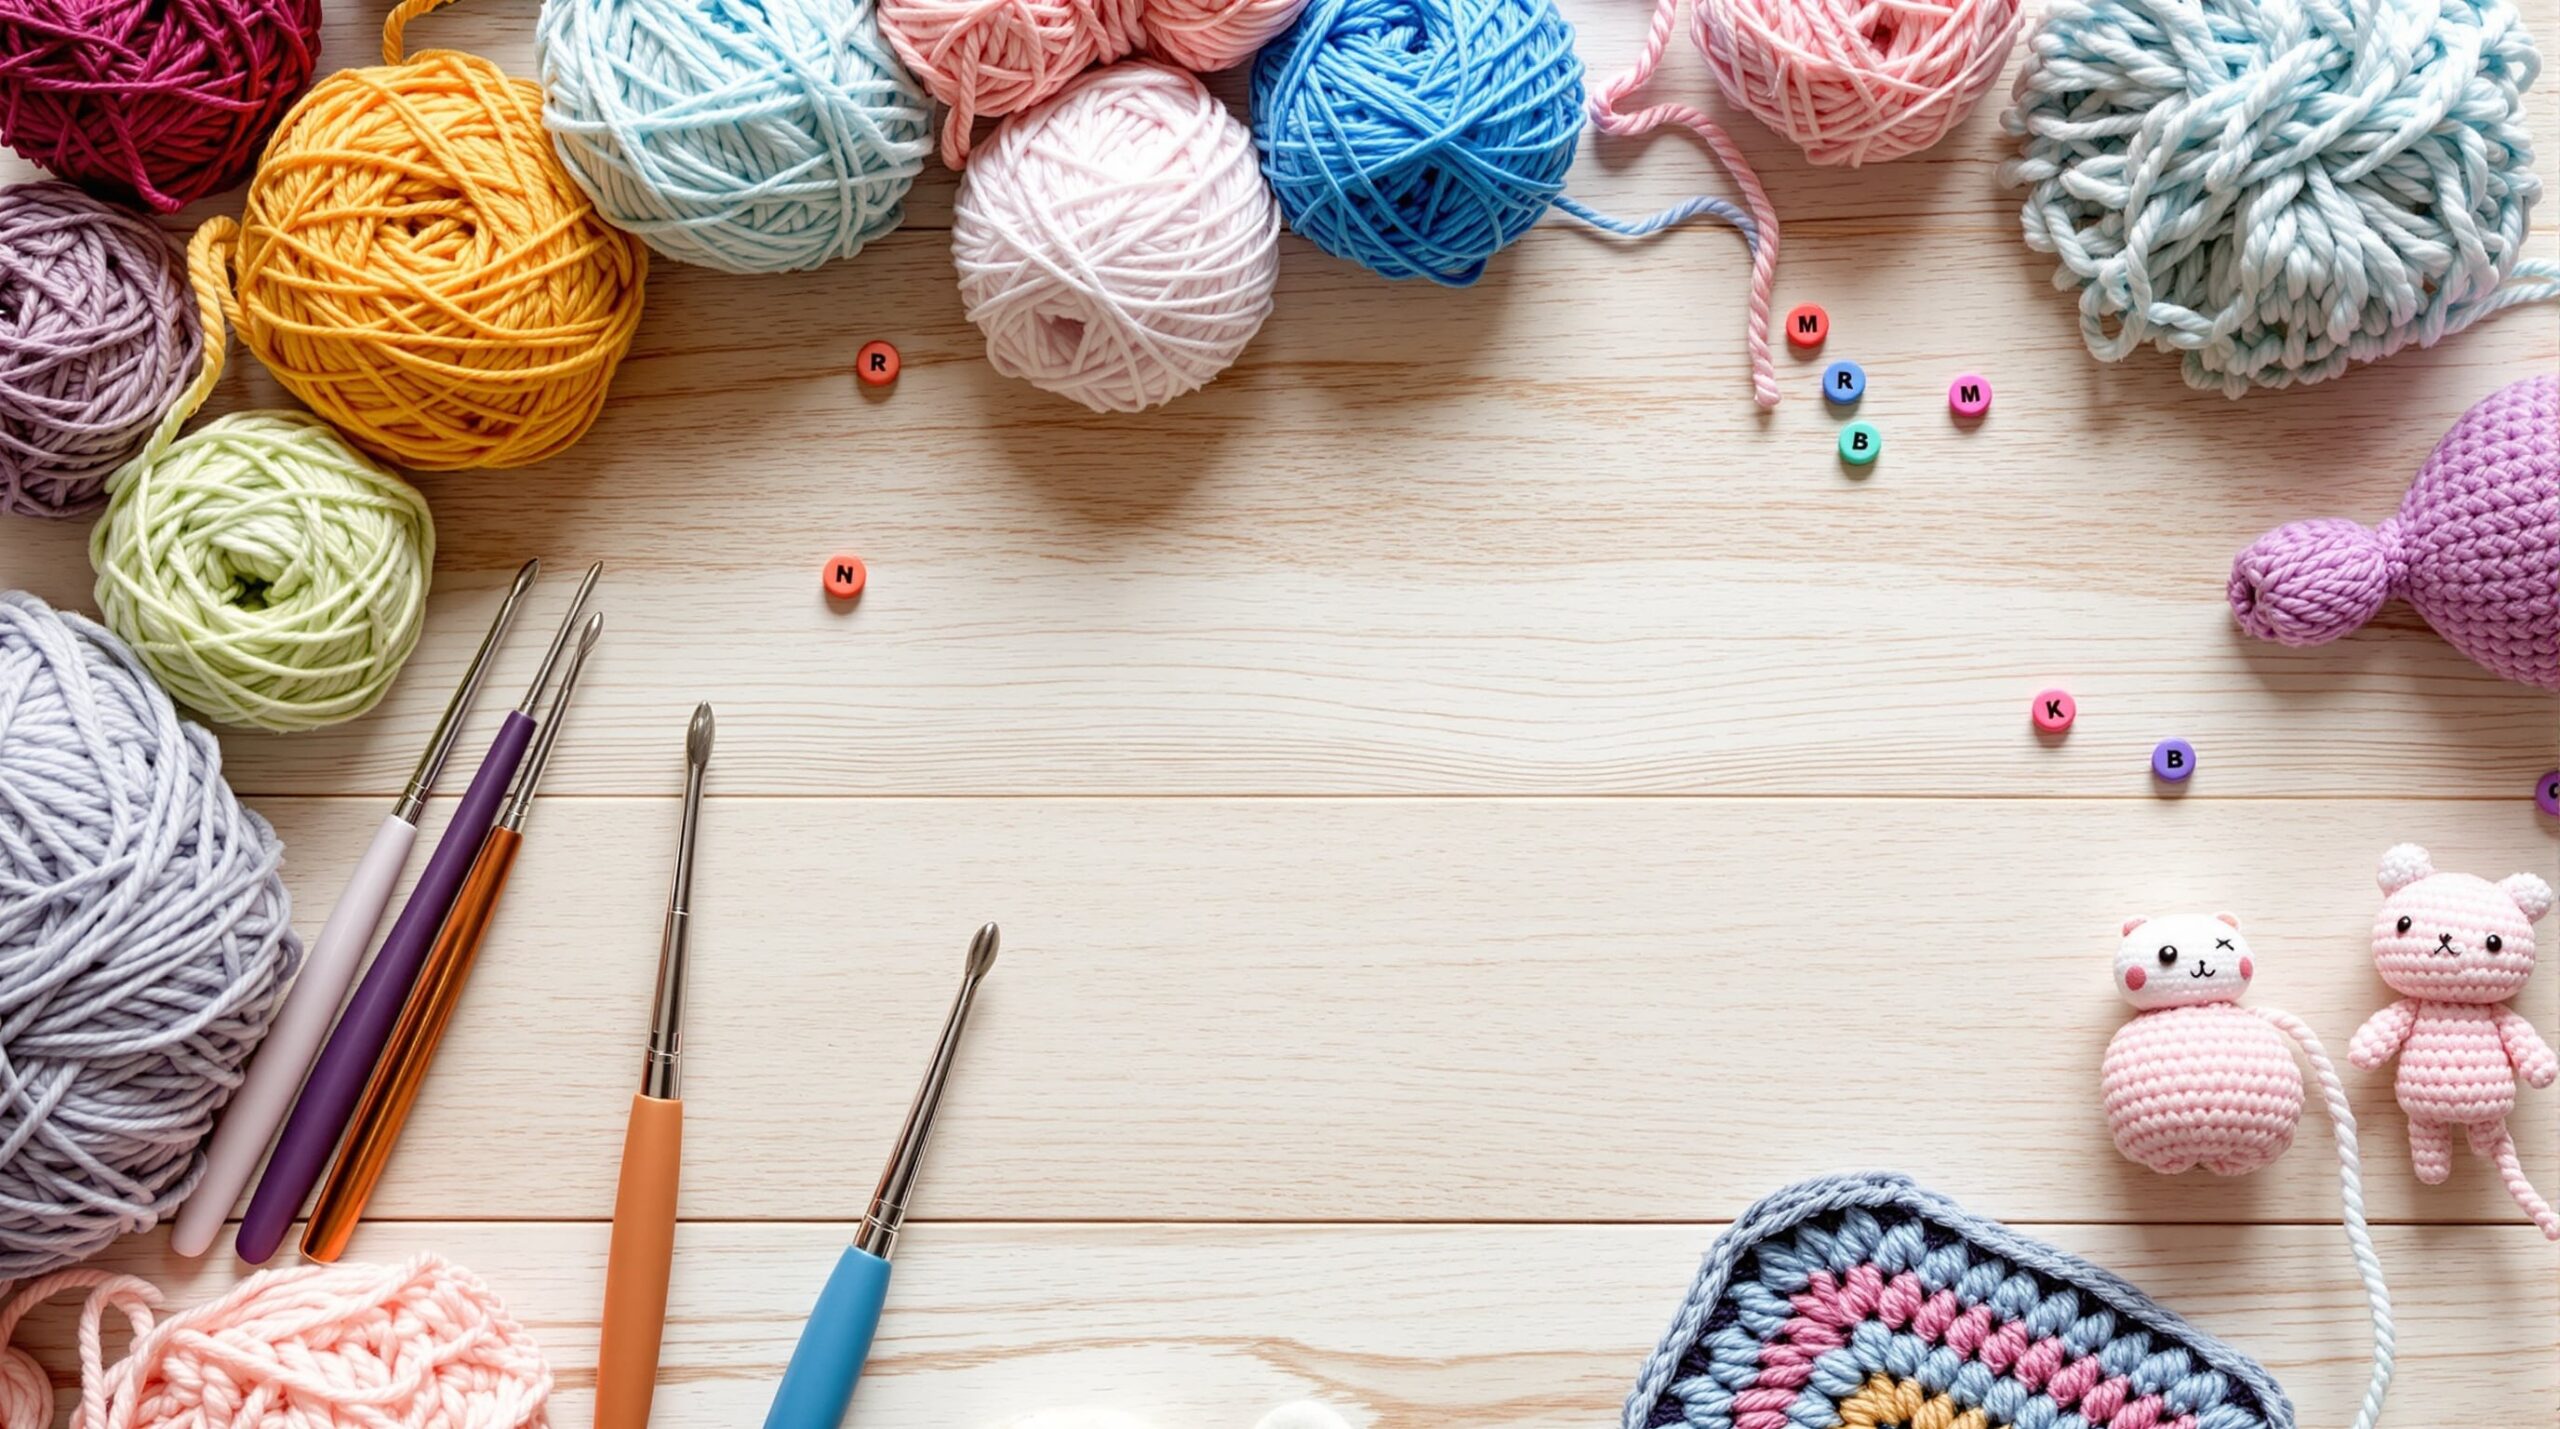
Essential Crochet Supplies and Tools
You don’t need a lot to get started, but having the right tools makes everything easier. Here’s what I recommend:
Must-Have Supplies
- Crochet hooks — Start with a 5mm (H/8) hook for worsted weight yarn. As you take on different projects, you’ll build a collection in various sizes. Ergonomic hooks with soft grips are worth the investment if you crochet for long stretches.
- Yarn — Start with a smooth, light-colored worsted weight acrylic. Light colors make it easier to see your stitches. Avoid dark, fuzzy, or novelty yarns until you’re comfortable with the basics.
- Scissors — A small, sharp pair for cutting yarn.
- Tapestry needle — A large, blunt needle for weaving in ends and sewing pieces together.
- Stitch markers — Locking stitch markers are the most versatile. You’ll use them constantly.
Nice-to-Have Tools
- Stitch counter — A row counter (manual or digital) helps you keep track of where you are in a pattern.
- Measuring tape — Essential for checking gauge and measuring your work.
- Stitch holders — Keep live stitches secure when you need to pause or work on another section.
- Project bag — Keeps your current project organized and portable.
- Crochet stitch kit — Many craft stores sell starter kits that include hooks, a tapestry needle, stitch markers, and a small case. These make great gifts for new crocheters.
For more recommendations on organizing your craft supplies, take a look at our craft organization tips and essential craft supplies guides.
How Crochet Connects to Other Crafts
Crochet doesn’t exist in a vacuum — it overlaps with and complements many other crafts. If you enjoy crochet, you might also love:
- Knitting — Crochet’s closest cousin. Many crocheters also knit, and some crochet patterns that look like knitting bridge the gap between the two. Check out our knitting patterns hub for more.
- Macramé — Another fiber art that uses knotting rather than stitching. If you like making plant hangers or wall hangings, explore our macramé patterns.
- Embroidery — You can add embroidered details to crocheted items for extra personality. See our embroidery patterns for inspiration.
- Sewing — Many crochet garment patterns require basic sewing skills for assembly. Our sewing projects section can help you build those skills.
- Beading — Beading crochet patterns combine beadwork with crochet for jewelry and decorative items. Crochet patterns with beads create beautiful textured pieces. Explore our beading projects for more ideas.
Frequently Asked Questions
How long does it take to learn to crochet?
Most people can learn the basic chain and single crochet stitch in an afternoon. Getting comfortable enough to follow a simple pattern usually takes a few days to a couple of weeks of regular practice. Within a month of consistent practice, you should be able to tackle beginner patterns with confidence. The easy steps to crochet for beginners really are easy — it’s just a matter of building muscle memory.
What’s the easiest crochet project for a complete beginner?
A dishcloth or washcloth in single crochet using cotton yarn. It’s a small, flat rectangle — no shaping, no complicated stitches, and you end up with something useful. After that, try a scarf or a simple beanie.
What size crochet hook should I start with?
A 5mm (US H/8) hook paired with worsted weight yarn is the standard recommendation for beginners. The hook is large enough to see what you’re doing but not so large that the stitches feel awkward. Check the yarn label — it will suggest a hook size range.
Is crochet easier than knitting?
Many people find crochet easier to learn because you only use one hook (instead of two needles) and it’s easier to fix mistakes — you can simply pull out stitches and redo them. Crochet is also better for 3D shapes and amigurumi. That said, both crafts have their strengths, and many crafters enjoy both.
How do I read a crochet pattern?
Start by learning the standard abbreviations: ch (chain), sc (single crochet), dc (double crochet), hdc (half double crochet), tr (treble crochet), sl st (slip stitch), sk (skip), rep (repeat). Instructions in parentheses or brackets are usually repeated. Asterisks mark repeat sections. A crochet stitch key or abbreviation list at the beginning of the pattern will define any special stitches. With practice, reading crochet patterns becomes second nature.
What’s the difference between a crochet stitch chart and written instructions?
Written instructions tell you what to do row by row in words and abbreviations. A crochet stitch chart (or crochet stitch diagram) uses symbols to show you visually what each row looks like. Some people are visual learners and prefer charts; others prefer written instructions. Many patterns include both. Japanese crochet patterns are especially known for their detailed charted instructions.
Can I sell items I make from crochet patterns?
In most cases, yes — you can sell finished items made from a pattern. However, you cannot sell or redistribute the pattern itself unless you wrote it. Always check the pattern’s terms of use. Crochet patterns to sell (meaning patterns designed with selling the finished product in mind) are popular for craft fairs and online shops. Simple, quick items like dishcloths, keychains, headbands, and amigurumi tend to sell well.
Where can I find free crochet patterns?
There are thousands of crochet patterns easy free and crochet patterns online free available. Ravelry, AllFreeCrochet, and Yarnspirations are popular sources. Many independent designers also share free patterns on their blogs. Right here on Crafting with Donna, I share crochet tutorials and patterns regularly — so keep checking back.
Keep Going — Your Next Stitch Is Waiting
Crochet is one of those crafts where there’s always something new to learn — a new stitch, a new technique, a new project that catches your eye. Whether you’re working on your very first chain or you’re deep into an advanced lace shawl, I hope this guide gives you a solid foundation and plenty of inspiration.
This page is your hub for all things crochet here on Crafting with Donna. I’ll be adding new tutorials, stitch guides, pattern roundups, and project walkthroughs regularly. If there’s something specific you’d like to see covered, drop me a note — I love hearing what you’re working on.
Now grab your hook, pick out some yarn, and let’s make something. I’ll be right here with you.
Easy Crochet Frog Patterns For Beginners To Try

Crochet frog pattern trends are on the rise as crafters new and old explore creating charming amphibian friends. Amigurumi frog patterns simplify the process for newcomers, offering delightful crochet animal patterns through stepbystep frog tutorials and no-sew frog patterns.
Mastering basic techniques like the magic ring technique and slip stitch crochet allows anyone to produce these wonderful crochet amphibian toys.
Many beginner amigurumi projects require minimal yarn and offer straightforward assembly, encouraging crochet for beginners.
These yarn frog patterns result in incredibly cute small crochet frogs, perfect for everything from crochet keychain frogs to decorative crochet frogs, making crochet craft ideas accessible and fun for everyone[3][5][1][4].
First Steps in Amigurumi Basics
Embarking on your amigurumi journey begins with understanding a few foundational elements. Amigurumi basics revolve around repeating stitches in continuous rounds to build three-dimensional shapes.
Consider yarn weight flexibility when choosing your materials; lighter yarns and smaller hooks are ideal for delicate crochet keychain frogs, while bulky yarns create huggable plush frog crafts for children’s crochet toys or home decor crochet. The magic ring technique is your starting point for a neat, tight center, followed by essential stitches like single crochet, increasing crochet, and decreasing crochet to form the basis of any good beginner crochet animal.
Secure any loose yarn tails inside the piece before stuffing; this simple crochet finishing trick greatly improves the appearance of your beginner amigurumi projects.
Developing these foundational crochet skills opens the door to countless creative crochet exploration, from simple crochet toys to elaborate whimsical frog designs[3][4][5].

What Are Beginner Crochet Animals?
Embarking on beginner crochet animals offers a fantastic avenue for cultivating creative confidence, particularly when patterns emphasize straightforward shapes and minimal assembly requirements. Amigurumi basics shine through with animals like chunky frogs, bears, or whales that utilize rounded forms and a select few oversized components—often the body and head are crafted as a single unit.
New crafters can readily commence with crochet animal patterns that skillfully employ fundamental stitches, such as single crochet and the magic ring technique, rather than those demanding complex shaping or intricate sewing.
Opting for minimal yarn projects—like a plush frog with simple attached limbs—allows beginners to savor their initial finished toy while diligently mastering these foundational skills.
For instance, amigurumi frog patterns typically present a cohesive, single-piece body, basic embroidery for facial elements, and swift assembly, rendering them ideal for accessible crafting and achieving early success.
Foundational crochet skills are gracefully introduced through these approachable animal designs, making them perfect starting points for anyone venturing into the world of crochet. Online crochet guides and video crochet tutorials provide invaluable support for visual crochet learners, demystifying techniques like the magic ring technique and slip stitch crochet.
The joy of creating whimsical frog designs or other simple creatures lies in their straightforward construction, often involving just a few key pieces that require minimal crochet assembly. Many crochet amphibian toys, such as small crochet frogs, focus on simple shaping and basic stitches, building confidence with each row.
These projects are wonderful for developing amigurumi basics, offering a clear path to completing your first stuffed creation.
Accessible crafting is at the heart of these patterns, ensuring that even complex-looking animals become achievable with patience and the right guidance.
Friendly crochet encouragement is abundant in patterns designed for early success.
Simple Crochet Toys for Beginners
The essence of simple crochet toys lies in a construction that significantly curtails sewing and ensures each component remains uncomplicated. Numerous amigurumi frog and animal patterns tailored for beginners incorporate just a handful of elements: a primary body, basic limbs, and potentially stitched-on embellishments, thereby streamlining the crochet assembly process.
The consistent use of single crochet stitches yields a firm, closely-knit fabric—essential for securely holding stuffing and shaping robust pieces. Patterns that thoughtfully omit excessive color changes, such as a charming crochet keychain frog or a petite whale, empower crafters to concentrate on mastering the stitches and diligently following step-by-step frog tutorials, offering a clear learning path.
These particularly beginner-friendly crochet projects are instrumental in developing essential foundational crochet skills, establishing them as perfect choices for crafting quick crochet gifts or charming, handmade collectibles without introducing undue complexity.
Selecting patterns with minimal color changes greatly aids in maintaining focus on stitch work, which is a key aspect of crochet for beginners.
The benefit of using single crochet for a firm fabric cannot be overstated; it prevents stuffing from poking through and gives the finished toy a satisfying weight and shape.
For those interested in plush frog crafts, look for stuffed frog patterns that integrate elements like button eyes or simple embroidered smiles, which are easily achievable. Many beginner amigurumi projects, including various crochet animal patterns, are designed with few components, simplifying the overall crochet finishing.
These projects are excellent for building proficiency in techniques like increasing crochet and decreasing crochet, which are fundamental to shaping amigurumi. When exploring yarn frog patterns, prioritize those that suggest a single yarn weight for consistency.
Custom crochet frogs can be just as simple with strategic color choices and placement of safety eyes crochet or decorative crochet cheeks.
These projects foster creative crochet exploration, making them ideal for creating childrens crochet toys or unique home decor crochet pieces.
The simplicity in construction for these adorable frog designs makes them a joy to create.
- Beginner crochet animals often utilize rounded forms and minimal assembly, such as single-piece bodies and simple attached limbs, making them ideal for new crafters.
- Fundamental stitches like single crochet and the magic ring technique are commonly employed in beginner-friendly crochet animal patterns, allowing for mastery of foundational skills.
- Projects with minimal yarn requirements and straightforward shaping, like plush frogs with basic embroidery for facial features, help beginners build confidence and achieve early success.
- Online guides and video tutorials are valuable resources for visual learners tackling techniques such as the magic ring and slip stitch crochet for these approachable animal designs.
Magic Ring Technique for Frogs
The magic ring technique is fundamental for creating seamless circles in amigurumi frog patterns, preventing holes and ensuring a neat start for your projects. This essential method, a cornerstone of amigurumi basics, minimizes gaps by forming a tightly closed loop initially, improving both the durability and the overall appearance of your plush frog crafts.
For those new to crochet for beginners, mastering this step allows for smoother assembly of small crochet frogs.
To execute this technique for your beginner crochet animals, begin by wrapping your yarn around two fingers to create an adjustable loop, ensuring the initial loop is snug, akin to a tiny, stuffed donut, which is a key part of these step-by-step frog tutorials.
Then, insert your crochet hook beneath the bottom strand within this loop, and pull through to create a slip knot; this is a foundational crochet skill. Next, crochet your first round of stitches directly into this loop.
Pull the yarn tail to cinch the stitches securely, forming a perfect magic ring, and seamlessly transitioning to your next stitches. For further guidance on this and other crochet stitches guide, consult our Amigurumi Basics Guide.
Slip Stitch Crochet for Details
Slip stitch crochet offers remarkable precision and texture, benefiting beginner crochet animals like delightful frogs, proving perfect for securely attaching features or adding decorative elements.
Unlike the more pronounced, raised texture of single crochet, slip stitches yield a flat, dense join with typically tighter tension, ideal for achieving neat finishes in plush frog crafts.
This technique is incredibly useful for sewing on small amigurumi parts, adding embroidered frog smiles, or outlining surface features without introducing excessive bulk into your whimsical frog designs. For makers interested in custom crochet frogs, employing this stitch will significantly enhance their step-by-step frog tutorials with crisp, professional details, particularly when creating decorative crochet cheeks or small crochet frogs.
Creating Subtle Raised Lines
For those seeking subtle raised lines on their amigurumi frog patterns, a simple adjustment to the slip stitch method proves effective. By working your slip stitches only into the front loop of the previous row, you can achieve a gentle, textured accent, adding another layer of detail to your adorable frog designs.
This method is also excellent for defining edges or creating seams with a cleaner appearance than other stitches might provide, a valuable tip for anyone crafting stuffed frog patterns or crochet amphibian toys.
This approach aids in the overall crochet assembly and crochet finishing, especially for projects like crochet keychain frogs or decorative crochet frogs, ensuring a polished look for your crochet craft ideas.
- The magic ring technique is fundamental for creating seamless circles in amigurumi frog patterns, preventing holes and ensuring a neat start.
- Slip stitch crochet offers remarkable precision and texture, perfect for securely attaching features or adding decorative elements to beginner crochet animals.
- Working slip stitches only into the front loop of the previous row can achieve subtle raised lines and define edges for amigurumi frog patterns.
- Mastering the magic ring technique allows for smoother assembly of small crochet frogs and improves both durability and overall appearance.
Crochet Finishing Touches Explained
Amigurumi frog patterns become polished plush frog crafts, transforming simple crochet toys into professional pieces that showcase foundational crochet skills. Amigurumi basics highlight how meticulous crochet finishing, from sewing seams to weaving ends, elevates beginner crochet animals into treasures.
Employing strategic finishing methods—like sewing parts together with matching yarn or using seamless techniques—ensures joins remain nearly invisible, keeping parts of your amigurumi frog patterns snugly in place.
Securely weaving in ends means threading the yarn tail through the back of stitches or into the stuffing to conceal it properly, making your crochet keychain frogs neat.
For a professional result, weave tails back and forth through stuffing before gently tugging. This technique creates a knot inside and finishes with a perpendicular direction weave, anchoring the yarn invisibly.
Attentive crochet finishing techniques, from sewing seams to weaving invisible ends, transform beginner crochet animals into decorative, durable creations for your whimsical frog designs. Next, let’s discover how to achieve that perfect, huggable texture for your frog creations with skillful stuffing.
Stuffing Amigurumi Softly
Stuffing amigurumi creates that signature huggable feel, ensuring simple crochet toys, like these whimsical frog designs, retain shape and delightful softness.
Amigurumi basics suggest using small tufts of polyester fiberfill, adding it gradually to avoid lumps or uneven surfaces, important for crochet animal patterns intended for cuddling.
For consistent structure in amigurumi frog patterns, distribute stuffing evenly using the blunt end of your crochet hook, gently working material into each corner and edge for a rounded, even silhouette.
For stuffing small or intricate parts smoothly: Divide stuffing into wispy strands and insert small amounts at a time. This prevents overstuffing, which can stretch stitches or create bumps, ensuring your plush frog crafts maintain their shape.
This approach ensures each crochet frog remains plush without becoming rigid, striking a perfect balance key to plush frog crafts and decorative crochet frogs.
Mastering stuffing makes your amigurumi frogs soft, squeezable, and irresistibly charming, ready for any collection or playful adventure, making them great simple crochet toys.
Key Takeaways for Amigurumi Frog Creation
- Meticulous crochet finishing, including sewing seams and weaving ends, transforms beginner crochet animals into professional-looking pieces.
- Securely weaving in yarn tails by threading them through stuffing and anchoring them invisibly ensures a neat appearance for crochet keychain frogs.
- Stuffing amigurumi gradually with small tufts of polyester fiberfill and distributing it evenly with a crochet hook prevents lumps and creates a huggable texture.
- Dividing stuffing into wispy strands for small or intricate parts prevents overstuffing, which can distort stitches and affect the final shape of plush frog crafts.
Custom Crochet Frogs Variations
Crochet frog pattern exploration truly blossoms by building upon the magic ring technique from amigurumi basics. This foundational skill allows for significant creative exploration in crafting your own adorable amphibian crafts.
Try altering color palette variations; move beyond traditional greens to delightful pastels, vibrant blues, or even playful stripes for truly whimsical frog designs.
The yarn weight flexibility found in many amigurumi frog patterns means you can easily adjust sizes, creating everything from tiny crochet keychain frogs to larger plush frog crafts perfect for home decor.
Adding Personality and Flair
Enhancing your beginner crochet animals involves adding personalize touches that make each frog unique. Embrace embroidered frog smiles for charming expressions, or add decorative crochet cheeks to give your frogs a sweet, rosy glow.
These simple embellishments, part of step-by-step frog tutorials, elevate basic stitches into expressive characters. Consider adding small accessories like a tiny crochet hat or a detachable flower, transforming your creation into a truly special piece.
These details make your crochet amphibian toys stand out and are excellent ideas for children’s crochet toys or unique festival crochet decor.
The flexibility in stuffing amigurumi and closing crochet projects, along with shaping crochet limbs, further contributes to the custom nature of each piece, making them ideal quick crochet gifts and budget-friendly crafts.
These amphibian crafts are perfect for playful crochet and creative crochet exploration, building foundational crochet skills.
Custom Crochet Frogs
- The magic ring technique, a fundamental amigurumi skill, is the basis for creating custom crochet frog variations.
- Color palette variations, yarn weight flexibility, and embellishments like embroidered smiles and decorative cheeks allow for unique frog designs.
- Customization options extend to size, from tiny keychain frogs to larger plush crafts, and the addition of accessories like hats or flowers.
- These customizable crochet frogs are suitable for various purposes including children’s toys, festival decor, quick gifts, and budget-friendly crafts, promoting creative exploration and foundational crochet skills.
Enchanted Coast Wrap Crochet Pattern Tutorial

Embark on a crafting journey reminiscent of gentle seaside charm with the Enchanted Coast Wrap crochet pattern. Designed by the talented Eleonora Tully, this boho accessory offers a pathway to tranquil creation, where each stitch interweaves the magic of the ocean.
Crafters seeking a meditative making experience will delight in the intricate flower square motif that forms the heart of this design.
Utilizing Scheepjes Colour Crafter, this crochet project promises a luxurious feel, truly embodying the essence of coastal living.
Prepare to transform your wardrobe with this beautiful, handmade wrap.
What is the Enchanted Coast Wrap?
Experience the serene beauty of the coast, as this coastal crochet wrap captures the essence of rolling tides and the soft whisper of a sea breeze. Eleonora Tully’s design begins with a captivating flower square motif, unfolding into a truly unique flowy design.
This centerpiece radiates outwards, creating a stunning, lightweight shawl that drapes with an effortless grace. The choice of Scheepjes Colour Crafter, with its harmonious colors inspired by the sea, enhances the tactile texture and overall appeal.
Whether you embrace planned color palettes or enjoy stash busting, this pattern offers exceptional creative freedom, making it a perfect summer accessory or a cherished transitional piece.
Inspiration and Aesthetic
Drawing inspiration from the tranquil beauty of seaside mornings, this crochet tutorial embodies the spirit of coastal living.
The underlying theme speaks of ocean magic, translating into a romantic accessory.
Eleonora Tully design meticulously crafted each element to evoke a sense of peace, much like the gentle sound of rolling tides. Beach-inspired yarn, particularly the exquisite shades found in Scheepjes Colour Crafter, further amplifies this connection to nature, adding a layer of authenticity to the boho chic aesthetic.
This piece is more than just a fashion accessory; it’s a wearable piece of art.
Suitability and Versatility
This handmade wrap serves as a versatile addition to any wardrobe, seamlessly transitioning from a casual beach cover-up to an elegant evening accessory. The beginner crochet friendly nature of the pattern, combined with its sophisticated outcome, makes it ideal for skill building.
Enjoy the process of meditative making as you work with the textured stitches, creating a piece that is both beautiful and functional.
Its flowy design ensures it complements various outfits, making it a go-to for any occasion.
Whether you choose a vibrant color palette or a more subdued tone, this creative project promises a satisfying outcome.
Craft your own piece of wearable art with this enchanting crochet project. The Enchanted Coast Wrap beckons, offering a perfect blend of creative crafting and relaxation.
Embrace the joy of skill building as you master new stitch techniques. This designer pattern is a testament to the beauty of floral crochet and the allure of texture focus, creating a truly unique fashion statement.
From the initial joining motifs to the final finishing tips, every step is designed for success.The Ravelry pattern is a gateway to endless craft inspiration.
Consider a yarn pack or kit option for a truly seamless experience, or dive into yarn substitution for a truly personalized craft. The result is a beautiful, lightweight yarn creation that whispers of the sea breeze and the magic of seaside crochet.

Coastal Crochet Wrap: Yarn, Hook, and Color Palette
The initial creation of an Enchanted Coast Wrap begins with selecting the perfect beach-inspired yarn, achieving its signature lightweight feel and flowy design. Scheepjes Colour Crafter, a DK weight acrylic, is the recommended yarn for this coastal crochet wrap, offering both softness and durability for effortless drape.
A 0 mm crochet hook is advised to achieve the correct gauge, essential for the wrap’s balanced fit and a truly meditative making experience.
The carefully curated color palette, featuring popular shades like “Wadden Sea” and “Windmills,” blends harmonious colors reminiscent of the sea breeze and rolling tides, enhancing each flower square motif with a serene, boho accessory aesthetic.
This thoughtful yarn selection encourages creative crafting, transforming the finished piece into an expression of tranquil craft and coastal living, a delightful craft project awaiting its creation. This beautiful handmade wrap is a wonderful DIY fashion statement.
Eleonora Tully Design: Signature Style and Unique Touches
Eleonora Tully design philosophy imbues each crochet wrap pattern with her unique balance of mindful creation and compelling visual storytelling. Her energetic flower square motifs and flowing rows, combined with beginner crochet techniques, highlight her passion for textured stitches and meditative making.
Many coastal crochet projects by Tully feature tactile texture, intricate details, and the blending of harmonious colors, elements that elevate each handmade wrap into a piece of wearable art.
The Enchanted Coast Wrap, a signature piece in Tully’s coastal collection, also underscores her commitment to skill building and creative freedom, offering both inspiration and relaxation for crafters of all levels, a true fashion accessory.
This designer pattern is a wonderful opportunity for creative crafting and skill building, offering a flowy design that is a perfect summer accessory.
Key Details for the Coastal Crochet Wrap
- Scheepjes Colour Crafter, a DK weight acrylic yarn, is recommended for its softness and durability.
- A 0 mm crochet hook is advised to achieve the correct gauge for a balanced fit.
- The color palette includes shades like Wadden Sea and Windmills to evoke a coastal aesthetic.
- Eleonora Tully’s designs often incorporate energetic flower square motifs, textured stitches, and harmonious color blending.
Scheepjes Colour Crafter Yarn
Scheepjes Colour Crafter yarn is a superb choice for crafting a coastal crochet wrap, offering exceptional affordability and accessibility. This beginner crochet friendly yarn, available in over 90 shades, makes yarn selection a delightful part of your craft project, from a simple DIY fashion piece to an intricate flower square motif.
The soft, premium acrylic fibers lend a subtle sheen, enhancing any textured stitches and making the yarn ideal for a beachinspired yarn creation like a lightweight shawl or romantic accessory.
Its widespread availability ensures you can easily find the perfect color palette for your creative crafting, while its durability and machine-washability make your handmade wrap or boho accessory a joy to maintain.
This yarn promotes meditative making, turning each stitch into part of a larger, beautiful process, perfect for a tranquil craft experience.
What stitches are used?
The Enchanted Coast Wrap, a stunning Eleonora Tully design, intricately weaves together a series of beloved stitch patterns to evoke the serene beauty of the coast. This crochet tutorial begins with the iconic flower square motif, forming a beautiful central panel that is then expanded with rows of various textured stitches.
These include classic stitches and more decorative ones, creating a rich, tactile texture reminiscent of the rolling tides and gentle sea breeze. The chosen stitch techniques contribute to a delightful flowy design, transforming each crochet project into a unique piece of wearable art.
Special techniques are employed for joining motifs seamlessly, and finishing tips like proper blocking and draping are essential to achieve the wrap’s elegant silhouette, making it a perfect summer accessory or transitional piece.
- Scheepjes Colour Crafter yarn is available in over 90 shades.
- The yarn is made from soft, premium acrylic fibers.
- The Enchanted Coast Wrap is a design by Eleonora Tully.
- The crochet tutorial for the wrap includes techniques for joining motifs and finishing tips like blocking and draping.
Textured Stitches
The Enchanted Coast Wrap design masterfully employs creative stitch techniques, particularly textured stitches, to achieve a flowing movement and cozy warmth reminiscent of a gentle sea breeze. Crafted with beginner crochet in mind, within this crochet wrap pattern, the puff stitch stands out.
This stitch is constructed by looping yarn multiple times before closing them, forming plush, raised elements that provide rich tactile texture and harmonious colors evoking rolling tides.
Such stitches, often paired with beach-inspired yarn like Scheepjes Colour Crafter, allow the fabric to drape softly while offering insulation, making it a perfect lightweight shawl for transitional weather.
Creative crafting and stitch variations allow crafters to personalize their boho accessory—from open lacework to tighter motifs—ensuring each coastal crochet wrap is unique and expressive. The result: every stitch variation helps define not only the final look but also the tranquil, meditative making experience that the pattern celebrates, offering a truly personalized craft.
How to Finish?
Finishing tips ensure your handmade wrap is beautifully durable and ready to join your handmade wardrobe as a breezy fashion accessory.
After textured stitches add body and warmth to your Enchanted Coast Wrap, follow a stepbystep guide for a polished finish, enhancing your skill building.
Securing Ends
To begin securing your ends, first, you need to fasten off your final stitch securely to prevent unraveling. Next, thread a yarn needle with the tail.
Weave the tail back through several stitches in the same direction to anchor it.
Then, weave it back in the opposite direction to create a secure knot, reinforcing your craft project.
Trim any excess yarn close to the fabric, ensuring a neat appearance for your creative project.
Joining and Embellishing
For patterns utilizing a flower square motif, joining motifs is typically done with seamless whipstitching or invisible seaming, supporting the wrap’s flowy design and maintaining its smooth drape, a key aspect of this designer pattern. To fully embrace the boho chic style, consider personalizing your coastal crochet wrap with fringe, beads, or tassels.
Each embellishment can elevate your yarn craft into a true wearable art statement, adding a touch of ocean magic appeal to your creation, perfect for a summer accessory.
- The Enchanted Coast Wrap design utilizes textured stitches, specifically the puff stitch, to create a flowing movement and cozy warmth.
- The pattern is designed with beginner crochet in mind, making it accessible for those new to the craft.
- Finishing tips are provided to ensure the handmade wrap is durable and polished, enhancing skill building.
- Personalization options like fringe, beads, or tassels can be added to elevate the wrap into wearable art with ocean magic appeal.
Crafting Your Coastal Masterpiece
Blocking and Draping
The Enchanted Coast Wrap, an Eleonora Tully design, truly comes alive with careful blocking, a step that refines the flower square motif and enhances its overall shape. Blocking is essential for achieving perfect stitch definition for this boho accessory, allowing the Scheepjes Colour Crafter yarn to showcase its intended character.
For this beautiful beach-inspired yarn creation, opt for a wet blocking method to achieve a light and flowy drape, mimicking the gentle movement of rolling tides.
Submerge your handmade wrap in lukewarm water, gently pressing out excess water without twisting the delicate fabric.
Pin the piece to a blocking mat or clean towel, carefully stretching it to the desired dimensions, ensuring the crochet wrap pattern’s graceful flow is established. Focus on aligning your various motifs precisely to achieve a professional presentation for this craft project.
Let the wrap air dry completely while pinned; this process sets the shape and unlocks that exquisite drape characteristic of wearable art, making it a stunning fashion accessory. Avoid overstretching the fabric, and a light touch of steam can further perfect the drape of this charming summer accessory.
Key Steps for the Enchanted Coast Wrap
- Blocking is crucial for refining the flower square motif and achieving perfect stitch definition for the boho accessory.
- Wet blocking is recommended to achieve a light and flowy drape, mimicking the movement of tides.
- Carefully stretching and pinning the wrap to the desired dimensions while air drying sets the shape and unlocks exquisite drape.
- A light touch of steam can further perfect the drape of this charming summer accessory.
Free Hourglass Beanie Crochet Pattern Using Hand Dyed Yarn

Hand-dyed yarn truly transforms crafting into a unique art form, especially when paired with the distinct Hourglass Beanie crochet pattern. TGWTH hand-dyed yarn provides incredible color variation and superior softness, making this modern crochet hat an essential project for beginner crochet enthusiasts and seasoned makers alike.
This merino wool blend ensures cozy warmth and luxurious stitch definition within each skein.
Explore this engaging textured beanie tutorial for a quick crochet project that truly highlights your artistic expression and showcases hand-dyed fiber craft project techniques.
Unleash your creativity with accessible instructions and a comprehensive step-by-step guide, resulting in a stylish crochet accessory perfect for winter accessories or for thoughtful gifting.
Hourglass Beanie crochet pattern explained
The Hourglass Beanie crochet pattern offers a fresh step beyond basic hat designs, inviting adventurous crafters to explore innovative stitches and modern crochet fashion.
TGWTH handdyed yarn’s beautiful yarn color variation is expertly showcased by the pattern’s signature hourglass texture, created through a dynamic stitch pattern and a carefully selected stitch library. This luxurious merino wool blend guarantees a rewarding craft experience and vibrant color saturation for every artisan yarn crafting project.
For the best results, block your gauge swatch before measuring—especially when working with this pattern’s unique stitch definition—to ensure a custom fit beanie and a successful fiber art showcase.
Both beginners and experienced hands will discover pattern clarity and accessible instructions for every step of this engaging project.
Pattern Highlights
Discover the elegance of the Hourglass Beanie crochet pattern, a contemporary design perfect for showcasing the unique properties of TGWTH handdyed yarn.
This beginner crochet hat tutorial offers a textured beanie tutorial experience that blends modern crochet fashion with the warmth of a merino wool blend. As a winter accessory pattern, it’s a quick crochet project, providing a satisfying step-by-step guide.
The pattern features crochet stitches explained clearly, leading to a beautiful slouchy beanie pattern. Its yarn color variation is a key element, resulting in a unique handmade hat design.
This offers significant craft inspiration and celebrates textile artistry in DIY headwear, aligning with current crochet fashion trends for warm winter wear.
The outcome is a line of stylish crochet accessories, a true fiber craft project highlighting excellent stitch definition and pattern clarity.
With accessible instructions, it promises a rewarding craft leading to a successful project, creating something truly artisan made and becoming bespoke headwear. This fiber art showcase emphasizes wool blend benefits, including nylon durability, creating amazing yarn depth and color saturation.
The specific stitch pattern contributes to crochet mastery, fostering a sense of belonging within the crafting community and ensuring project completion. The custom fit beanie makes for wonderful gift crochet ideas and perfect market stall items, reflecting individual personal style accessory and promoting artistic expression as a valued creative outlet.
This demonstrates textile innovation through innovative crochet, highlighting unique yarn properties.
It’s also a fitting sewing substitute, making it a great craft kit suggestion and a potential yarn store recommendation, fitting for a crochet workshop or handicraft demonstration.
The provided stitch library allows for easy pattern modification.
Embark on a creative journey with the Hourglass Beanie crochet pattern, designed to highlight the exceptional beauty of hand-dyed yarns. This project offers a delightful way to enhance your crochet skills while creating a stunning accessory.
Tips for Success
Achieving the perfect gauge is essential for the Hourglass Beanie crochet pattern, especially when working with the unique texture created by TGWTH handdyed yarn.
Ensuring your tension is consistent will provide a beautiful custom fit beanie. This aspect is key to a successful project when aiming for a polished, artisan made look.
For a truly bespoke headwear piece, paying attention to gauge guarantees the beanie will fit as intended.
This careful approach also enhances the fiber art showcase, allowing the wool blend benefits, such as nylon durability, to shine through, contributing to the yarn depth and overall desired aesthetic.
Mastering this detail is a step towards crochet mastery, especially with complex elements like this striking stitch pattern.

What is TGWTH handdyed yarn?
TGWTH handdyed yarn, marking a progressive step artisan yarn crafting trends, emerged from a burgeoning desire for distinctive, superior fibers within the crafting collective.
This yarn captivates due to its specialized hand-dyeing process, which imbues each skein with intricate tonal shifts and vibrant color variations, allowing textile artistry to exhibit striking stitch definition in elaborately textured creations such as the Hourglass Beanie crochet pattern.
Yarn Base Selection
Merino wool blend bases, frequently featured in TGWTH yarns, not only offer unparalleled softness but also optimize pattern clarity—every stitch displays subtle artistic expression, whether aiming for bold or nuanced effects.
For makers selecting handdyed skeins, it’s prudent to choose a base boasting excellent stitch definition and nylon durability, like a merino wool mixed with nylon, to guarantee your bespoke headwear and modern crochet fashion accessories are both comfortable and enduringly fabulous.
The Impact of Hand-Dyeing
The unique yarn properties of TGWTH, a true fiber art showcase, result from expert hand-dyeing techniques, creating remarkable yarn color variation that makes each project, like a custom fit beanie, a true original.
This attention to detail in dyeing contributes significantly to the overall aesthetic of the handmade hat design, ensuring every loop and twist of yarn adds to artistic expression and creative outlet.
A key aspect of working with this yarn involves understanding how the yarn depth and color saturation influence the appearance of different crochet stitches explained, making for a rewarding craft experience.
The Hourglass Beanie crochet pattern, for instance, beautifully highlights these qualities, transforming a simple beginner crochet hat into a piece of wearable art. This makes TGWTH a prime choice for those seeking innovative crochet, or perhaps a sewing substitute for projects requiring intricate color work.
Beginner crochet hat tips
Embarking on your first beginner crochet hat project with TGWTH handdyed yarn promises a rewarding craft and opens the door to a world of crochet fashion trends.
Foundational Stitches for Texture
Start with essential stitches, like single and double crochet, which form the basis for the eye-catching texture of a textured beanie tutorial or any quick crochet project.
This stepbystep guide to crochet stitches explained will lead you toward mastering the beautiful hourglass motif, a perfect example of how simple techniques can create stunning visual interest.
Achieving a Perfect Fit
Maintaining consistent tension is key—this ensures your handmade hat design achieves the classic fit and can be easily adapted into a slouchy beanie pattern, catering to your personal style accessory.
The Hourglass Beanie crochet pattern offers a pattern clarity that simplifies creating a custom fit beanie, transforming a basic necessity into a stylish creation for warm winter wear.
This accessible instructions approach guarantees a successful project, even for those new to artisan yarn crafting or seeking gift crochet ideas.
Finishing Touches for Professionalism
After finishing your fiber craft project, blocking your hat is a pro tip that smooths stitches and creates a polished profile, optimizing the color saturation and final shape of your DIY headwear.
This finishing step elevates any handmade item, making it resemble expertly crafted market stall items or a thoughtful craft kit suggestion, showcasing true textile innovation.
Blockquote:
For a truly professional look on your hand-dyed yarn creations, such as the Hourglass Beanie crochet pattern, blocking helps showcase the beautiful yarn color variation and ensures a perfect, wearable finish.
This attention to detail transforms your creation into a piece of textile artistry, a perfect example of modern crochet fashion and a stylish addition to any wardrobe.
It’s an excellent opportunity for artistic expression and to enjoy a satisfying project completion.
Consider exploring a crochet workshop or handicraft demonstration to further enhance your skills with unique yarn properties, making each creation in your stitch library a testament to your growing crochet mastery and contribution to the crafting community.
- TGWTH handdyed yarn is frequently crafted with Merino wool blend bases, offering softness and optimizing pattern clarity.
- The hand-dyeing process imbues each skein with intricate tonal shifts and vibrant color variations, showcasing yarn color variation.
- Choosing a base with good stitch definition and nylon durability, like a merino wool and nylon mix, ensures comfort and longevity for handmade items.
- The Hourglass Beanie crochet pattern is cited as an example that beautifully highlights the unique qualities of TGWTH yarn, transforming a simple hat into wearable art.
Textured beanie tutorial steps
Exploring beyond basic hat construction, the textured beanie tutorial emphasizes creative stitch techniques to enhance visual and tactile appeal for every fiber craft project. Hourglass Beanie crochet pattern designs frequently incorporate advanced stitches—think front or back post trebles and rich clusters—that deliver robust, sculpted surfaces.
The choice of yarn ply dramatically affects stitch definition: higher plies like those found in artisan yarn crafting amplify raised patterns, letting details pop, while lower ply yarns produce a gentle, blended effect that can soften intricate textures.
For smoother project completion, always weave yarn tails on the wrong side as you finish each motif, ensuring a neat finish without snagging or bulk trapped in dense stitches.
This stitch pattern approach guarantees a rewarding craft experience, setting you up perfectly for winter accessory pattern success as you explore merino wool blend benefits next.
Beyond Basic Stitches
Crochet stitches explained offer a vast realm for creating unique textures on your next handmade hat design.
Beyond simple increases and decreases common in a beginner crochet hat, explore stitches like the puff stitch, bobble stitch, or even cable stitches for truly eye-catching results in your stitch library. These techniques add depth and dimension, transforming a simple slouchy beanie pattern into a piece of textile artistry.
Yarn Ply and Stitch Visibility
Yarn depth significantly influences how your chosen stitches appear in your crochet fashion trends project.
Higher plies, common in artisan yarn crafting with TGWTH handdyed yarn, tend to showcase raised stitches more prominently, allowing for excellent stitch definition and vibrant color saturation.
Lower plies can create a softer, more subtle texture, which might be desirable for certain modern crochet fashion aesthetics but can sometimes obscure intricate stitch patterns.
Managing Yarn Tails
Practical tip for managing yarn tails when working textured patterns: Weave your yarn tails securely into the wrong side of your work as you go, using a tapestry needle.
This prevents them from showing through to the front and keeps your finished hat looking clean and professional, ensuring a successful project.
Merino wool blend benefits
Selecting the right fiber is essential, and merino wool blend offers a superior experience for those seeking both style and performance in modern crochet fashion.
Blending merino with nylon or other fibers yields enhanced elasticity and nylon durability, helping each quick crochet project retain shape and resist abrasion—an improvement over pure wool.
For warm winter wear and expressive, handmade hat design, these blends provide gentle warmth, breathability, and luxurious softness ideal for beginner crochet hat or experienced makers.
For garment longevity, gently hand wash your beanie in cool water with a mild wool-safe detergent, press rather than wring, and dry flat to protect both color saturation and stitch definition—ensuring your fiber art showcase piece lasts for seasons to come.
Durability and Elasticity
Wool blend benefits, particularly with additions like nylon, significantly enhance a garment’s wearability for your stylish crochet accessories.
The inherent strength and elasticity of these fibers mean your project completion is more durable and retains its shape better than pure wool, offering excellent value for your craft inspiration. This makes your bespoke headwear resilient to frequent wear and washing.
Caring for Your Blend
To maintain the beauty of your merino wool blend creation, follow simple care instructions for a successful project.
Gently hand wash your handmade hat design in cool water with a wool-safe detergent.
Avoid wringing; instead, press out excess water. Lay the item flat to dry, preserving its shape, color saturation, and stitch definition for long-lasting enjoyment.
This care ensures your fiber art showcase piece remains a personal style accessory.
- Advanced crochet stitches like front or back post trebles and clusters create robust, sculpted surfaces on textured beanies.
- Higher yarn plies enhance stitch definition, making raised patterns more prominent, while lower plies create a softer, blended effect.
- Merino wool blends with fibers like nylon offer improved elasticity and durability, helping crochet projects retain shape and resist abrasion.
- Proper care for merino wool blends involves gentle hand washing in cool water and flat drying to preserve color and stitch definition.
Modern Crochet Fashion Essentials
Modern crochet fashion represents an evolution from traditional craft into a dynamic force in contemporary style and wardrobe versatility. Contemporary designers are increasingly highlighting textile artistry by integrating innovative crochet patterns into everyday wear, offering everything from elegant tops to striking accessories.
Fashion essentials, such as the iconic Hourglass Beanie crochet pattern, particularly benefit from the use of TGWTH handdyed yarn.
This choice ensures remarkable color saturation and intricate stitch definition, transforming each piece into a unique work of art.
The resulting handmade hat design elevates basic outfits into refined cold-weather wear, demonstrating how modern crochet provides accessible instructions and rewarding craft inspiration for everyday ensembles.
Achieving a chic stylish look for winter is readily accomplished by pairing a textured beanie tutorial, like the Hourglass Beanie, with a well-tailored wool coat, a classic neutral scarf, and elegant boots.
This combination beautifully blends tradition with current trends, all while expressing personal flair. The Hourglass Beanie crochet pattern itself offers a quick crochet project, serving as a perfect example of modern crochet fashion‘s appeal.
Artisan Yarn Crafting Guide
Unique yarn sourcing infuses every fiber craft project with distinctive qualities, as artisan yarn crafting celebrates individuality in both material selection and the aesthetic of the finished accessory.
This approach ensures that each creation is truly one-of-a-kind, reflecting personal taste and creative spirit.
Fiber preparations, such as worsted spun or chain-plied techniques, play a significant role in achieving excellent stitch clarity. These methods lend durability and warmth to accessories, making them ideal for items like the beginner crochet hat or a cozy slouchy beanie pattern.
The merino wool blend found in TGWTH hand-dyed yarn is frequently favored for its enhanced stitch definition, beautiful yarn color variation, and dependable nylon durability, all contributing factors to its popularity in modern crochet fashion.
For the best preservation of handspun yarn and specialty yarns, it is recommended to store them in breathable cotton bags or their original skeins.
Supplementing this storage with cedar or lavender sachets helps protect their texture integrity and yarn depth.
This care ensures that each artisan made creation remains vibrant, supporting future pattern modification and guaranteeing that every piece is a testament to successful project completion and a fulfilling creative outlet.
- Modern crochet fashion integrates innovative patterns into everyday wear, transforming basic outfits into refined ensembles.
- The Hourglass Beanie crochet pattern, using TGWTH handdyed yarn, exemplifies modern crochet’s appeal as a quick and rewarding project.
- Artisan yarn crafting, utilizing techniques like worsted spun and chain-plied, enhances stitch clarity and durability for projects like beginner crochet hats.
- Merino wool blends are favored in modern crochet fashion for their stitch definition, yarn color variation, and nylon durability.
Winter Accessory Pattern Preview
Winter accessory patterns offer more than just hats; explore cozy headbands and scarves, employing advanced crochet techniques for maximum warmth and style. The Hourglass Beanie crochet pattern, a prime example of modern crochet fashion, utilizes dense stitch patterns that effectively trap air, enhancing insulation for your handmade hat design.
TGWTH hand-dyed yarn, with its exceptional color saturation and yarn depth, complements this accessory beautifully, showcasing artisan yarn crafting.
Selecting a merino wool blend, often combined with nylon durability, for your crochet project guarantees a soft texture and excellent temperature retention, making it ideal for warm winter wear.
Textile artistry shines in these projects, transforming simple stitches into intricate designs. This step-by-step guide for a textured beanie tutorial makes crafting enjoyable, providing accessible instructions suitable for a beginner crochet hat project.
The slouchy beanie pattern option allows for personal style accessory customization, while the focus on pattern clarity ensures a rewarding craft experience. Discover how the unique yarn properties of hand-dyed skeins can lead to a truly unique yarn color variation in every piece.
This fiber craft project is a testament to innovative crochet and a rewarding way to achieve crochet mastery.
From market stall items to gift crochet ideas, this pattern offers a creative outlet for artistic expression.
Crafting Your Cozy Creations
The Hourglass Beanie crochet pattern is celebrated for its modern design and unique hourglass texture, perfect for those seeking beautiful crochet fashion trends. This beginner crochet hat project is designed with accessible instructions, making it a fantastic starting point for new crafters and a delightful, quick crochet project for seasoned artisans.
Working with TGWTH hand-dyed yarn, especially a luxurious merino wool blend, significantly enhances the stitch definition and overall quality of your stylish crochet accessories. The blend of merino wool benefits, like softness and warmth, with nylon durability creates a resilient and comfortable handmade hat design.
This pattern is a true celebration of artisan yarn crafting, allowing the inherent beauty of hand-dyed skeins to shine, resulting in a unique yarn color variation in each finished piece.
Instructions are meticulously crafted to provide pattern clarity, ensuring a successful project.
Whether you’re looking for a satisfying fiber craft project or inspiration for your next handmade hat design, this tutorial offers a rewarding craft experience. The design allows for a custom fit beanie, catering to individual preferences and making it ideal for gift crochet ideas or personal style accessory creation.
Tip for Maximum Insulation: When focusing on warmth, prioritize natural fibers like merino wool or alpaca, or high-quality blends that offer excellent thermal properties—these materials significantly improve the insulation factor of any crochet project.
The project is structured to be a quick crochet project, offering a rewarding craft and a tangible sense of accomplishment upon project completion.
It’s an excellent way to explore stitch patterns and achieve crochet mastery.
Joining the crafting community with this project can lead to sharing insights on yarn depth and color saturation.
The Hourglass Beanie crochet pattern serves as an excellent foundation for developing skills in textile innovation and bespoke headwear creation. It represents a perfect blend of functional design and artistic expression, offering a creative outlet for all.
Key Highlights of the Winter Accessory Patterns
- The Hourglass Beanie crochet pattern uses dense stitch patterns for enhanced insulation and warmth.
- Merino wool blends, often combined with nylon, are recommended for their soft texture and excellent temperature retention in crochet projects.
- The patterns are designed with accessible instructions, making them suitable for beginner crochet hat projects and offering pattern clarity for a rewarding craft experience.
- Hand-dyed yarn, such as TGWTH hand-dyed yarn, is highlighted for its exceptional color saturation and depth, contributing to unique yarn color variations in finished pieces.
How To Crochet Highland Cow Amigurumi Patterns

Highland cow amigurumi enthusiasts can explore an array of crochet patterns for lifelike Scottish cattle with shaggy coats and signature horns, suitable for both beginner crochet and advanced amigurumi makers. Step confidently into plushie making by selecting patterns with photo assembly guides and clear amigurumi instructions, ensuring successful safety eye installation, stuffing plush toys, and shaping plush features.
From mini Highland cows to pillow plushies, free patterns offer accessible entry points, while paid patterns deliver intricate detail designs, colorwork realism, and finishing tips such as fluffing hair and stitching horns.
Platforms like Etsy, Ravelry, and dedicated craft blogs host a rich amigurumi collection, letting you craft personalized cows or handmade gifts with customizable accessories.
Detailed yarn weights and fiber choices play a key role in achieving a wooly coat amigurumi with authentic plushie texture for your Scottish cattle crafts.
Select soft acrylic for beginner crochet projects, balancing fluffiness and durability, or opt for natural cotton blends for advanced amigurumi requiring crisp stitch definition and breathability. Consider the tactile experience: fuzzy and boucle yarns add lifelike cows effects, while smoother yarn yields refined horn yarn and snout yarn.
Techniques like single crochet and half double crochet provide a snug plushie structure and support basic sewing assembly for secure ears and horns.
Pick main yarn colors reflecting the Highland cow’s coat, then integrate embellishment tips for embroidered hooves or pompom tails, elevating your DIY plush toys for nursery decor or collectible plush toy displays. These craft patterns are essential for creating delightful stuffed animal patterns.
When embarking on your yarn craft project, focusing on the core crochet hook usage and yarn needle skills is paramount.
Understanding the magic ring technique is foundational for creating seamless starts for your plush toy pattern.
Mastering increase decrease methods efficiently shapes your small plush cows and larger creations, while working back loops can add definition to specific textures.
Curly forelock patterns and twisted horn patterns are often highlighted within these comprehensive guides, offering pathways to achieve realistic markings. Exploring various learning styles is supported by both written tutorials and video tutorials, making the journey of yarn sculpting accessible.
Creating these lovable creatures involves careful attention to detail, from the initial yarn selection to the final assembly. Each stitch contributes to the overall charm of your fluffy Highland cow, whether intended as cuddle toys or cherished collectible plush toys.
The process itself is a rewarding experience, offering crafting inspiration and opportunities for personal growth in your crafting abilities.
Choosing Your Highland cow amigurumi
Dive into selecting the right yarn for that iconic wooly coat, differentiating between acrylic and cotton for plushness and durability.
Consider the tactile experience of different fibers, choosing those that best suit your cuddly creation.
Remember the foundational stitches discussed earlier for crafting snug joins and ensuring the structural integrity of your piece, making it a perfect example of a crochet plushie pattern.
Detailed yarn weights and fiber choices play a key role in achieving a wooly coat amigurumi with authentic plushie texture for your Scottish cattle crafts. Select soft acrylic for beginner crochet projects, balancing fluffiness and durability, or opt for natural cotton blends for advanced amigurumi requiring crisp stitch definition and breathability.
Consider the tactile experience: fuzzy and boucle yarns add lifelike cows effects, while smoother yarn yields refined horn yarn and snout yarn.
The foundational stitches like single crochet and half double crochet provide a snug plushie structure and support basic sewing assembly for secure ears and horns. Pick main yarn colors reflecting the Highland cow’s coat, then integrate embellishment tips for embroidered hooves or pompom tails, elevating your DIY plush toys for nursery decor or collectible plush toy displays.
These craft patterns are essential for creating delightful stuffed animal patterns.
Highland cow amigurumi patterns allow crafters to make unique plushies showcasing the breed’s shaggy fur and curved horns, often with step-by-step photo instructions.
Most patterns list detailed yarn weights, hook sizes, and embellishments for realism, such as embroidered hooves or pom-pom tails.
Amigurumi Highland cows make charming handmade gifts, nursery decor, and collectibles, and can be personalized with colors and accessories.
Experienced pattern writers often include finishing tips—like how to fluff the hair for maximum cuteness and securely stitch horns and ears for safe play, ensuring your creation becomes a safe play plushie. Free and paid patterns offer a wide range of designs, ensuring styles for both beginners learning basic stitches and experts seeking creative amigurumi challenges.
This section is a gateway to mastering amigurumi instructions for truly charming stuffed Highland cows.

Finding the Best Crochet Patterns
Crochet patterns crafted for animal forms, particularly Highland cow amigurumi, often showcase expert shaping and intricate detailing, appealing to enthusiasts of plushie making. Seek out pattern designers who specialize in Scottish cattle crafts, as they tend to incorporate unique touches like twisted horn patterns and wooly coat amigurumi textures, elevating the finished product.
Understanding stitch notations beyond the common US and UK conventions will broaden your access to amazing crochet patterns, simplifying the interpretation of instructions from advanced amigurumi creators worldwide.
Always prioritize patterns that include clear photo assembly guides and detailed shaping instructions; these visual aids are indispensable for creating lifelike cows and are often found within detailed yarn weights and crochet hook sizes.
Photo-rich crochet animal patterns that teach customizable accessories, securing horns, and assembling plush toy pattern details with precision are highly recommended for a rewarding crafting inspiration.
Mastering Plushie Making Basics
Stuffed animal patterns, such as those for Highland cow amigurumi, necessitate a firm grasp of foundational techniques for even distribution of stuffing plush toys and achieving seamless basic sewing assembly. Successful plushie making begins with carefully turning pieces right-side out to create neat seams, ensuring your Scottish cattle plushies possess well-defined, fluffy shapes and are safe play plushies.
For optimal structural integrity and to achieve the best results, vary stuffing densities; use firmer filling in limbs and softer stuffing in large plush cows or the main body sections. Seamless joins—accomplished using a yarn needle and matching yarn—are essential for invisible attachments, particularly when stitching horns or securing ears to a fluffy Highland cow, and are a hallmark of professional amigurumi.
Reliable amigurumi tutorial resources, available as both written tutorials and video tutorials, cater to diverse learning styles and significantly enhance the finish of every DIY plush toy and collectible plush toy within your amigurumi collection.
Key Takeaways for Crafting Highland Cow Amigurumi
- Seek patterns from designers specializing in Scottish cattle crafts for unique details like twisted horns and wooly coat textures.
- Understanding various stitch notations beyond US and UK conventions is crucial for accessing advanced global amigurumi patterns.
- Achieving well-defined shapes in plushies requires careful turning of pieces, even stuffing distribution, and seamless joins using a yarn needle.
- Clear photo assembly guides and detailed shaping instructions are indispensable for creating lifelike amigurumi, especially when securing elements like horns and ears.
Creating Scottish Cattle Crafts
Scottish cattle crafts offer a rich tapestry of creative possibilities, extending well beyond the classic Highland cow amigurumi crochet patterns. Crafters are encouraged to explore alternative mediums such as needle felting or simple sewn plush shapes to represent these iconic animals.
Needle felting, for instance, allows artists to sculpt incredibly lifelike shaggy manes and intricately twisted horn yarn details.
This is achieved by skillfully layering colored wool, employing multi-needle tools for added fluff, and shaping the horns separately before securely attaching them using basic sewing assembly or a robust fabric glue.
Simple sewn plush shapes, typically crafted from felt or fleece, present an accessible beginner crochet alternative. These projects can feature fringed fabric expertly cut to mimic fluffy coats, and felt horns that attach with ease to small plush cows.
Stuffed animal patterns, in general, can be adapted in scale. Whether you aim for miniature Highland cows or generously sized pillow plushies, these adaptable patterns promise quick, satisfying results and foster confidence in every DIY plush toy enthusiast.
By embracing these beginner-friendly practices and integrating elements like curly forelock patterns and straightforward sewing techniques, creating charming and display-worthy Scottish cattle plushies becomes an achievable delight.
Crafting Wooly Coat Amigurumi
The world of Highland cow amigurumi truly shines when focusing on textured stitches that beautifully showcase their famously fluffy coats, leading to unique plushie making experiences suitable for all skill levels.
Crochet patterns frequently utilize the bobble stitch or the loop stitch to authentically replicate the breed’s iconic wooly mane.
Achieving the desired density and plushness often involves a combination of worsted or chunky weight yarn and a small crochet hook. These specific stitch patterns, when placed strategically along the cow’s back and forehead, naturally create a wonderfully tousled fleece effect.
Following an amigurumi tutorial, a crafter can employ the magic ring technique and single crochet stitches for seamless body shaping. Subsequently, adding carefully selected horn yarn and other embellishments will bring a lifelike quality to the Scottish cattle plushie.
Stuffed animal patterns also offer ample room for personalization.
Consider adding charming flower embellishments, intricate embroidered hooves, or playful pompom tails.
This flexibility allows crafters to easily transition between creating mini Highland cows and larger pillow plushies, depending on their individual creative challenges and desired outcomes. This versatile approach invariably results in plush toy patterns possessing irresistible fuzzy hair effects, yielding collectible plush toys that are perfect for both display and delightful cuddling.
| Crafting Mediums | Techniques for Texture | Customization Options |
|---|---|---|
| Needle Felting, Simple Sewn Plush Shapes, Crochet Amigurumi | Bobble stitch, Loop stitch, Layering colored wool | Fringed fabric, Felt horns, Flower embellishments, Embroidered hooves, Pompom tails |
| Versatile for various plush sizes | Skillful layering for lifelike manes and horns | Adaptable stuffed animal patterns for different scales |
Beginning Beginner Crochet Projects
Highland cow amigurumi projects introduce beginners to the delightful world of plushie making, perfect for capturing the charm of Scottish cattle crafts. Crochet patterns employing the intarsia method simplify colorwork, enabling the creation of distinctive patches of color for realistic markings without complex yarn management.
Practicing with swatch samples helps maintain consistent tension, a vital skill for achieving uniform stitch sizes and a polished finish in your yarn sculpting.
Minimal shaping patterns, such as simple flat circles or basic cow bodies, are excellent for building confidence as you master foundational stitches like single crochet and half double crochet.
Starting with a free pattern that highlights straightforward color changes, secure weaving of yarn ends, and basic sewing assembly will ensure your first DIY plush toys are delightful and stress-free creations. This approach supports different learning styles, offering both written tutorials and video tutorials for guidance.
Understanding Advanced Amigurumi Techniques
Advanced amigurumi designs elevate stuffed animal patterns by introducing sophisticated shaping techniques beyond basic increase and decrease.
Mastering variations of the magic ring technique creates tighter, gap-free bases essential for premium plushies. Enthusiasts also employ front and back post stitches, adding subtle texture to simulate the realistic fur of a fluffy Highland cow or to create intricate detail designs on horns and forelocks.
Jointed elements, such as poseable legs and tails, are crafted using durable yarn or safety joints, granting your stuffed animal patterns increased movement and lifelike features.
To add realism, securely encase weighted pellets in fabric pouches before stuffing plush toys, preventing leaks and enhancing their substantial feel.
These more complex techniques are often detailed in comprehensive crochet tutorials and paid patterns, distinguishing your wooly coat amigurumi within an amigurumi collection.
Key Takeaways for Amigurumi Crocheters
- Beginners can start with Highland cow amigurumi using intarsia crochet patterns for simplified colorwork.
- Consistent tension is crucial for achieving uniform stitch sizes and a polished finish in amigurumi projects.
- Advanced techniques include mastering the magic ring for gap-free bases and using post stitches for texture.
- Jointed elements and weighted pellets can be incorporated into amigurumi for increased movement and a more substantial feel.
Assembling Your DIY Plush Toys
Bringing your Highland cow amigurumi to life relies on thoughtful plushie assembly and careful feature placement. Consider the art of assembly, focusing on the precise placement of safety eye installation and embroidered features like noses for character expression.
For added charm, embroidered features—like the nose—are stitched with matching or contrasting yarn, using a fine yarn needle skills for clean details and character, enhancing its appeal as a plush toy pattern.
Attaching Limbs and Internal Support
When attaching limbs, each piece is neatly aligned and sewn into the body using basic sewing assembly and ladder stitches for a polished finish.
Stuffing plush toys with small amounts of filler and shaping as you go maintains the plushie’s structure. For toys intended for more handling, learn about adding internal support or armature for durability and posability.
Secure limbs and use even stitches to ensure your DIY plush toy stands up to frequent cuddling or display as a collectible Scottish cattle crafts creation.
Adding Expressive Details
The secure installation of safety eyes; test positions while lightly stuffing the head, ensuring they’re symmetrical and reflect your chosen expression. Consider the curly forelock patterns and twisted horn patterns to achieve a lifelike cow.
Many patterns include photo assembly guides and techniques for shaping plush features and securing horns, along with tips for fluffing hair to create fuzzy hair effects for a more realistic look.
Key Aspects of Plush Toy Assembly
- Precise placement of safety eyes and embroidered features is crucial for character expression.
- Ladder stitches are recommended for neatly attaching limbs to the body for a polished finish.
- Internal support or armatures can be added for durability and posability, especially for toys intended for frequent handling.
- Utilizing photo assembly guides and techniques for shaping plush features, securing horns, and fluffing hair contributes to a more realistic and appealing final product.
How To Crochet A Honeycomb Cardigan With Granny Squares

Crochet techniques, specifically the charming bobble stitch, create the delightful honeycomb texture defining this cardigan’s appeal. These bobble granny squares offer a cozy depth and a touch of vintage style, making it a standout piece.
Fluffy yarn crochet is paramount for achieving that sought-after warmth and luxurious feel throughout the garment.
Carefully measuring each bobble square allows for a perfect custom fit, particularly for the fashionable cropped silhouette and the voluminous balloon sleeve crochet design.
The clever granny square assembly, using methods like the single crochet join or the continuous join, transforms individual squares into a cohesive piece of wearable art with clean, professional seams. This unique bobble stitch cardigan design and its intricate construction result in a trendy, handmade sweater that will undoubtedly become a cherished item within your fiber arts collection.
Your next step involves Choosing Your Fluffy Yarn.
Choosing Your Fluffy Yarn
Yarn selection is the foundation for crafting a luxuriously soft granny square cardigan, so prioritize fibers that promise plushness. Consider options like brushed acrylic yarn for easy care, luxurious merino wool yarn for exceptional softness, or even novelty yarns such as chenille and faux fur for unique texture and abundant warmth.
For the honeycomb cardigan crochet, using bulky yarn or a substantial worsted weight yarn will create a thicker, wonderfully cozy fabric that truly accentuates the bobble detail.
A yarn with a solid ply, ideally between 2 and 4 plies, will provide a better drape, essential for creating elegant balloon sleeves and ensuring the garment’s durability.
Crochet craft experts often suggest fluffy or brushed yarn finishes to enhance the distinctive honeycomb effect; it’s best to avoid slick, tightly spun strands if a cozier outcome is desired. When it comes to handmade sweater care, differentiating between fiber types is key—machine wash acrylics, but always lay wool or delicate blends flat to dry to maintain their softness and longevity, ensuring your DIY fashion piece lasts for years.
Fiber Types and Weights
Soft yarn is essential for a cloud-like feel; exploring options such as acrylic yarn, alpaca yarn, or mohair yarn can provide the plushness you desire for a truly cozy experience.
Worsted weight yarn and DK weight yarn are excellent choices, offering a good balance between warmth and stitch definition for this project. Merino wool yarn and wool blend yarn also lend themselves beautifully to this cardigan’s design, providing natural warmth and a soft hand.
For an extra touch of luxury and texture, consider alpaca yarn or mohair yarn, which can significantly enhance the fluffy aesthetic.
Ply and Drape
Yarn crafting involves understanding how yarn ply influences the final fabric – a solid ply, typically from 2 to 4 strands twisted together, offers improved drape and greater durability than single-ply yarns.
Gauge swatch creation helps confirm your yarn’s behavior, ensuring the intended drape for the balloon sleeve crochet and overall fit.
Crochet instructions often emphasize using yarns with good elasticity to prevent stretching out of shape, especially in a garment like this.
Enhancing Fluffiness
Textured crochet is amplified by choosing fluffy fibers; look for yarns specifically labeled as brushed, boucle, or novelty to boost the honeycomb effect. Bobble stitch cardigan projects benefit greatly from yarns that can hold shape while still providing a soft, inviting texture.
Crochet tips suggest experimenting with different yarn textures to see how they interact with the bobble stitch, ensuring a visually appealing and tactilely pleasing outcome for your crochet project.
Care and Longevity
Garment making necessitates proper care to maintain the beauty of your creation; acrylic yarn is generally machine washable and dryable on low heat. Natural fibers like merino wool yarn or alpaca yarn typically require hand washing in cool water and laying flat to dry to prevent shrinking or felting.
Finishing techniques, including proper blocking, can help set your stitches and ensure the cardigan retains its shape and softness over time, making it a true piece of wearable art.

Mastering the Bobble Granny Square
Bobble stitch placement unlocks the bold, textural style that defines a honeycomb cardigan. Granny square cardigan makers achieve greater dimension by mapping bobbles at the center or corners of each square; this highlights the honeycomb effect and increases visual impact.
Yarn crafting offers many alternative bobble stitch methods, like the puff and popcorn stitches, adding unique texture—offering variety for creative crocheters pursuing eye-catching results.
Yarn selection matters greatly; worsted weight yarn ensures crisp, raised bobble detail, while fluffy yarn crochet with bulky weights achieves plush, cloud-like pops.
To maintain professional, even bobble size throughout your crochet project, count each yarn over and keep tension consistent across all stitches. Crafting uniform bobbles results in a cohesive, polished square ready for a stylish, modern crochet garment, ideal for DIY fashion or a handmade sweater creation.
Strategic Bobble Placement
Bobble detail placement significantly contributes to the visual appeal of your work.
Crochet techniques for bobble placement involve strategically positioning them to create patterns, adding depth. For instance, placing bobbles on the interior of a square can create a subtle texture, while concentrating them along the edges or at corners can provide a more pronounced decorative effect, enhancing the overall design of a stylish sweater or a cozy cardigan.
This careful consideration of where each bobble stitch appears truly elevates the finished piece, making it a true wearable art.
Varied Bobble Textures
Stitch variations extend beyond the basic bobble, offering diverse textures for your projects.
Exploring alternative bobble stitch techniques, such as the puff stitch or popcorn stitch, adds a different dimension of fluffiness and definition to your crochet craft.
These methods can yield slightly different visual and tactile results, allowing for greater creative expression in your garment making. Selecting the right yarn selection is also key; softer, fluffier fibers like mohair yarn or wool blend yarn can enhance the plushness of these stitches, creating a wonderfully cozy and luxurious feel for any project.
Optimizing Bobble Definition
Yarn selection plays a key role in achieving optimal bobble definition.
For a crisp, defined bobble, consider using yarns like worsted weight yarn or DK weight yarn. These weights provide enough structure for stitches to pop without becoming lost.
Conversely, fluffy yarn crochet using bulky yarn or novelty yarn can create softer, more diffused bobbles that contribute to a wonderfully plush and inviting texture, perfect for a cozy cardigan.
Whichever path you choose, pay close attention to your stitch count and tension for the best results.
Consistent Bobble Sizing
Crochet tips for consistent bobble size are paramount for a polished appearance.
To achieve uniform bobbles across your granny square method, strive for consistent tension in every stitch. Counting your yarn overs for each bobble, particularly when using different stitches or yarn types, helps maintain regularity.
Practicing with a gauge swatch beforehand, using your chosen yarn and hook, will also ensure all your bobble patterns are the same size, making your joining squares process smoother.
Granny Square Assembly Guide
Granny square assembly is the strategic process that transforms individual bobble granny squares into a refined cropped cardigan pattern. Joining squares with invisible seam techniques like slip stitch, whip stitch, or a continuous join gives your textured crochet garment a flawless finish.
Yarn weight choices should remain consistent with your original squares, as using the same worsted or bulky yarn maintains the correct gauge for seamless assembly and prevents distortion.
When planning layout, organize your squares according to sleeve construction and cropped silhouette for accurate sizing and aesthetically pleasing sleeve and body proportions.
Reinforce joins at high-stress points—such as underarms and shoulder seams—using extra stitches or a finer yarn to boost structural integrity, ensuring your handmade sweater stands up to everyday wear in cozy fashion crochet style.
Seamless Joining Methods
Joining squares with invisible seam techniques ensures your finished crochet project looks professional. Methods such as the slip stitch, whip stitch, or a continuous join create clean, nearly invisible seams, allowing the textures of your bobble detail to stand out.
These techniques are essential for sophisticated garment making, contributing to a polished look for any handmade sweater or cozy cardigan. Practicing these methods on smaller swatches of your chosen yarn, whether it’s merino wool yarn or acrylic yarn, will build confidence for joining the entire piece.
Strategic Square Layout
Granny square assembly requires careful planning of your square layout for optimal garment shaping.
Organizing your crocheted squares according to your desired cropped silhouette and sleeve construction is key.
For example, when creating balloon sleeve crochet, you will need to arrange more squares to achieve the desired width for the sleeves compared to standard sleeves.
Considering the overall stitch count and how squares will fit together prevents distortion and ensures a flattering fit for your stylish sweater, offering a beautiful blend of retro fashion and modern crochet.
Reinforcing Key Joining Points
For enhanced structural integrity in your crochet project, reinforcing key joining points is advisable. This involves adding extra stitches or using a slightly finer yarn at areas experiencing more stress, such as shoulder seams or underarm areas.
Proper reinforcement ensures your handmade sweater, whether a beginner crochet item or an advanced crochet piece, maintains its shape and durability over time. This attention to detail elevates your craft inspiration and results in a garment that’s both beautiful and resilient, making it a perfect gift idea crochet.
| Yarn Weight Recommendation | Bobble Definition | Texture Result |
|---|---|---|
| Worsted Weight Yarn | Crisp, Raised Bobble Detail | Defined, Structured |
| Bulky Weight Yarn | Plush, Cloud-like Pops | Soft, Inviting |
| DK Weight Yarn | Clear, Defined Bobble | Neat, Polished |
| Novelty Yarn | Softer, More Diffused Bobbles | Unique, Plush |
Crocheting Balloon Sleeves
Transforming a simple sleeve into a balloon sleeve crochet masterpiece begins with mastering stitch shaping and mindful assembly. Increasing your stitch count at the upper and midsections creates signature fullness, while strategic decreases at the cuff retain the classic puffy silhouette associated with textured crochet cardigans.
When planning sleeve construction, precise joining of bobble granny squares is essential for a seamless transition to the main body, mirroring the granny square assembly of a honeycomb cardigan.
For successful yarn management around the sleeve’s circumference, use stitch markers and manage yarn tails for a tidy, professional finish—especially helpful on larger DIY fashion projects using fluffy yarn crochet techniques.
Select soft yarn for ultimate comfort and visual appeal, a key step in creating your garment.
Crochet sample bobble granny squares, then measure them to determine how many are needed for your desired size and shape, a process essential for garment making. Join squares for front, back, and sleeves using slip stitch, whip stitch, or continuous join techniques, a fundamental assembly technique.
Assemble squares to shape the cropped silhouette and balloon sleeves; sleeve sizing depends on square number and arrangement within your crochet project. Add ribbing, cuffs, and finishing details to polish the cardigan, enhancing its wearable art appeal.
Use suitable blocking to smooth seams and enhance the garment’s drape, ensuring a well-fitted, stylish sweater for your yarn crafting collection.
Crocheting Techniques for Cardigans
Creating a granny square cardigan that balances coziness and structure hinges on smart construction choices and stitch adaptations.
Cardigan construction methods vary significantly, with bottom-up approaches (often used in honeycomb cardigans) involving the stepwise joining of squares for the body and sleeves, while top-down builds start from the neckline for faster assembly.
Adapting stitches like the bobble stitch cardigan or using tighter crochet techniques on button bands adds both texture and stability to the garment, improving its overall durability. The choice of stitches and yarn—from plush fluffy fibers to dense joins—directly influences the cardigan’s drape and comfort.
For finishing touches, crocheting ribbed or slip stitch button bands and neckline edges ensures polished, handmade sweater appeal in any stylish or vintage crochet cardigan project, reflecting beautiful fiber arts.
Cardigan Construction Approaches
Cardigan construction methods offer distinct pathways to building your handmade sweater. The bottom-up approach, often seen in granny square cardigan designs, involves assembling and joining individual squares or sections sequentially to form the body and sleeves.
Conversely, top-down builds commence at the neckline, gradually expanding the garment to create the body and sleeves, a method that can sometimes facilitate quicker assembly and easier sleeve integration for beginner crochet enthusiasts.
Understanding these different crochet instructions is key to selecting a method that suits your project and skill level.
Adapting Stitches for Structure
You can adapt common crochet stitches for a more structured cardigan fabric, significantly impacting the finished garment’s feel and appearance.
Tighter stitches or specific stitch variations used on edges like button bands or necklines provide neatness and prevent stretching, contributing to the overall polish of a crochet craft project. Using stitches such as single crochet or slip stitch for edging can create a firm border, contrasting nicely with the looser stitches used for the main body, enhancing the textured crochet elements.
Employing a denser fabric also means your cozy cardigan will hold its shape better over time against frequent wear.
Linking Stitches to Comfort and Drape
The selection of stitches and yarn type directly influences a cardigan’s comfort and drape. For instance, using bulky yarn or incorporating stitches that create loft, like the bobble stitch, results in a warmer, more substantial garment that provides excellent coziness.
Softer yarns such as merino wool yarn or alpaca yarn contribute to a plush feel, enhancing the comfort factor of your DIY clothing.
Conversely, yarns with less elasticity or stitches that create a dense fabric can lead to a more structured drape.
The ultimate balance depends on your desired tactile experience and the overall aesthetic of your fashion crochet design.
Finishing Touches: Button Bands and Necklines
Polishing your cardigan involves meticulous attention to finishing techniques, particularly around button bands and neckline edges, ensuring a professional look for your crafty projects. Crocheting a defined edge, such as a ribbed band using front and back post stitches or a clean slip stitch border, adds structure and prevents fraying.
For button bands, ensuring consistent tension is key to a neat appearance, and the placement of buttonholes will depend on your chosen button size and the overall garment’s fit. Adding a well-worked neckline, whether it’s a simple crochet edge or a more intricate pattern, completes the aesthetic of your stylish sweater, making it a desirable gift idea crochet.
- Mastering stitch shaping and mindful assembly, including increasing stitch count in upper and midsections and strategic decreases at the cuff, is crucial for creating balloon sleeves with their signature fullness and classic puffy silhouette.
- Precise joining of bobble granny squares is essential for a seamless transition to the main body of a cardigan, mirroring the assembly of other granny square designs.
- Selecting soft yarn, crocheting sample squares to determine quantity, and using appropriate joining techniques like slip stitch or whip stitch are fundamental steps in garment making for projects like balloon sleeve cardigans.
- Cardigan construction methods, whether bottom-up or top-down, along with adapting stitches for structure on edges and choosing yarns that influence comfort and drape, significantly impact the final appearance and wearability of a handmade sweater.
Textured Crochet for Comfort
Explore how different stitch combinations create tactile interest beyond basic patterns. Connecting stitch texture to yarn choice emphasizes fibers that enhance coziness.
Discover practical advice on how to achieve a soft hand-feel in finished garments.
Suggest specific textured stitches that are conducive to relaxing wear.
Exploring Stitch Variations
Textured crochet techniques transform simple patterns into cozy, visually striking wearable art by using varied stitch combinations and thoughtfully selected yarn types. Bobble stitch and popcorn stitches create plush, raised surfaces that lend a honeycomb effect to cardigans, while techniques like front post double crochet and surface crochet add depth and tactile interest for a true bobble stitch cardigan.
Choosing fluffy yarn—such as acrylic blends, mohair yarn, or chenille—further enhances coziness and softness, making each granny square irresistibly touchable. For a soft hand-feel, pre-washing natural fibers, working with slightly larger hooks, and maintaining a relaxed gauge are essential tips for your next cozy cardigan.
Practical stitches for relaxing wear include the moss stitch, shell stitch, bean stitch, and Prairie stitch—each delivering gentle, soothing textures.
Enhancing Coziness with Yarn Selection
Selecting the perfect fluffy fibers significantly contributes to the overall comfort of a crocheted piece.
Consider the benefits of bulky yarn and soft yarn when aiming for a truly snug garment.
Many crocheters opt for luxurious options like merino wool yarn, alpaca yarn, or mohamair yarn for their exceptional warmth and natural softness. Similarly, blends like wool blend yarn can offer a wonderful balance of properties.
Alternatively, acrylic and novelty yarns provide accessible softness and unique textures, making DIY fashion projects enjoyable for all skill levels. When making your yarn selection, think about how different textures, such as those from a bobble pattern, will interact with the chosen fibers.
Achieving a Soft Hand-Feel
To achieve a desirable soft hand-feel in your finished garments, several practical approaches can be employed.
It is often beneficial to block crochet pieces before assembly, as this process smooths out stitches and evens out the fabric.
When selecting your yarn crafting materials, natural fibers like wool and alpaca often soften considerably after washing.
Using a slightly larger hook than recommended for a particular weight of yarn can also create a looser, softer fabric. Maintaining a consistent, relaxed tension throughout your crochet craft is equally important for a more pliable result.
This attention to detail in your crochet instructions ensures a more comfortable and luxurious final product.
Recommended Textured Stitches
Several stitch variations naturally lend themselves to creating relaxing and comfortable wear. The moss stitch, also known as the granite stitch, produces a dense yet flexible fabric that is wonderfully soft.
Similarly, the shell stitch provides a beautiful, scalloped texture that adds visual interest without stiffness.
The bean stitch creates a slightly raised, bumpy texture that is both cozy and unique.
For an even more pronounced tactile experience, consider stitches like the Puff stitch or the very popular bobble stitch, which add delightful dimensionality. These stitch variations are perfect for projects like a cozy cardigan or a stylish handmade sweater.
Cardigan Style and Fit
Relate fit considerations to the yarn’s drape and stitch definition.
Provide guidance on how to measure for a flattering cardigan fit. Explain how to adjust patterns for different body shapes and desired silhouettes.
Offer styling tips to maximize the aesthetic appeal of a crocheted cardigan.
Measuring for a Flattering Fit
Cardigan style and fit begin with understanding how yarn drape and stitch definition work together to shape the finished garment, especially when planning a cropped cardigan pattern or balloon sleeves.
Precise measurement is key; track bust circumference, shoulder width, sleeve sizing, and overall length before joining squares for your granny square cardigan. To ensure a flattering fit for your crochet project, it is essential to create a gauge swatch.
This allows you to check your tension and accurately calculate the number of stitches and rows needed. Adjusting the square quantities for a customized silhouette is simple; whether you desire a laid-back cropped silhouette or a fuller balloon sleeve crochet effect, thoughtful measurement is paramount.
Adjusting Patterns for Silhouettes
Tailoring your crochet pattern to achieve desired silhouettes involves strategic adjustments in square assembly and stitch count.
When aiming for a cropped cardigan pattern, you’ll want to carefully plan the number of squares needed for the back and front panels to achieve that shorter length.
For styles featuring balloon sleeve crochet, you will typically increase the number of squares used for the sleeve width to create that voluminous effect, then taper them towards the cuff using specific sleeve construction techniques.
The granny square assembly process allows for significant personalization; by altering the number of squares used in different sections, you can create unique shapes and fits that flatter your individual body type. This adaptability makes DIY clothing projects wonderfully unique.
Styling Your Crocheted Cardigan
Maximizing the aesthetic appeal of your finished handmade sweater involves thoughtful styling choices that complement its texture and shape.
For a modern vibe, layer your creation over high-waisted jeans or a sleek skirt. If you’ve incorporated a distinctive bobble detail, consider pairing your cardigan with minimalist accessories to let the craftsmanship shine as wearable art.
A cropped cardigan looks fantastic with high-waisted bottoms, creating a balanced and contemporary look.
Alternatively, if you’ve opted for statement sleeves, such as balloon sleeves, keep the rest of your outfit relatively simple to allow the sleeves to be the focal point.
Don’t forget the impact of color; a vibrant hue can make your stylish sweater a true statement piece.
Finishing Techniques and Details
Elevating your crochet project to a professional standard often comes down to the finishing techniques applied. After completing the main construction, focusing on elements like ribbing, cuffs, and neckline finishes can dramatically enhance both the
Textured Crochet
- Stitches like the bobble stitch and popcorn stitches create plush, raised surfaces that add tactile interest.
- Fibers such as acrylic blends, mohair yarn, and chenille are recommended for enhancing coziness and softness.
- Practical stitches for relaxing wear include the moss stitch, shell stitch, bean stitch, and Prairie stitch.
- Blocking crocheted pieces before assembly is a key technique for achieving a soft hand-feel.
Cozy Cardigan Crafting Tips
Bobble stitch cardigans, much like the acclaimed Honeycomb Cardigan, benefit immensely from thoughtful yarn selection and finishing details. Utilizing fluffy yarn crochet with a slight halo amplifies softness and warmth, adding a premium touch to your DIY fashion project.
A moderate stitch tension, as you’d maintain for a bobble pattern, ensures your bobble detail yields a cozy, inviting drape, reminiscent of luxurious handmade sweaters.
This approach elevates your crochet project into true wearable art, showcasing sophisticated stitch variations.
When assembling your granny square assembly for a textured crochet piece, meticulous square joining and secure weaving of all ends prevent snagging and maintain plush comfort, a key aspect of successful garment making.
For a truly professional finish, blocking crochet is essential: gently soak and pin your finished cardigan into shape, letting it air dry for enhanced softness and improved stitch definition, a vital step in finishing techniques for any crochet craft.
If your project involves prolonged crocheting sessions, adopt ergonomic crochet techniques—such as using cushioned hooks and taking regular stretch breaks—to reduce wrist strain, ensuring the yarn crafting process remains enjoyable from start to finish. This mindful approach to advanced crochet or even beginner crochet ensures pleasure throughout your crafty projects and is a significant part of successful crochet instructions.
Mastering the Honeycomb Cardigan Construction
The Honeycomb Cardigan, a delightful example of modern crochet with hints of vintage crochet flair, is expertly crafted using bobble granny squares and fluffy yarn for a uniquely cozy, textured finish.
The strategic assembly of these squares, a key granny square method, results in a trendy cropped silhouette and stylish balloon sleeve crochet, all achieved by careful planning, measurement, and precise joining techniques. This crochet tutorial offers insight into creating a fashionable garment.
Yarn Selection for Ultimate Coziness
Selecting soft, fluffy yarn is paramount for both comfort and visual appeal in your stylish sweater.
Popular choices include roving and luxury fluffy blends, ideal for warmth and texture, making your handmade sweater exceptionally inviting.
Experimenting with different soft yarn types, such as merino wool yarn, alpaca yarn, or mohair yarn, can further enhance the luxurious feel of your fiber arts creation.
Strategic Square Joining and Assembly
Crochet sample bobble granny squares and measure them meticulously to determine the required quantity for your desired size and shape, a fundamental aspect of gauge swatch precision.
Join squares for the front, back, and sleeves using methods like slip stitch, whip stitch, or continuous join techniques, ensuring a secure fabric. The assembly of squares shapes the cropped cardigan pattern and balloon sleeves; sleeve sizing depends heavily on the square number and arrangement, a key consideration during sleeve construction.
Essential Finishing Touches
Add ribbing, cuffs, and other finishing details to polish your cardigan, transforming it into a standout piece of DIY clothing.
This is where your creative crafting truly shines. Consider adding faux fur trims for an extra touch of luxury.
Use suitable blocking to smooth seams and enhance the garment’s drape, a crucial step for a professional outcome in any advanced crochet or even intermediate crochet project.
| Yarn Type Recommendation | Assembly Technique | Finishing Essential | Crochet Skill Level |
|---|---|---|---|
| Fluffy yarn crochet (e. g. , roving, merino, alpaca, mohair blends) | Meticulous square joining (slip stitch, whip stitch, continuous join) | Blocking for softness and stitch definition | Beginner to Advanced |
| Amplifies softness and warmth for a premium touch | Prevents snagging and maintains plush comfort | Smooths seams and enhances garment drape | Can be adapted for various skill levels |
| Enhances luxurious feel and visual appeal | Shapes cropped silhouette and balloon sleeves | Adds ribbing, cuffs, and optional faux fur trims | Focus on ergonomic techniques for prolonged sessions |
How To Crochet A Simple Sleeveless Summer Top Tutorial

Summer crochet top enthusiasts, envision a breezy sleeveless top that’s quick to make, utilizing two simple rectangles joined with neat seams and easy straps for a beautifully customized fit. Our beginner crochet tutorial guides you step-by-step, starting from the bottom: create two flat panels using straightforward stitches like chain stitch, single crochet, or double crochet, ensuring clean lines and simple measuring for a perfect fit.
Opt for cotton yarn or a soft cotton blend yarn to achieve a breathable fabric with excellent drape, ideal for warm weather wear and a lightweight, comfortable sensation.
This two panel construction method minimizes complex shaping while allowing you to easily adjust the width, length, and strap placement.
Finish with tidy borders around the neckline and armholes, then try it on before fastening for an effortlessly wearable DIY garment that’s truly your own. Next, let’s dive into Choosing Your Crochet Yarn.
Choosing Your Crochet Yarn
Yarn selection plays a significant role in the fabric’s drape, its cooling comfort, and how easily it can be cared for—all important factors for a sleeveless top you’ll want to wear all season long.
Cotton yarn offers a naturally breathable fabric with crisp stitch definition, making it perfect for showcasing basic stitches and subtle textural elements. Using DK yarn or a light worsted cotton blend will keep your handmade top lightweight, durable, and simple to maintain with gentle machine wash cycles.
Achieving a consistent crochet gauge is easier with smooth, plied strands that glide smoothly under your hook, resulting in neat rows whether they feature simple or textured stitch patterns.
Your chosen hook size should initially match the yarn label’s recommendation, but be prepared to adjust it after making a swatch to achieve your desired fit and fabric density.
For best results with care tips: always lay your finished piece flat to dry, which helps maintain its shape and beautiful drape.
Fiber Focus: Cotton and Blends
Cotton yarn is an excellent choice for a summer crochet top due to its natural breathability and delightful softness, making it perfect for warm weather wear. The crisp drape of cotton makes stitches pop, ideal for showcasing simple stitches and subtle textures.
Cotton blend yarn, often incorporating linen or bamboo, can offer enhanced drape and a slightly different sheen, further contributing to the garment’s lightweight feel and comfort. When selecting your yarn, consider brands known for quality, ensuring a smooth, plied texture that will glide easily on your hook, aiding in consistent tension control and neat stitch work.
Yarn Weight Guidance
For this sleeveless crochet pattern, choosing a DK yarn or a light worsted weight yarn is recommended, as these weights provide a lovely balance between speed of construction and fabric weight.
This ensures your DIY garment feels light and airy, perfect for layering or wearing on its own during warmer months.
Using a lighter weight yarn also contributes to a beautiful fabric drape, preventing the top from feeling too heavy or stiff.
This choice is part of what makes it an easy crochet project.
Achieving the Right Gauge
To ensure your crochet tank top fits as intended, creating a crochet gauge swatch before starting is essential. Swatch making involves crocheting a small square using your chosen yarn and hook, then measuring your stitches and rows against the pattern’s requirements.
This step helps you understand your personal tension and make necessary adjustments to your hook size if your gauge doesn’t match. Getting your gauge right guarantees your finished crochet clothing will be the correct size, avoiding issues like a too-tight or too-loose fit.
A measuring tape, stitch markers to note your gauge, and a yarn needle are indispensable tools for this process.
Caring for Your Handmade Top
Proper care tips are important for maintaining the beauty and longevity of your handmade top.
Generally, cotton yarn items can be hand-washed or machine-washed on a delicate cycle with cool water.
Always lay the garment flat to dry, using blocking mats and pins if necessary, to prevent stretching and maintain the intended shape and fabric drape. Following these simple care instructions will ensure your stylish summer fashion piece remains a favorite in your wardrobe for seasons to come.
Section>

What Hook Size to Use?
Selecting the correct hook size is pivotal for achieving your desired crochet gauge and the perfect fabric drape for your summer crochet top. Yarn labels offer recommended hook ranges as a starting point for your swatch making.
Cotton yarn, especially DK yarn, often pairs well with hook sizes from 0 mm to 0 mm, but adjust this based on whether you want a lacy effect or a denser fabric.
A larger hook with fine yarn can create an airy, open fabric like filet crochet, while a smaller hook yields a tighter, more structured fabric with clear stitch definition.
Employing a measuring tape to track your rows ensures consistent sizing, preventing guesswork and leading to a more accurate, customizable fit for your handmade top.
- Tip: After creating a swatch making, lightly block it and adjust your hook size to match your intended crochet gauge for a successful DIY garment.
- Aim: Balance the fabric’s drape and coverage to perfectly suit your warm weather wear needs and personal style.
Mastering Basic Stitches
The foundation of any beautiful crochet clothing piece, including your Crochet tank top, relies on consistent tension control of your basic stitches. For instance, single crochet creates firm, stable fabric ideal for edges, while double crochet adds height and speed, contributing to the breathable fabric of a lightweight crochet garment. Practicing a few rows of each stitch until they are uniform will significantly improve your stitch definition and the overall look of your fashion crochet. For added visual interest without overcomplicating, consider the grit stitch, which alternates single and double crochet, or lightly incorporate filet crochet sections for enhanced airflow. It is advisable to use the same hook size used for your gauge swatch throughout the project to maintain consistency. If you notice your fabric becoming too tight or too loose, revisit a quick swatch to re-establish your tension.
- Practice: Work several small practice pieces: commit to 10 rows of single crochet, then 10 rows of double crochet, carefully observing your tension throughout.
- Refine: For a clean finish that avoids puckering prevention, edge your garment’s openings with a relaxed single crochet or a crab stitch.
| Hook Size Range (mm) | Yarn Weight | Fabric Effect | Stitch Definition |
|---|---|---|---|
| 0 – 0 | DK | Lacy or Denser | Clear or Tighter |
| Larger | Fine | Airy, Open (e. g. , Filet Crochet) | Less Defined |
| Smaller | Fine | Tighter, Structured | Clearer |
Creating Your Two Panel Construction
Summer crochet top creation begins with confirming your panel dimensions using a measuring tape, then you will work bottom-up rectangles to match your calculated width and length for a truly customizable fit. Stitch markers placed every 10–12 stitches reinforce tension control, assisting in keeping your edges even and preventing any creeping width changes during rows.
Cotton yarn or DK yarn provides breathable drape; maintain consistent single crochet or double crochet to preserve stitch definition and achieve clean side seams.
This beginner crochet tutorial guidance: recount at row ends to catch any skips, add a light border to square waviness, and test fitting before fastening ensures panels align for seamless crochet assembly and easy joining.
Gauge is important for sizing your crochet tank top; make a swatch to achieve accurate sizing, adjusting hook size as needed.
For example, a gauge of 16 sts × 20 rows = 4 in × 4 in (10 × 10 cm) in single crochet after light blocking is a great starting point. Yarn selection of 100% cotton or cotton-linen blends offers excellent breathability and crisp stitch definition.
Smooth, low-halo yarns enhance stitch clarity, making them ideal for warm climates.
- Panel Width Calculation: Bust measurement + desired ease (typically 2 to 6 inches) divided by
- Panel Length: Measure from the desired hemline to the underarm point.
- Stitch Markers: Use these at regular intervals of 10-12 stitches to maintain consistent panel width and tension control. This is a practical application of stitch control, helping to maintain consistent panel width.
- Edge Consistency: Methods for creating even edges for seamless joining include consistent tension and using stitch markers to guide your stitch count per row.
- Addressing Uneven Width: Potential issues like uneven fabric width during construction can be mitigated by using stitch markers at regular intervals.
Assembling Your DIY Garment Sections
Fashion design principles apply here: align panels with right sides facing, then pin or place stitch markers along hems, underarms, and shoulder seams to avoid any distortion. Crochet techniques that complement basic stitches include a mattress stitch with a yarn needle for invisible structure or a tight single crochet seam for durability and neat lines. Summer crochet top builders should seam from hem to underarm, repeat on the other side, and then join shoulders, leaving armholes open for test fitting. For DIY garment finishing, add neckline edging and armhole finishing with relaxed tension to prevent puckering and maintain the breathable fabric comfort.
The mattress stitch or a tightly crocheted seam can provide a professional and durable join, complementing your chosen stitch pattern beautifully.
- Seaming Sides: Align the two panels right sides together. Seam the sides from the hem upward using a whip stitch or a tight sc seam, leaving armholes open as preferred. This allows for adjustable armhole depth during fitting before fastening.
- Joining Shoulders: If you created a straight, square neckline on both panels, seam the shoulders together. If you plan to add separate straps, you may skip this step or seam only partway.
- Strap Creation: Place markers on the front and back panels where the straps will sit. Attach your yarn and crochet foundation chains to your desired length. Work 1–3 rows of sc over the chains to stabilize them. Alternatively, you can crochet the straps directly onto the front and back edges for extra security and a sturdier feel.
- Edging and Finishing: Work a round of single crochet around the armholes and neckline for clean edges. Keep your tension relaxed here to prevent any puckering. Add a bottom hem edging: 1–3 rounds of sc or a simple crab stitch (reverse single crochet) adds structure and a polished look.
- Customization Tips for Fit: For more ease, add extra width to your panels; for a more fitted look, subtract ease but ensure comfortable armholes. Adjust the panel length by adding rows for a standard tank or subtracting for a crop top.
- A gauge of 16 stitches by 20 rows in single crochet per 4×4 inches is recommended for accurate sizing of a crochet tank top.
- Adding 2 to 6 inches of desired ease to the bust measurement is suggested for a comfortable fit when calculating panel width.
- Using stitch markers every 10-12 stitches helps maintain consistent panel width and tension control during crochet construction.
- Relaxed tension is advised when adding edging to armholes and necklines to prevent puckering and ensure fabric comfort.
Finishing Touches for Straps
Crafting a refined Crochet tank top involves meticulous attention to strap attachment, ensuring both comfort and aesthetic appeal. Let’s explore how to achieve a stable and attractive strap integration for your summer crochet top.
Use stitch markers to precisely map the attachment points on both the front and back panels, promoting symmetry and allowing for a truly customizable fit; always test fitting before permanently fastening your straps to prevent any unwelcome slippage.
Consider various design choices for your straps, from delicate slim spaghetti straps to more supportive cross-back options, or even practical 3–5-stitch bands in single crochet for enhanced load distribution, making it a truly easy crochet project.
To improve durability and prevent stretching on your handmade top, consider reinforcing the strap edges with a double crochet or crab stitch. Integrating your straps by crocheting them directly onto the panel edges provides a remarkably sturdy join and a visually polished transition for your clothing item.
Customizing Your Crocheted Top
Once your straps are securely in place, you can elevate your sleeveless crochet pattern with thoughtful design upgrades, transforming a simple piece into a unique handmade top.
Experiment with border finishing techniques to define the neckline, armholes, and hemline; a contrasting picot edging or a sharp crab stitch can impart modern clean lines to your summer crochet top. Explore texture play by incorporating slim bands of grit stitch or filet crochet to introduce visual interest and enhance airflow without significantly complicating the two panel construction of your DIY garment.
Fine-tune the fit by adjusting strap length and the overall ease for an adjustable sizing approach; wider straps can offer increased support, making this a versatile crochet versatility creation.
Harmonize your yarn choice, perhaps opting for breathable cotton yarn or a soft DK yarn, for a fabric that offers excellent drape and clear stitch definition, perfectly complementing everyday casual wear.
| Strap Attachment Techniques | Customization Options |
|---|---|
| Use stitch markers for precise attachment points. | Experiment with border finishing (picot edging, crab stitch). |
| Consider different strap designs (spaghetti, cross-back, single crochet bands). | Incorporate texture play (grit stitch, filet crochet). |
| Reinforce edges with double crochet or crab stitch for durability. | Adjust strap length and ease for adjustable sizing. |
| Crochet straps directly onto panel edges for a sturdy join. | Harmonize yarn choice for drape and stitch definition (cotton, DK). |
Crafting Your Lightweight Crochet Creation
Caring for Your Lightweight Crochet
Providing essential post-creation advice is a crucial step after all assembly and customization. This ensures your handmade top maintains its integrity, shape, and vibrant color, allowing you to enjoy it through many warm seasons.
Gentle Washing Methods
Crochet tank top pieces thrive with gentle washing; fill a basin with cool water, add a mild detergent specifically for delicates, and swish lightly.
Avoid twisting your summer crochet top or wringing it out, as this can damage the delicate stitches and alter the garment’s shape, particularly sections worked with single crochet or double crochet.
Drying and Storage
Cotton yarn benefits from patient handling; soak your sleeveless crochet pattern briefly, then roll the finished item in a clean towel to absorb excess water.
This method is far gentler than wringing and effectively prevents stretching, preserving the stitch definition of your beginner crochet tutorial project.
For drying, lay the garment flat on a clean, dry towel, reshaping the edges and straps to their intended dimensions. Ensure it dries with ample airflow, away from direct heat or harsh sunlight, to preserve the vibrant color of your cotton yarn.
Preserving Shape and Fit
Proper storage is key to maintaining the form of your DIY garment; store your lightweight crochet piece folded, never hanging, to protect the side seams and strap creation.
Place it in a breathable drawer or bin, perhaps with a light block placed between folds if using blocking mats, ensuring the fabric drape remains consistent. This approach helps prevent unnecessary stretching and indentation, keeping your warm weather wear looking its best.
Maintaining Stitch Definition
Your quick crochet make, perhaps a beautiful fashion crochet item, needs mindful care.
To maintain its texture and the clarity of stitches like the grit stitch or filet crochet, spot clean small marks as they appear.
For a more thorough clean, use a mesh bag for occasional delicate cycles.
This careful approach helps preserve the structure of your handmade top and the integrity of your yarn crafting project.
Reinforcing Durability
When constructing your two panel construction project, using basic stitches like the chain stitch and ensuring proper seam finishing on your side seams and strap creation is important. Adding a neat border finishing and considering a customizable fit through adjustable sizing during assembly results in a piece that holds up well to wear.
For lasting beauty of your crochet assembly, focus on gentle handling during cleaning and drying.
- Gentle washing with cool water and mild detergent is recommended to preserve the integrity of delicate crochet stitches like single and double crochet.
- Avoiding twisting or wringing the garment prevents damage to stitches and maintains the intended shape of the crochet piece.
- Laying the garment flat to dry on a clean towel, with reshaping, is crucial for preventing stretching and preserving stitch definition.
- Folding the finished crochet item for storage, rather than hanging, protects side seams and strap creation from unnecessary stretching and indentation.
Ariana Crochet Cardigan Pattern Review For Colorful Granny Square Cardigan

Ariana cardigan crafters are buzzing about Amy Christoffers’ latest crochet cardigan pattern, a stunning granny square cardigan that introduces a modern twist to a vintage technique. This Berroco crochet masterpiece transforms traditional squares, assembled through clever crochet assembly and a unique side-to-side orientation, into a bold, colorful crochet fashion statement.
Offering an oversized fit and knitted button bands and cuffs for a professional finish, this crochet cardigan pattern is a wearable result that rewards intermediate skill with creative flexibility and vibrant joy, inspiring over 1,600 shared projects.
Ariana cardigan: A colorful delight
The psychological impact of color in wearable art, like the stunning Ariana cardigan, profoundly boosts mood and uplifts any wardrobe with its bold garment appeal and cheerful accent colors.
Crochet assembly of this vibrant cardigan easily pairs with minimalist layers; style your statement outerwear with neutral pieces to truly highlight each meticulously joined granny square.
For effective stashbusting and neat organization, labeling yarn by weight—using clear bins helps keep every shade accessible, especially for women’s crochet clothing projects, making color experimentation a breeze. Yarn weight variations can significantly influence the fit and drape of your creation: opting for a heavier yarn establishes structure and warmth, while lighter options provide a wonderfully drapey, delicate look, allowing the adaptable Ariana pattern’s design to shine vibrantly in any season.
Ariana cardigan lovers often choose multiple shades to create a stunning, harmonious blend or embrace unique combinations using their existing stash yarn, showcasing remarkable color experimentation. The Amy Christoffers design for this granny square cardigan is celebrated for its classic appeal and the creative flexibility it affords makers, who sometimes adjust sleeve or body fit for their preferred shape preferences, proving this crochet fashion piece is truly adaptable.
The Berroco crochet pattern, a free pattern available on the Berroco website with accurate instructions as of the May 2024 update, calls for an F hook (75mm) alongside a size 5 (75mm) circular knitting needle for finishing the bands and cuffs, establishing a clean edge for a structured edge.
This crochet cardigan pattern beautifully blends a vintage technique with a modern twist, with its side-to-side orientation and vibrant squares offering delightful visual interest, making it a practical project for any crafter.
The ease of the granny square join and overall crochet assembly result in a fashionable outcome, perfect for statement outerwear with a spacious fit and comfortable fit, easily achieved through the pattern’s clear instructions and extensive community support, including user photos and crafter tips that offer inspiration.

Berroco Crochet: Vintage Meets Modern
Berroco crochet continues to captivate, showcasing a renewed appreciation for timeless techniques, exemplified by the Ariana cardigan. This exquisite piece masterfully interprets the beloved granny square cardigan trend within contemporary crochet fashion.
Classic crochet techniques, such as iconic motifs and familiar stitches, are being reimagined and integrated into modern wardrobes, effectively bridging the gap between retro artistry and current runway aesthetics, resulting in a versatile, wear-anywhere look.
For makers eager to introduce a modern twist, consider exploring alternatives like cotton blends, bamboo, or eco-friendly yarns in place of conventional wool.
These selections can impart your colorful crochet projects with updated textures and beautiful drape. To truly personalize patterns, delve into their construction and joinery—meticulously dissect each motif, sketch out assembly pathways, and evaluate stitch density.
This approach allows for seamless adaptation of the pattern to reflect current styles and individual fit preferences, ensuring each granny square cardigan becomes a unique creation. Crafter insight often highlights the adaptability of these designs, encouraging a playful approach to crafting your next statement piece.
Reviving Vintage Crochet
The revival of vintage technique is beautifully evident in modern crochet, offering a fresh perspective on classic designs.
This resurgence links historical craftsmanship with current fashion trends, making these pieces highly desirable.
Those seeking a modern twist might find that alternative yarn fibers, such as sustainable cottons or breathable bamboo, offer a delightful departure from traditional wool.
This substitution greatly enhances the texture and drape of your colorful crochet projects, providing a unique and contemporary feel. Meticulously analyzing an old pattern’s structure and joinery is key to deconstructing and adapting it.
By breaking down each motif, visualizing construction routes, and testing different stitch densities, you can tailor any crochet cardigan pattern to modern styles and preferred fits, making each granny square cardigan uniquely yours. The Ariana cardigan, for instance, exemplifies how traditional elements can be reinterpreted for a bold garment.
Granny Square Cardigan: Pattern Insights
The construction of a granny square cardigan relies on ingenious modular techniques, where individual vibrant squares are crafted separately before being meticulously joined to form a cohesive and bold garment.
Enthusiasts of the Ariana cardigan particularly appreciate this construction method for its inherent adaptability, empowering crafters to experiment with multiple shades and carefully selected accent colors during the crochet assembly process.
Consider exploring variations on established motifs—incorporate puff stitches, embrace imaginative color experimentation, or thoughtfully combine traditional and contemporary rounds to introduce captivating visual interest into your crochet cardigan pattern.
Achieving a impeccably clean edge is straightforward using simple single crochet or the classic whipstitch granny square join, thereby guaranteeing a highly professional finish. Ultimately, the practice of wet blocking each individual square prior to its final integration is essential.
This step ensures a structured edge and results in uniform, eyecatching apparel that is both remarkably comfortable and unfailingly fashionable, appealing greatly to aficionados of womens crochet clothing. The Amy Christoffers design is frequently cited for its blend of traditional techniques with modern wearability.
Modular Construction and Joining Techniques
The modular construction central to the granny square cardigan involves creating individual motifs, which are then expertly joined.
For a truly seamless connection, the whipstitch or single crochet edging provides an effective granny square join.
This method ensures that the squares integrate flawlessly, contributing to the overall aesthetic of the finished piece.
Adopting specific blocking techniques is paramount for achieving uniformity across all squares. Wet blocking individual motifs before final assembly guarantees that each piece lies flat and maintains a consistent size, which is essential for the garment’s structure and appearance.
This attention to detail in assembling squares contributes to a professional finish. The Amy Christoffers design for the Ariana cardigan showcases how these modular elements can be arranged for maximum impact, offering a delightful canvas for color schemes and personal expression.
This approach makes the granny square cardigan a truly versatile and creative project.
Key Aspects of Modern Crochet Cardigans
- The Ariana cardigan exemplifies the integration of classic crochet techniques, like granny squares, into contemporary fashion.
- Using alternative yarn fibers such as cotton blends, bamboo, or eco-friendly yarns can update the texture and drape of crochet projects.
- Modular construction, where individual squares are joined, allows for significant adaptability in color experimentation and pattern personalization.
- Techniques like wet blocking individual motifs before assembly are crucial for achieving uniform size, structured edges, and a professional finish in granny square cardigans.
Amy Christoffers’ Design: A Creative Vision
Amy Christoffers design emerges from a childhood steeped in yarn, a profound connection to fiber arts flourishing thanks to her grandmother’s store. Granny square cardigan creations, exemplified by the Ariana cardigan, showcase a meticulous fusion of vintage techniques and modern color theory.
These designs celebrate traditional motifs, reimagined with bold, contemporary palettes often echoing folk art and bohemian aesthetics, providing a unique visual interest.
The importance of stitch definition is paramount; Amy Christoffers ensures each square’s texture is pronounced in the final crochet cardigan pattern.
Colorful crochet enthusiasts will find ample opportunity to personalize their Ariana cardigan, encouraging experimentation with yarn weights, diverse colorways, and varied stitch applications, fostering a truly individual expression in their crochet fashion.
The beauty of this project lies in its adaptability for your personal stash-busting and color experimentation.
Amy Christoffers’ work encourages a deep dive into color experimentation, allowing crafters to create harmonious blends or vibrant juxtapositions with multiple shades.
Crochet Cardigan Pattern: A Step-by-Step Guide
Mastering the crochet cardigan pattern begins with a thorough understanding of how each individual granny square contributes to the Ariana cardigan’s vibrant foundation. This project offers both a creative challenge and a rewarding outcome through its distinctive side-to-side orientation and assembly.
Gauge swatching proves critical to achieve the intended oversized fit and maintain consistency during the joining of squares for this beloved piece of women’s crochet clothing.
Troubleshooting tips for this intermediate skill level project include consistently checking stitch tension, employing a clean finishing edge, and preparing for the subsequent knitted button bands and cuffs.
Garment finishing advice for this statement outerwear emphasizes meticulous end-weaving and blocking each square to ensure a polished, professional result.
Constructing the Ariana Cardigan
Crochet assembly for the Ariana cardigan involves meticulously crocheting traditional squares, then arranging them with a unique side-to-side orientation for compelling visual interest, a hallmark of Amy Christoffers design. The pattern, available as a free pattern on the Berroco website, is designed to adapt to your personal style.
Granny square join techniques create a seamless flow, resulting in a wearanywhere look that blends comfort and style. The finished garment, a bold garment, offers a spacious and comfortable fit, making it a practical project for everyday wear.
Many crafters appreciate the creative flexibility, noting they have adjusted sleeve or body fit for personalized shaping preference.
Finishing Touches and Customization
Berroco crochet patterns, like this one, often incorporate knitting techniques for a refined finish.
The Ariana cardigan features knitted button bands and knitted cuffs, providing a structured edge and a professional finish that elevates the overall aesthetic.
For those starting, the F hook, or 75mm hook, is recommended, alongside a circular knitting needle, size 5 needle, for these finishing elements. The pattern is adaptable, allowing for sleeve adjustment and body fit adjustment, a testament to its adaptable pattern nature.
The May 2024 update ensures accurate instructions, reflecting crafter insight and community feedback.
Embracing Color and Community
Colorful crochet is central to the Ariana cardigan’s appeal, with patterns suggesting multiple shades or a harmonious blend of multiple shades. This encourages stashbusting and color experimentation, inviting crafters to use stash yarn for unique combinations.
The Ariana cardigan, a standout in crochet fashion, is praised for its classic appeal and the opportunity it presents for color experimentation.
With over 1,600 projects shared online, there’s a wealth of community support, inspiration, and user photos offering crafter tips for creating your own vibrant cardigan.
This creative project results in a wearable result, a piece of eyecatching apparel.
- The Ariana cardigan design by Amy Christoffers fuses vintage techniques with modern color theory, often echoing folk art and bohemian aesthetics.
- The pattern is available as a free pattern on the Berroco website and encourages personalization through yarn weights, colorways, and stitch applications.
- The project requires gauge swatching for an intended oversized fit and includes troubleshooting tips for intermediate crocheters, such as checking stitch tension and finishing edges.
- Finishing touches often incorporate knitting techniques, including knitted button bands and cuffs, with the recommended hook size being an F hook (75mm) and a size 5 circular knitting needle.
Colorful crochet: Choosing your shades
Color theory brings your granny square cardigan to life, transforming every Ariana cardigan into a vibrant statement piece that reflects your personality and mood. Primary, secondary, and tertiary colors form the foundation of impactful colorful crochet, while color wheels help crafters select harmonious blends or daring contrasts for maximum visual interest.
Warm hues like reds and yellows inject energy, while cool blues and greens create calm—choose your palette to evoke emotion and align with your project’s intent.
Techniques like gradual color blocking and “yarn pooling” introduce smooth gradients, making each crochet cardigan pattern uniquely striking.
Choosing your palette
Crafter insight into selecting shades for your Ariana cardigan guides the creative process toward a truly personal expression.
Color experimentation with stash yarn unveils unique combinations, with many makers referencing Berroco crochet patterns for inspiration. Consider the emotional resonance of color palettes; for example, warm hues like reds and yellows inject energy, while cool blues and greens create calm, allowing you to evoke specific emotions.
The foundational aspects of color theory help crafters select harmonious blends or daring contrasts for maximum visual interest.
Techniques for vibrant effects
Learn to create smooth gradients for a striking effect in your granny square cardigan. These techniques, like gradual color blocking, introduce subtle shifts in shade, making each crochet cardigan pattern remarkably unique.
Exploring resources for color inspiration, such as nature, art, or platforms like Pinterest, can spark fresh ideas for your next project.
Transitioning from your palette to fashion, let’s see how crochet shapes a sustainable, expressive wardrobe.
Crochet fashion: A wearable statement
Crochet fashion transcends mere trends, blending sustainability and individuality into every project.
From a vibrant cardigan to a chic clutch, each piece is both eco-conscious and expressive.
Handmade garments, like the Ariana cardigan, reduce waste and encourage “stashbusting,” supporting ethical, slow fashion habits. The Amy Christoffers design for the granny square cardigan exemplifies this modern approach.
Sustainability and ethical choices
Crafter insight into sustainable practices influences the creation of unique wardrobe pieces.
Opt for natural yarns or recycled fibers to lower your environmental footprint and increase garment longevity, making your womens crochet clothing both stylish and responsible. This emphasis on eco-conscious materials aligns with a growing movement toward ethical, slow fashion.
Styling your crochet pieces
The granny square cardigan offers remarkable versatility, suitable for various occasions and styling preferences.
Style your vibrant cardigan over jeans for a casual, everyday look or layer it with accessories for a more dressed-up ensemble.
Building a capsule wardrobe means mixing timeless staples, like a neutral crochet vest, with bold, statement outerwear pieces for a fresh, adaptable wardrobe.
This adaptable pattern allows for adjustments, ensuring a comfortable fit.
Creative flexibility lies at the heart of modern crochet clothing, ensuring each wearable result is as practical as it is original, offering a truly fashionable result.
- Color theory, including primary, secondary, and tertiary colors, is fundamental to creating visually interesting crochet pieces.
- Warm hues like reds and yellows can inject energy, while cool blues and greens create a sense of calm in crochet designs.
- Crochet fashion, such as the Ariana cardigan, supports sustainable and ethical slow fashion habits by reducing waste and encouraging stashbusting.
- The granny square cardigan is a versatile piece that can be styled for various occasions, from casual everyday looks to more dressed-up ensembles.
Crochet Assembly: Perfecting Your Ariana Cardigan
Fine-tuning your Ariana crochet cardigan pattern ensures your granny square cardigan fits and flatters. This Berroco crochet project benefits from precise gauge; begin by making a thorough swatch, then measure and match your tension, adjusting with an F hook or changing yarn weight as needed.
Modify fit by adding or subtracting rounds from each granny square for an adaptable pattern, allowing for sleeve adjustment and body fit adjustment.
For vibrant squares, intarsia crochet lets you work geometric patterns right into your squares, while duplicate stitch is perfect for decorative motifs or correcting color mistakes, fortifying creative flexibility and visual interest for your colorful crochet fashion.
Seam squares using your preferred granny square join for a clean, professional finish on your cardigan.
Add closures like handmade buttons or knitted button bands for structure and a contemporary, wear-anywhere look, creating a polished, wear-anywhere look.
Embellishments and accent colors boost the statement outerwear appeal of this bold garment—ideal for anyone exploring colorful crochet fashion or vintage technique with a modern twist.
Crafting Your Crochet Cardigan: From Squares to Statement Piece
The Ariana cardigan, an Amy Christoffers design, transforms traditional squares into a bold garment. This crochet cardigan pattern, featuring a sidetoside orientation, offers creative flexibility.
For a harmonious blend with multiple shades, consider using stash yarn for unique combinations, allowing for extensive color experimentation on this colorrich cardigan. This adaptable pattern is a practical project, ideal for building your wardrobe with statement outerwear.
Achieving a structured edge and clean edge on your crochet assembly is simple with knitting techniques.
The May 2024 update on the Berroco website provides accurate instructions for attaching knitted button bands and knitted cuffs, ensuring a professional finish.
Crafters find immense inspiration, with over 1,600 projects shared online, offering valuable crafter insight and community support through user photos and crafter tips.
This granny square cardigan, a perfect example of womens crochet clothing, offers an oversized fit and a comfortable fit.
The intermediate skill level requires proficiency in crochet techniques alongside knitting techniques. The F hook, or 75mm hook, and a circular knitting needle, size 5 needle, are essential.
This fashionable result and wearable result showcase the beauty of assembling squares and thoughtful color schemes.
The Ariana cardigan blends a vintage technique with a modern twist, creating eyecatching apparel that’s both comfortable and stylish.
This free pattern is a creative project for anyone interested in crochet fashion, especially those who enjoy color experimentation and stashbusting. The spacious fit makes it a go-to for a wearanywhere look, combining classic appeal with a vibrant cardigan.
Key Details for Crafting the Ariana Cardigan
- The Ariana cardigan pattern, designed by Amy Christoffers, is an adaptable project that allows for modifications to sleeve and body fit by adjusting the number of rounds in each granny square.
- This crochet cardigan project utilizes both crochet and knitting techniques, requiring an F hook (75mm) and size 5 circular knitting needles for elements like button bands and cuffs.
- The project encourages creative flexibility through color experimentation, suggesting the use of stash yarn for unique combinations and highlighting intarsia crochet and duplicate stitch for decorative elements.
- The Ariana cardigan is presented as a free pattern, ideal for intermediate skill levels, and is celebrated for its comfortable, oversized fit and its blend of vintage techniques with a modern aesthetic, resulting in fashionable and wearable apparel.
How To Crochet A Hamsadhwani Sari Crop Top Pattern

Crocheters eager to blend traditional charm with contemporary style will find the Hamsadhwani Sari Crop Top an exquisite choice. This unique crochet blouse offers a blend of textured elegance and versatile wearability, perfect for elevating any ensemble.
The crochet pattern features primarily the accessible double crochet stitch, creating a beautifully textured fabric that is both visually appealing and satisfying to work.
This project comes with step-by-step crochet instructions, making it a rewarding and beginner-friendly crochet endeavor for those new to garment construction or intricate yarn craft.
The resulting sari crop top is a piece of handmade fashion that seamlessly transitions between traditional wear and modern separates, offering a truly unique garment for your wardrobe. Transition to details on Choosing Your Crochet Pattern to begin your crafting journey.
Choosing Your Crochet Pattern
Selecting the right elements for your Hamsadhwani Sari Crop Top is key to a successful and enjoyable craft project.
Consider the fiber content for a beautiful drape and easy washability—ideal for everyday wear or more festive occasions. Evaluate the stitch complexity; while this design uses accessible stitches like the fundamental double crochet stitch, making it beginner-friendly crochet, understanding the pattern’s nuances ensures a good match for your skill level.
Look for clear, well-written step-by-step crochet instructions that include stitch definitions and guidance; this specificity greatly aids in achieving a perfect personalized fit.
Always think about the intended wear and occasion, as this influences material choice and potential embellishments for your versatile apparel, contributing to the overall aesthetic of your handmade fashion creation.
Fiber Content and Effects
Yarn choice significantly impacts the drape and feel of your crochet blouse.
For a soft, breathable finish that’s perfect for everyday wear, materials like cotton or a cotton blend are excellent selections. These fibers ensure comfort against the skin and are generally easy to care for, contributing to the longevity of your wearable art.
Consider yarn weight; DK or worsted weight yarns are typical for this crochet pattern, providing a good balance between creating a defined textured crochet fabric and maintaining fluidity in the garment’s structure. A well-chosen yarn will enhance the beauty of the basic double crochet stitch and make the construction process more enjoyable for producing your unique garment.
Pattern Complexity and Skill Matching
Crochet pattern difficulty should align with your proficiency to ensure a positive experience.
This specific sari crop top pattern is designed with accessible stitches, primarily utilizing the straightforward double crochet stitch.
This makes it an ideal beginner-friendly crochet project, allowing newcomers to experience the satisfaction of creating a complete garment.
More experienced crafters can further refine their technique by focusing on achieving an even tension and exploring subtle variations in stitch patterns. The clarity of the step-by-step crochet instructions will guide you through the panel construction and seaming, ensuring a well-executed blouse design.
Clarity of Instructions and Visual Aids
Step-by-step crochet instructions are paramount for the successful completion of any garment, including this stylish crochet blouse.
Seek out patterns with clear, concise language, detailed stitch counts, and helpful diagrams or photographs. Such resources demystify the process of garment construction, aiding in techniques like shaping, seaming techniques, and strap attachment.
For visual learners, illustrative photographs accompanying each stage of the pattern tutorial can be incredibly beneficial, ensuring you can accurately replicate the intended textured crochet design.
A well-documented craft project empowers you to create a precisely fitted and aesthetically pleasing end product.
Intended Wear and Styling Versatility
Fashion styling possibilities abound with the Hamsadhwani Sari Crop Top, making it a truly versatile apparel piece.
While designed to complement traditional Indian wear like sarees, its modern silhouette allows it to transition effortlessly into Western outfits. Pair this crochet blouse with high-waisted skirts, jeans, shorts, or trousers for a chic, bohemian look.
It can also serve as an interesting layer over dresses or under blazers, showcasing its adaptability as a piece of handmade fashion. This unique garment is a testament to how yarn craft can create adaptable clothing styles that bridge cultural aesthetics, fitting perfectly into various fashion trends.

What Yarn For This Blouse?
Cotton blends are a fantastic starting point for a breathable crochet blouse, offering lightness and structure to showcase intricate stitch patterns, especially for a sari crop top. Cotton acrylic blend yarn provides durability and superior resistance to shrinking and fading, essential for handmade fashion that withstands frequent wear and wash cycles, making it a great choice for a crochet blouse.
For a rustic, airy feel suitable for bohemian chic, linen yarn allows excellent airflow and adds a relaxed drape to your blouse design.
Merino wool offers exceptional softness and warmth, transforming the garment into a versatile apparel staple for cooler weather, ideal for fusion wear.
Always consult your crochet pattern for specific yarn weight recommendations, typically DK or worsted, to maintain accurate stitch definitions and ensure a precise personalized fit for your DIY fashion.
Mastering Textured Crochet Stitches
Practice post stitches to add remarkable dimension to your sari crop top, instantly elevating texture and making each crochet blouse tactile and visually striking. Experimentation with bobbles and popcorns brings even more unique effects, creating focal points that elevate a classic blouse into a standout piece of handmade fashion.
Front and back loop techniques introduce subtle ribbing, lending extra surface interest without overwhelming the textured fabric. To achieve a harmonious look for this craft project, thoughtfully combine different stitch patterns, ensuring every beginnerfriendly crochet project results in sophisticated wearable art.
This fusion of accessible stitches and strategic variation transforms a simple crochet pattern into a showcase of inventive textile crafts, perfect for adding to your fashion styling repertoire.
Yarn and Stitching Recommendations for Crochet Blouses
- Cotton blends, cotton acrylic blends, and linen yarn are recommended for breathable and durable crochet blouses, suitable for various styles like sari crop tops and bohemian chic designs.
- Merino wool is suggested for warmer, versatile apparel, ideal for fusion wear and cooler weather.
- Post stitches, bobbles, popcorns, and front/back loop techniques are highlighted for adding dimension and visual interest to textured crochet fabrics.
- Combining different stitch patterns is encouraged to create sophisticated wearable art from crochet patterns.
Beginnerfriendly Crochet Garment Construction
Craft project success for those new to yarn craft often begins with focusing on simple garment shapes, making creations like the Hamsadhwani sari crop top exceptionally approachable. Beginnerfriendly crochet garments usually start with straightforward rectangles or squares, predominantly utilizing the double crochet stitch—a foundational technique that imbues the fabric with lovely texture while remaining easy for those embarking on their first crochet pattern.
To achieve a polished finish, mastering basic seaming techniques, such as a simple whip stitch or mattress stitch, ensures each panel joins cleanly, transforming flat pieces into a refined, wearable crochet blouse.
Selecting a garment construction that requires minimal shaping offers crafters an inviting project, facilitating a personalized fit and the authentic appeal of handmade fashion.
Getting Started with Simple Shapes
Embarking on your garment construction journey, a crochet pattern for beginners often guides you toward simple shapes like rectangles and squares.
These foundational elements are key to building a beautiful crochet blouse without the complexity of advanced shaping, which is perfect for those exploring accessible stitches. Focusing on the double crochet stitch creates a wonderfully textured fabric, adding visual interest while keeping the process straightforward for your craft project.
Mastering these basic building blocks is the first step towards creating your own wearable art.
Focus on Basic Stitches and Seaming
To begin your DIY fashion adventure, prioritize the double crochet stitch, as it is foundational for creating the lovely textured crochet fabric characteristic of this blouse design. Learn essential seaming techniques to join your crocheted panels together neatly, ensuring a professional and comfortable finish to your unique garment.
These foundational stitches and methods are part of the core stitch definitions and essential for assembling your project.
Minimal Shaping for Maximum Comfort
For an approachable craft project that results in a garment with a truly personalized fit, consider designs that involve minimal shaping.
This approach reduces the complexity of the garment construction, allowing you to concentrate on the basic stitches and assembly, making it an ideal beginnerfriendly crochet endeavor.
Such designs contribute to both the comfort and overall aesthetic of your handmade fashion piece.
Stepbystep Crochet Instructions Guide
This stitch guide simplifies the creation of the Hamsadhwani Sari Crop Top by dividing each process into easily manageable, actionable steps. Projects featuring textured crochet truly shine with clarity; every stage is accompanied by helpful photographs, empowering crafters to proceed with confidence.
Facing a common issue? This comprehensive guide addresses frequent hurdles, such as uneven tension or fabric curling, offering practical solutions and advice for garment alteration. The inclusion of various customization tips ensures the final top perfectly aligns with your personal style, whether you opt to adjust its length, width, or introduce distinctive embellishments.
Through this clear and approachable method, both novices and experienced makers can produce a unique garment that represents truly versatile apparel and contemporary handmade fashion.
Breaking Down Complex Steps
To ensure every craft project is enjoyable, stepbystep crochet instructions are essential for clearly outlining each stage of the process.
This pattern tutorial breaks down complex techniques into manageable actions, making the creation of a beautiful crochet blouse accessible even for those new to yarn craft.
Following these steps meticulously helps in achieving the desired textured fabric for your design.
Visual Guidance for Each Stage
Every part of the creation process, from initial panel formation to the final strap attachment, is illuminated with illustrative photographs. This visual approach to a pattern tutorial significantly aids in understanding the crochet techniques involved, particularly with stitches like the double crochet stitch.
Such clarity is invaluable for any new crochet pattern.
Embrace the journey of creating your own fashion styling. This guide ensures you have the knowledge for every step of your craft project, from selecting the right crochet hook to finishing your wearable art.
Enjoy the creative outlet provided by this delightful yarn craft.
Troubleshooting Common Issues
Should you encounter any snags during your garment construction, this guide offers practical advice for common troubleshooting issues.
From managing tension to ensuring straight edges, these tips help refine your crochet techniques and improve the overall look of your unique garment, contributing to the success of your DIY fashion.
These are all part of creating excellent custom clothing.
Offering Variations and Customization
To truly make the garment your own, explore the included customization tips. Whether you are aiming for a specific personalized fit or wishing to add unique flair, these suggestions allow you to adapt the crochet pattern.
This flexibility transforms a standard design into a piece of wearable art, perfect for fashion styling and reflecting your individual taste.
- The double crochet stitch is a foundational technique for beginner-friendly crochet garments, offering lovely texture and ease of use.
- Simple shapes like rectangles and squares are recommended for beginner crochet garment construction, reducing the complexity of shaping.
- Basic seaming techniques such as whip stitch or mattress stitch are essential for joining crocheted panels cleanly and achieving a polished finish.
- Customization tips are provided to allow for adjustments in length, width, or the addition of embellishments, enabling a personalized fit and unique style.
Creating Your Sari Crop Top Fit
A well-fitted sari crop top, or crochet blouse, is foundational for a polished look, beginning with accurate garment construction measurements. Accurate Measurements: precisely measure your bust and waist circumference using a flexible tape, ensuring the fit is snug but comfortable for a personalized fit, a key aspect of any handmade fashion project.
Pattern Adjustment: adjust the crochet pattern for your desired length, whether aiming for modern separates or a more traditional wear silhouette, and consider modifying sleeve and strap styles to enhance fashion styling and ensure ease of movement.
Professional Finish: practice different hemming techniques like a single crochet border or a picot edge using accessible stitches, and neatening all yarn ends elevates your unique garment’s appeal and durability for everyday wear.
Learning the double crochet stitch is beginner-friendly and forms the basis for this texturize crochet design. This craft project offers step-by-step crochet instructions for a satisfying outcome.
Versatile Apparel Styling Tips
Elevate your styling with a crochet blouse, a prime example of versatile apparel, by pairing its textured crochet nature with contrasting fabrics. Pairing Textures: combine your sari crop top with materials like denim, linen, or silk to create visual interest and highlight the unique garment’s inherent charm and artisanal craft.
Layering for Dimension: layer your crochet blouse over solid basics, such as camisoles or fitted tees, which smoothly transitions your festival outfit into effortless everyday wear while adding subtle detail without competing with the intricate stitch patterns of your handmade fashion.
Thoughtful Accessorizing: enhance your ensemble with fashion accessories; statement earrings or layered bracelets complement the double crochet stitch work beautifully, adding to the overall fashion styling.
Seasonal Transitions: integrate blazers or long-sleeved tops during cooler months, and pair with light skirts or high-waisted shorts when the weather warms, making your DIY fashion a truly adaptable wardrobe staple. This ensures your yarn craft piece is a year-round delight.
| Key Measurement | Pattern Adjustment Focus | Finishing Touches | Styling Combination |
|---|---|---|---|
| Bust and waist circumference for snug but comfortable fit | Desired length for modern separates or traditional silhouette | Single crochet border or picot edge for neatening | Pairing with denim, linen, or silk for visual interest |
| Accurate garment construction measurements | Modifying sleeve and strap styles for fashion and movement | Neatening all yarn ends for appeal and durability | Layering over camisoles or fitted tees for everyday wear |
| Personalized fit is a key aspect of handmade fashion | Consideration for ease of movement | Learning the double crochet stitch for a textured design | Accessorizing with statement earrings or layered bracelets |
Handmade Fashion Wearable Art
Handmade fashion boasts a vibrant spectrum of unique color combinations, igniting creative expression within wearable art. Designers move beyond trend-driven norms, embracing the full spectrum of textile innovation and fashion design.
Incorporating embellishments like beads or embroidery transforms pieces such as a sari crop top into statement-making marvels, while the story behind each stitch becomes just as important as the overall blouse design.
For instance, the Hamsadhwani Sari Crop Top exemplifies this by blending textured crochet with versatile apparel.
This artisanal craft champions slow fashion, turning every creation into a canvas for personal narratives and artistic vision, as seen in this distinct garment construction.
The Hamsadhwani Sari Crop Top: A Fusion of Tradition and Craft
The Hamsadhwani Sari Crop Top stands as a testament to handmade fashion, a contemporary crochet blouse that seamlessly blends intricate textured crochet with a highly versatile apparel.
Offering an appealing project for both novice and seasoned crocheters, this design utilizes accessible stitches, particularly the double crochet stitch, to create a beautifully textured fabric. The pattern provides step-by-step crochet instructions, making it a truly beginner-friendly crochet experience.
Yarn craft expertise shines through in the Hamsadhwani Sari Crop Top, an example of sophisticated garment construction that prioritizes both aesthetics and a personalized fit.
This piece encourages a deep dive into stitch definitions and seaming techniques, offering rich avenues for customization tips.
Whether aiming for a statement piece or a subtle addition to your fashion styling repertoire, this crochet pattern empowers the creator to produce a truly unique garment. It’s more than just a craft project; it’s an invitation to explore DIY fashion and elevate one’s wardrobe with a touch of wearable art.
.
Accessible stitches, primarily the double crochet stitch, form the foundation of this attractive blouse design, resulting in a textured fabric that is both visually appealing and tactilely rich. The construction method itself—working flat in three main panels (one front, two backs) plus two straps—allows for effortless adjustments, ensuring a personalized fit for every wearer.
This thoughtful approach to garment construction makes it an ideal craft project for developing skills in fashion sewing and understanding clothing pattern nuances.
Styling and Customization: Embracing Versatility
This crochet blouse is designed with versatility at its core, seamlessly transitioning from its intended pairing with traditional wear like a saree to becoming a key component of modern separates ensembles.
Consider wearing it with skirts, jeans, shorts, trousers, or layering it over blazers and jackets for diverse fashion styling opportunities. The pattern offers generous customization tips, allowing for modifications in length, width, or texture to align with individual style preferences, whether aiming for a bohemian chic look or a sophisticated fusion wear outfit.
The assembly process is clearly outlined, featuring marked joining points and strap placement for a secure and comfortable finish. These step-by-step crochet instructions guide you through panel formation, stitch definitions, joining, and strap creation, providing an insightful look into the clothing pattern.
The pattern also includes a comprehensive materials list, specifying ideal yarn weights and crochet hook sizes, along with additional notions and optional embellishments, covering all necessary craft supplies.
Beginner-friendly crochet is a hallmark of this design, yet it offers depth for those exploring
| Project Focus | Key Techniques | Skill Level | Versatility |
|---|---|---|---|
| Handmade Fashion Wearable Art | Textured Crochet, Garment Construction | Beginner-Friendly Crochet | Fusion Wear, Modern Separates |
| Hamsadhwani Sari Crop Top | Double Crochet Stitch, Stitch Definitions | Appealing to Novice & Seasoned Crocheters | Pairing with Traditional & Modern Wear |
| Artisanal Craft & Slow Fashion | Embellishments (Beads/Embroidery), Seaming Techniques | Encourages Skill Development | Customization for Personal Style |
How To Crochet Like Viral Crochet Prodigy Jonah Hands

Embark on a vibrant crochet journey by adopting the signature methods of Jonah Hands, a true craft innovator whose accessible teaching style has revolutionized fiber arts engagement for a global audience. Jonah Hands crochet prodigy recognition stems from his clear, step-by-step crochet tutorials that simplify complex stitches for everyone, from absolute beginners to experienced makers. Each creation, from bright granny square patterns to fashionable wearables, is designed to spark creativity and build essential crochet skills development.
Through engaging YouTube crochet instruction and exciting Boye collaborations, Jonah demonstrates how supportive, hands-on guidance cultivates a thriving crochet community impact, welcoming crafters of all ages.
Prepare to elevate your crafting with his inspiring approach.
Discover Jonah Hands’s Crochet Philosophy
Jonah Hands’s method prioritizes foundational crochet education, ensuring every learner solidifies essential techniques before advancing. His welcoming crochet tutorials illustrate the correct way to hold hooks and yarn with remarkable clarity, making beginner crochet incredibly approachable for all.
Nurturing learning environments are fostered through detailed video demonstrations and beginner-friendly crochet kits, often part of his Boye collaborations, designed to ensure success and build momentum. A perfect first project, like a classic granny square, empowers new crafters by solidifying their grasp of basic stitches and encouraging vibrant color exploration, reflecting the heart of Jonah’s distinct crochet approach.

Master Jonahs Signature Crochet Techniques
Jonah Hands crochet prodigy in yarn crafting begins each amigurumi with a precisely executed magic ring, creating a tight, seamless base that securely holds stuffing and prevents unsightly center holes for a truly professional finish and a refined look. He then employs invisible decreases and increases, a cornerstone of his crochet techniques, to craft sculpted curves and smooth transitions, avoiding any jarring bumps or jogs.
Should your tension slip or stitches appear uneven, gently adjust your yarn or hook size to maintain consistency—practical crafting guidance for all yarn crafting enthusiasts.
Mastering these creative crochet techniques is paramount for achieving a polished aesthetic in amigurumi creations, showcasing genuine crafting artistry and advanced crochet proficiency for exceptional results.
Explore Jonahs Amigurumi Designs
Jonah Hands’ amigurumi designs, celebrated for their delightful character shapes, expressive embroidered faces, and vibrant color palettes, beckon both beginner crochet enthusiasts and seasoned makers into the crochet community impact he fosters.
His crochet journey is often inspired by the animal kingdom, whimsical food items, and fantastical themes, seamlessly blending innovative crochet techniques with approachable crafting inspiration. To emulate his cheerful crochet aesthetics, select soft, medium-weight yarns in captivating vibrant or gentle pastel tones, and then accentuate features with striking contrasting colors for added definition.
Start by carefully reading the crochet pattern provided, then gather all necessary crochet materials, crochet each component individually, and finally use a ladder or whip stitch for invisible seaming. Even stuffing distribution and secure embroidery are key to ensuring each DIY crochet wearable or collectible vividly reflects Jonah’s distinctive crochet style.
| Jonah’s Signature Techniques | Key Elements for Amigurumi Success | Tips for Emulating Jonah’s Style |
|---|---|---|
| Precisely executed magic ring for a tight, seamless base. | Even stuffing distribution and secure embroidery. | Select soft, medium-weight yarns in vibrant or pastel tones. |
| Invisible decreases and increases for sculpted curves and smooth transitions. | Invisible seaming using ladder or whip stitch. | Accentuate features with striking contrasting colors for definition. |
| Adjust yarn or hook size for consistent tension and even stitches. | Expressive embroidered faces. | Carefully read the crochet pattern and gather all necessary materials. |
Beginner Crochet Tips from Jonah Hands
Embarking on your crochet journey begins with selecting the right crochet tools and materials for early success, as advised by crochet prodigy Jonah Hands. Essential supplies for a novice crocheter include a comfortable, medium-sized ergonomic hook, smooth, light-colored yarn for excellent stitch definition, practical stitch markers, sharp scissors, and a tapestry needle, mirroring the setups available in popular crochet kits and comprehensive crochet tutorials offered by Jonah.
Jonah’s crochet education advice stresses the importance of practicing consistent yarn tension; to avoid common beginner mistakes like holding yarn too tightly or too loosely, experiment with comfortable grip positions and proceed slowly at first, building confidence in your crochet skills development.
Always count your stitches, using markers frequently and referencing YouTube crochet instruction to confidently decipher patterns and ensure accuracy in your learnable crochet projects.
Mastering foundational crochet techniques—like creating a secure slip knot, consistent chains, and evenly spaced single crochet stitches—will pave the way for a fulfilling crochet journey.
What Are Jonah’s Favorite Crochet Stitches?
Jonah Hands consistently showcases his signature crochet stitches explained through clear, step-by-step video tutorials, empowering crafters to master versatile techniques for various beginner crochet projects and intricate amigurumi designs.
The magic ring is a foundational element that provides a seamless starting point for circular makes, ensuring amigurumi shapes remain tight and professional, contributing to exceptional amigurumi designs.
Single crochet (SC) creates a firm, compact fabric, essential for the structure and shaping of most granny square patterns, coasters, and the bodies of amigurumi, forming the basis for many handmade crafts.
Half double crochet (HDC) and double crochet (DC) stitches lend drape and softness to his DIY crochet wearables, maintaining clarity and aesthetic appeal within stitch patterns, offering a pleasing contrast in texture. Versatile in both texture and appearance, Jonah’s crochet style encourages crafters to confidently alternate between dense and open stitches, ensuring each project meets both aesthetic and functional objectives with clean, learnable crochet projects.
Key Takeaways from Jonah Hands’ Crochet Advice
- Essential beginner crochet supplies include a comfortable hook, smooth light-colored yarn, stitch markers, sharp scissors, and a tapestry needle.
- Practicing consistent yarn tension and counting stitches are crucial for avoiding common beginner mistakes and ensuring accuracy.
- Mastering foundational crochet techniques like the slip knot, chains, and single crochet stitches are vital for a successful crochet journey.
- Jonah Hands highlights the magic ring for seamless circular projects, single crochet for firm fabrics (like amigurumi and granny squares), and half double crochet/double crochet for drape and softness in wearables.
Learning Crochet from Influencer Jonah
Jonah Hands, a celebrated crochet prodigy, makes fiber arts accessibility a reality for everyone. Crochet tutorials on his popular YouTube crochet channel offer a unique learning experience, differing from traditional methods.
His tutorials teach foundational skills and beginner crochet stitches, demonstrating proper hook grip and troubleshooting common mistakes.
Crochet education is further supported by curated resources and suggested crochet materials.
Learners benefit from comprehensive crochet kits, often developed in partnership with brands like Boye Knitting & Crochet, providing select yarns, hooks, and exclusive patterns for complete projects. Jonah’s digital presence fosters an active crochet community, where crafters discuss projects, celebrate successes, and share unique Jonah Hands crochet techniques, making the crochet journey enjoyable and collaborative.
Developing Your Crochet Skills with Jonah
Crochet skills development flourishes under Jonah’s guidance, with a practical progression of projects from coasters and bracelets to DIY crochet wearables and crochet accessories.
Mastering Jonah Hands crochet techniques contributes to overall crochet proficiency by combining basic and advanced stitches for vibrant, textured results. Experimentation is encouraged; adapt his crochet patterns using different color palettes, modify motifs, or explore hooks and yarns suggested by yarnspirations to create original designs.
Practice of specific stitch pairings, like those in his popular granny square patterns, cultivates speed, confidence, and creative crochet artistry, empowering crocheters to develop their own unique crochet style.
Project Progression and Skill Advancement
Jonah Hands, a recognized crochet influencer, guides learners through a structured path for crochet skills development, starting with simple projects.
This careful sequencing allows for the assimilation of new crochet techniques and stitches.
His approach to crochet education begins with fundamental projects such as coasters and bracelets, perfect for beginner crochet enthusiasts. These initial projects build a strong base in essential crochet stitches explained, ensuring confidence.
As skill levels grow, Jonah offers more complex learnable crochet projects, including DIY crochet wearables and decorative crochet accessories for the home, facilitating steady advancement in crafting expertise.
Mastering Signature Techniques for Crochet Proficiency
Mastering Jonah Hands crochet techniques significantly boosts overall crochet proficiency and creativity. His instruction on various crochet techniques, from single crochet to more intricate stitches, allows for a deeper crochet understanding.
These techniques are showcased in his diverse range of crochet designs, including popular amigurumi designs and detailed granny square patterns.
By focusing on the precision and application of these signature methods, crafters can achieve remarkable crochet artistry and a polished crochet style, enhancing their overall crochet progress and leading to greater crafting success.
Adapting Methods for Personal Design Ideas
Crafters are encouraged to adapt Jonah’s methods for personal design ideas, fostering significant crafting creativity.
Crochet patterns provided by Jonah often serve as a starting point, allowing for customization in color, size, and stitch variation. This freedom to experiment with colorful crochet and different crochet materials encourages unique crochet creations.
Jonah’s philosophy on crafting inspiration supports innovation, enabling makers to imbue their projects with personal meaning and a distinctive crochet aesthetic. This adaptability is key to developing a personal crochet approach and a unique crafting vision.
Emphasizing Practice for Enhanced Creativity
Practicing specific stitch combinations is paramount for unlocking greater crochet creativity.
Jonah’s emphasis on repetition and consistent application of crochet techniques builds muscle memory and confidence.
Learning to combine stitches effectively, as seen in his vibrant projects, leads to more complex and visually appealing outcomes.
This consistent practice strengthens crochet skills development, enabling crafters to explore intricate patterns and develop their own distinctive crochet style, ultimately deepening their crafting passion and leading to fulfilling crafting joy.
Jonah Hands, a renowned crochet influencer, provides accessible crochet tutorials through his popular YouTube crochet channel. His partnership with brands like Boye Knitting & Crochet has made crochet kits widely available, simplifying the process of learning beginner crochet.
He is celebrated for his clear explanations of crochet stitches explained and his engaging approach to teaching crochet techniques, which fosters substantial crochet skills development. Jonah’s innovative crochet designs, including various granny square patterns, consistently inspire crafters globally, contributing significantly to his crochet legacy and the broader crafting platform.
His contribution to crochet education and fiber arts accessibility continues to shape the future of yarn crafting, making him a pivotal figure in the contemporary crafting movement.
Key Takeaways from Jonah’s Crochet Instruction
- Jonah Hands, a crochet prodigy and influencer, makes fiber arts accessible through popular YouTube crochet tutorials that differ from traditional learning methods.
- His tutorials focus on foundational skills, beginner crochet stitches, proper hook grip, and troubleshooting common mistakes, supported by curated resources and suggested crochet materials.
- Learners benefit from comprehensive crochet kits, often developed in partnership with brands like Boye Knitting & Crochet, which include select yarns, hooks, and exclusive patterns.
- Jonah’s digital presence fosters an active crochet community where crafters share techniques, discuss projects, and celebrate successes, making the crochet journey enjoyable and collaborative.
Jonah Hands Crochet Community Impact
Jonah Hands crochet prodigy acts as a catalyst for growth and connection within the vibrant crochet community, inspiring both beginners and seasoned crocheters to explore new skills and creative crochet techniques. Through detailed crochet tutorials and frequent sharing of crafting knowledge, Jonah not only makes the craft more accessible but also encourages inclusivity and a sense of shared purpose among makers worldwide.
His impactful philanthropic initiatives—like building a library and raising funds for a science lab in Ethiopia—demonstrate the positive crochet community impact his work achieves.
He collaborates with major brands such as Boye Knitting & Crochet to produce beginner-friendly crochet kits, supporting accessible, learnable crochet projects for all ages.
By engaging with Jonah’s community through his platforms and partnerships, crocheters gain valuable crafting guidance, build confidence, and discover diverse crochet stitches explained—transforming their crochet journey into one of continual creativity and support. [1][2][3]
Fostering a Vibrant Crochet Community
sợi nghệ thuậtaccessibility and a shared purpose among makers worldwide define Jonah Hands’ expansive reach.
His signature crochet style, characterized by clear instruction and encouraging words, has resonated deeply, fostering a truly vibrant crochet community. This crafting vision extends beyond simple patterns; it cultivates a space where individuality thrives and learning is a communal adventure.
Jonah’s approach to fiber arts accessibility ensures that everyone, regardless of their current crochet proficiency, feels empowered to create and share.
Inspiring Makers and Popularizing Crochet
Jonah Hands crochet prodigy serves as a beacon, illuminating the path for countless crochet education enthusiasts. His YouTube crochet instruction, featuring slow, easy-to-follow demonstrations, caters to both foundational and advanced stitches, making the art of amigurumi designs and detailed stitch work approachable for creators of all skill levels.
This consistent focus on technique, starting with the absolute basics of holding a hook and yarn, builds a strong base for further exploration.
Jonah’s crafting inspiration encourages makers to experiment with a wide range of stitches and colorwork, fostering confidence and moving beyond repetition into truly creative work.
Enthusiasts often describe their crochet journey as transformative thanks to his guidance, highlighting how his accessible crochet tutorials have ignited their crafting passion.
Community Initiatives and Collaborative Projects
Boye collaborations represent a key element in Jonah’s commitment to community enrichment, resulting in accessible crochet kits and exclusive patterns. These partnerships facilitate the creation of beginner-friendly projects, such as endearing koala figures and stylish granny square tops, providing learners with guided instruction to complete tangible creations.
His influence extends to popularizing signature patterns like granny square tops and coasters, often utilizing colorful, lightweight yarns to promote individual expression and a sense of joyous crafting. Jonah actively advocates for the crochet community, consistently encouraging crafters of all ages to pursue their hobby and share their unique crochet creations, thereby enhancing the overall crafting engagement and collective crafting joy.
Enhancing the Crocheter’s Journey
crafting guidance from Jonah Hands profoundly enhances a crocheter’s journey, offering continuous learning and a supportive environment.
Through his platforms, crafters gain valuable insights into diverse crochet stitches explained, building confidence and discovering new avenues for their crafting creativity.
His emphasis on exploring color, texture, and stitch variety encourages a deeper engagement with yarn crafting.
This focus on the entire crochet experience fosters significant crochet skills development, transforming the hobby into a rich avenue for personal expression and artistic exploration. Jonah’s approach to crochet education makes the entire process of learning and creating a source of profound crafting self-expression and artistic fulfillment.
- Jonah Hands’ work makes crochet more accessible through detailed tutorials and sharing crafting knowledge, fostering inclusivity and a shared purpose among makers.
- His philanthropic initiatives, such as building a library and raising funds for a science lab in Ethiopia, highlight the positive community impact of his crochet endeavors.
- Collaborations with brands like Boye Knitting & Crochet result in beginner-friendly crochet kits, supporting accessible learning projects for all ages.
- Jonah’s YouTube crochet instruction provides slow, easy-to-follow demonstrations that cater to both foundational and advanced stitches, making techniques like amigurumi approachable.