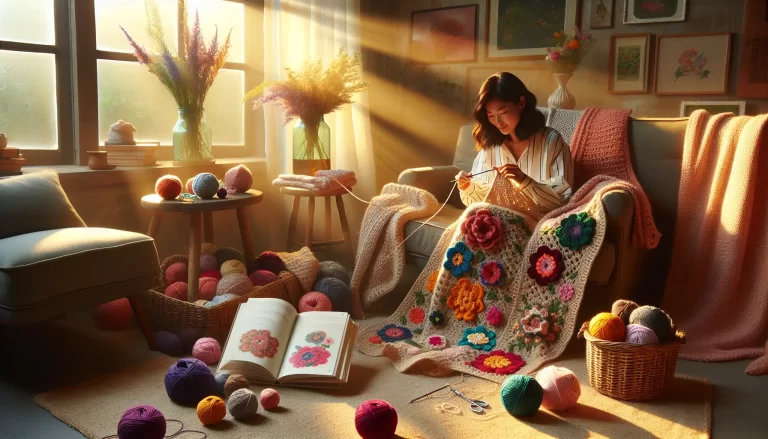
Striped Ripple Afghan Free Crochet Pattern Tutorial

Striped ripple afghan designs create charming, wavy crochet blanket patterns reminiscent of vintage handmade throws, bringing nostalgic appeal to any space with vibrant color transitions. This free crochet blanket tutorial provides ripple stitch instructions for crafting iconic peaks and valleys, focusing on foundation chain multiples and the use of crochet increases and decreases for beautifully repeating patterns that offer a classic look.
Yarn weight selection is important; using worsted weight yarn or a variety of yarns can contribute to a playful appearance and a personalized appearance, enhancing the overall vintage appeal.
Discover expert color transition tips for achieving seamless color changes and learn simple finishing techniques for neat blanket edging, making this a project ideal for crafters seeking polished afghan inspiration and timeless home decor.
Beginner Crochet Project: Achieving the Ripple Effect
The ripple effect, a favored technique for beginner crochet projects, utilizes straightforward stitches like the single crochet and double crochet to create approachable, wavy results.
This pattern involves alternating crochet increases (adding stitches at each mountain) and decreases (crocheting two stitches together at each valley) to define the characteristic chevron pattern, ensuring crisp clean stripes and sharp ridge definition. When considering yarn weight selection, worsted weight yarn provides a great balance for stitch definition and comfort, though using yarn scraps allows for creative stripe sequences and a budget-friendly approach, enhancing the playful appearance.
To maintain stitch consistency, practicing on a small swatch will help ensure even tension and accurate ripple formation throughout your blanket, paving the way for stunning repeating patterns and a professional finish, ultimately offering a free pattern for crafters.
Crafting the Classic Ripple Stitch
To begin your Striped Ripple Afghan, you’ll need to establish a foundation chain in the correct multiples for your desired width. Remember, foundation chain multiples vary, often around patterns like 13 chains plus 12, or 14 chains plus 2 or 3, depending on the specific pattern details.
This ensures your repeating patterns align correctly.
For the signature ripple effect, you’ll alternate between stitches that create mountains and valleys. This is achieved by using crochet increases, where multiple stitches are worked into a single stitch at the peak of the ripple, and crochet decreases, where two stitches are worked together at the trough of the valley.
This alternating technique is key to the zigzag stitch and the overall chevron pattern.
Switch yarn colors neatly at the end of a row. To achieve crisp clean stripes, pull the new color through the final two loops of the last stitch before fastening off.
This method ensures a smooth transition and prevents bulky knots. The ridge definition in this pattern is often enhanced by consistently working stitches into the back loops only, which creates a subtle raised effect.
Properly finishing edges neatly involves weaving in yarn ends securely with a yarn needle and, if desired, blocking the finished blanket to enhance stitch definition and shape, creating a truly polished afghan.
Pattern Sample: Row-by-Row Guidance
For a pattern sample using a 14+2 foundation chain multiple, you would start by chaining the required number of stitches.
Row 1 typically involves working a specific sequence of single crochet or double crochet stitches, following the basic ripple instructions to create the initial mountain and valley structure.
You might work a certain number of stitches, then perform an increase at the mountain, followed by regular stitches, and then a decrease at the valley. Repeat this sequence to cover the entire row.
For Row 2 and subsequent rows, you’ll continue to follow the established ripple pattern, working your established ripples and switching colors according to your stripe plan, such as three rows of white followed by three rows of gray, or any preferred palette for a classic look. It is important to maintain the repeat throughout your project, especially as you work on increasing size, to ensure the pattern lines remain clear and the design remains accurate.
Regularly count stitches at the end of each row to prevent losing stitch count and to maintain the integrity of the repeating patterns, ensuring the cleanest effect and enhancing stitch definition.
Essential Tips for a Flawless Ripple Afghan
To ensure your project results in a beautiful, eyecatching afghan, pay close attention to a few key tips.
Firstly, always count stitches regularly to maintain the integrity of the ripple pattern and prevent any accidental loss of pattern lines, which ensures the cleanest effect.
Secondly, when you decide to switch yarn colors, make sure to do so at the end of a row for the most seamless transition. Consider blocking your finished blanket.
Blocking smooths out stitches, evens out tension, and helps the afghan lay flat, enhancing its overall shape and stitch definition for a truly professional and cozy blanket.

Classic Color Striping Yarn Selection
The magic of a wavy crochet blanket truly comes alive with thoughtful color planning, especially when aiming for visually harmonious stripes that evoke a nostalgic look. Understanding hue and value is key; experiment with complementary colors for high-impact stripes or analogous colors for a more subtle, classic look, both of which work beautifully for a vintage throw pattern.
Consistent stitch consistency across your color changes ensures your ripple stitch design stands out with crisp, clean stripes and keeps transitions smooth, contributing to a polished afghan.
For an optimal experience, choose yarn fibers that hold color well, such as acrylic or cotton blends, and consider yarn weight selection, with worsted weight yarn often enhancing stitch definition beautifully.
A popular, timeless palette might include sky blue, cream, and soft grey, creating a coordinated colorway with gentle, smoothed stripes and immediate vintage appeal.
Choosing Your Yarn
When selecting yarn for this beginner crochet project, prioritize fibers that hold color vibrantly, ensuring your repeating patterns remain bright. Acrylic yarn is renowned for its excellent color retention, making it a superb choice for achieving crisp, clean stripes and allowing for a playful, personalized appearance.
Cotton blends offer a lighter feel, ideal for warmer climates or baby blankets, while wool or wool blends can provide warmth and excellent stitch definition, enhancing the ridge definition in your work. Explore yarn scraps to create unique, custom dimensions and a truly personalized appearance for your creation, making it a treasured handmade gift.
Popular Color Combinations
For a classic look that stands the test of time, consider a palette that blends neutrals with a gentle pop of color.
A combination of creamy white, soft grey, and a muted sky blue evokes a sense of calm and nostalgia, perfect for a vintage handmade throw.
Another option could be a gradient of blues or greens for a serene, ombre effect.
The goal is to create creative stripe sequences that maintain visual interest while adhering to your chosen stripe plan, ensuring a cohesive and appealing final design.
Crochet Increases Decreases Explained
The characteristic peaks and valleys of a ripple stitch originate from specific stitch manipulations, making an understanding of crochet increases and decreases fundamental to shaping your fabric. These techniques are the building blocks for creating the dynamic texture and defining the visual rhythm of a zigzag stitch, transforming simple yarn into an eyecatching afghan.
By strategically adding stitches (increases) and combining stitches (decreases) within a single row, you sculpt the distinctive wave, or chevron pattern, which is central to this vintage crochet style.
Creating the Ripple Effect
To build upon foundational stitch knowledge and illustrate how these techniques shape fabric, consider this practical application: a ripple stitch instructions, often designed with a specific foundation chain multiples, uses increases to create the mountains and decreases to form the valleys. For example, a common pattern might involve a sequence of single or double crochet stitches, followed by an increase in a single stitch, more regular stitches, then a decrease (working two stitches together) in the next stitch, and repeating this to the end of the row. This consistent application of increases and decreases is how you achieve the signature ripple effect and contribute to the creation of a unique blanket edging.
Practical Texture and Project Outcomes
The direct role of these techniques in achieving a specific project outcome, such as a cozy blanket or a baby blanket, is significant.
By consistently working stitches, especially in the back loops for enhanced ridge definition, crafters can ensure that the established ripples remain clear and well-defined throughout the project.
This attention to detail, alongside proper color transition tips and effective yarn weight selection, ensures a polished, professional finish.
When you switch yarn colors at the end of a row by pulling the new color through the final two loops of the last stitch before fastening off, you achieve those crisp, clean stripes essential for a seamless color change, contributing to the overall beauty of your handmade gifts or home decor piece.
- Thoughtful color planning, understanding hue and value, is key for visually harmonious stripes in a wavy crochet blanket, especially when aiming for a nostalgic look.
- Consistent stitch consistency across color changes ensures crisp, clean stripes and smooth transitions, contributing to a polished afghan.
- Acrylic yarn is recommended for its excellent color retention, making it a superb choice for achieving crisp, clean stripes and allowing for a playful, personalized appearance.
- Crochet increases and decreases are fundamental to shaping the fabric, creating the characteristic peaks and valleys of a ripple stitch and the dynamic texture of a zigzag stitch.
Seamless Color Changes Tips
Crochet blanket projects truly shine when seamless color transitions are thoughtfully integrated, enhancing both their aesthetic appeal and overall coziness. Yarn selection plays a pivotal role; opting for worsted weight yarn or a variety of yarns that share similar textures and dye lots will greatly support smooth color changes and contribute to a beautifully polished afghan.
Vintage crochet patterns often inspire gorgeous color palettes, so exploring vintage shades or pre-coordinated colorways can add a wonderful nostalgic look and authentic vintage throw pattern charm.
When it comes to weaving in yarn ends, thread them carefully with a yarn needle through the fabric’s existing stitches, splitting the yarn strands.
This technique effectively reduces bulk, ensuring a tidy finish and clean lines. For minimizing any visible joins between color changes, opt to switch colors at the very end of a row.
On the final stitch of the row, pull the new yarn through the final two loops of the existing stitch. This method guarantees those crisp clean stripes you’re aiming for.
Planning your color transition tips involves creating a creative stripe sequence; for a classic look, consider using three rows of white followed by three rows of gray, adjusting this through your preferred palette for consistently smooth stripes and a harmonious design.
Stitch Consistency for Afghans
Striped ripple afghan free crochet pattern tutorial techniques clearly demonstrate that evenly spaced stitches form the essential foundation for a visually balanced and captivating ripple effect.
Achieving stitch consistency is paramount; maintaining even tension as you work through increases and decreases is what ensures the iconic peaks and valleys that are central to all ripple stitch instructions.
Yarn weight selection uniformity helps keep the fabric smooth, so remember to check your tension across each row as you work. Periodically lay your wavy crochet blanket flat to compare stitch size and height.
This practice allows you to easily correct any unevenness and prevent losing those important pattern lines within repeating patterns. The ripple effect truly thrives on uniformity; carefully executed stitches are what define the “mountains” and “valleys” in patterns, giving your handmade afghan a striking, sharp shape and the attractive blanket edging you’ll be proud to display.
Crochet techniques like working stitches consistently in the back loops can enhance ridge definition, adding another layer of visual interest to your work.
- Opting for worsted weight yarn or yarns with similar textures and dye lots supports smooth color changes for a polished afghan.
- Switching colors at the end of a row, by pulling the new yarn through the final two loops of the existing stitch, creates crisp clean stripes.
- Maintaining even tension throughout increases and decreases is crucial for achieving the iconic peaks and valleys in ripple stitch patterns.
- Working stitches consistently in the back loops can enhance ridge definition, adding visual interest to crochet work.
Blanket Edging Finishing Techniques
Blanket edging choices dramatically shape the final look and quality of your wavy crochet blanket, giving it a polished afghan feel with crisp, finished lines. Perfect stitch consistency is achieved by working a round of single crochet, ensuring even edges, then building additional decorative rounds if desired for a classic or vintage throw pattern appearance.
For added flair, try a shell stitch edging or picot border—these both provide textural peaks ideal for echoing the ripple effect.
Securely weave in yarn ends using a yarn needle for durability, linking back to our previous guidance on fastening off and weaving for professional results.
To introduce a personalized appearance, alternate a coordinating color in the edging or apply a creative stripe, enhancing home decor with playful or nostalgic looks. For standout, eye-catching finishes, consider adding a lacy trim or ruffled border for your DIY blanket project, drawing inspiration from rounded, peaked, or scalloped edging techniques.
Creating Handmade Gifts Cozy Blanket
Handmade gifts instantly convey warmth and attention to detail, making a cozy blanket the ultimate personal present within any nostalgic home decor scheme.
Starting with a beginner crochet project like the striped ripple afghan, choose a pattern with clear ripple stitch instructions and foundation chain multiples to customize the desired width and keep your repeating patterns consistent. Yarn weight selection matters: opt for soft worsted weight or playful yarn scraps, blending colors for seamless stripes and ridge definition.
Packaging elevates your home furnishings gift—roll the finished afghan, secure it with a ribbon, and attach a tag listing yarn details and care instructions.
For extra charm, add a sample of the free pattern or coordinate colorway suggestions to inspire future crafting ideas.
This small touch transforms your DIY crafts into cherished, memorable handmade textiles.
Key Takeaways for Blanket Creation and Finishing
- Blanket edging techniques, such as single crochet rounds, shell stitch, or picot borders, are crucial for achieving polished and finished lines, enhancing the overall appearance and quality of a crochet blanket.
- Securely weaving in yarn ends with a yarn needle is recommended for durability and professional results, referencing previous guidance on fastening off.
- Personalization of a handmade blanket can be achieved by alternating coordinating colors in the edging or applying creative stripes, contributing to unique home decor styles.
- For handmade gifts, a cozy blanket is a highly personal present; selecting appropriate yarn weight (like worsted weight) and clear pattern instructions are important for customization and consistency.
Vintage Throw Pattern Nostalgic Look
Vintage throw pattern designs connect to the idea of classic design, where simplicity merges with the beauty of wavy, repeating patterns to create lasting visual appeal. Interpreting vintage crochet styles means capturing their iconic ripple stitch, which forms peaks and valleys reminiscent of cherished heirloom throws, offering crafter guidance for a beautiful result.
To achieve that nostalgic look, suggest yarn textures that evoke a nostalgic feel—blends of acrylic and wool, or natural cotton, lend authentic, cozy texture and warmth to your project[2][4].
Remember that original vintage handmade throws often used accessible materials, making today’s variety of yarns a creative advantage and opening possibilities for yarn scraps.
For adapting modern yarns to vintage patterns, always crochet a gauge swatch; it ensures your yarn weight and hook size recreate the intended stitch definition and drape, providing a playful appearance.
Crafting Your Striped Ripple Afghan
A striped ripple afghan uses wavy, repeating patterns to create striking stripes reminiscent of vintage handmade throws.
This beginner crochet project is scalable for seasoned crafters, offering color transition tips, guidance on stitch consistency, and seamless color changes for a polished afghan with a nostalgic look.
Foundation Chain and Ripple Effect
- Start with a foundation chain in multiples, such as 13+12, 14+2, or 14+3, depending on your chosen pattern and desired width[1][3][4]. This establishes the base for your ripple effect.
- For the ripple effect, alternate increases (stitching multiple times into one stitch) and decreases (crocheting two stitches together) along each row to form “waves” or “peaks and valleys”[1][3]. This creates the distinctive zigzag stitch.
- The ripple effect is enhanced by consistently working stitches in the back loops for greater ridge definition, contributing to the textured crochet[1].
Seamless Color Changes and Yarn Selection
- Switch yarn colors at the end of a row on the last stitch for crisp, clean stripes—pull the new color through the final two loops before fastening off to achieve smooth stripes[4].
- Use a variety of yarns; worsted weight or scraps can add a playful, personalized appearance[1]. Consider variegated yarn for an ombre effect.
- The stripe plan can involve creative stripe sequences, for example, 3 rows white, 3 rows gray, then vary through your preferred palette for a classic look[4].
Finishing Edges and Blocking
- To finish edges neatly, weave in yarn ends securely using a yarn needle, and block finished blanket if desired[2]. Blocking helps enhance stitch definition and shape.
Pattern Sample Guidance
For a pattern sample with a multiple of 14+2 or 14+3 foundation chain:
- Chain a length in the pattern’s required multiple plus the extra turning chains for your foundation chain.
- Row 1: Work single crochet or double crochet stitches according to ripple instructions (e. g. , a set number, then increase at the “mountain,” regular stitches, decrease at the “valley,” repeat to end). This establishes the mountain and valley.
- Row 2+: Continue following the established ripples, changing colors according to your stripe plan, and maintaining stitch consistency across rows[1][3][4]. Use classic color striping for the most authentic appeal.
- Ensure you maintain the pattern’s repeat, especially
Foundation Chain Guidance Ripple Effect Technique Color Transition Tip Finishing Technique Multiples like 13+12, 14+2, or 14+3 establish the base width. Alternating increases and decreases create peaks and valleys (zigzag stitch). Switch yarn colors on the last stitch of a row for clean stripes. Weave in yarn ends securely using a yarn needle for a neat finish.